Paediatric Orthopaedic Specialist
AIIS avulsion fracture (post acute phase)
Home Exercise Program
Not every exercise listed here is suitable for every child: the selection is individual and is defined during the consultation.
For whom: After an apophyseal avulsion, only with individual clearance for movement, stretching, resistance and loading based on verified healing. Absence of pain alone does not authorise progression.
Dose and frequency: Perform only the exercises selected during the visit. The listed dosages are examples to adapt: follow the dose, frequency, rest and progression prescribed for age, symptoms and phase. Do not automatically perform the whole list.
Equipment and supervision: A stable, clear surface, comfortable clothing and a secure support. Check resistance-band anchors. Adult supervision; avoid marbles and small objects if the child may put them in their mouth, using a towel instead.
Avoid: Forcing a painful or unauthorised movement; Increasing load, resistance or frequency without the agreed rest periods; Doing balance exercises without stable support or supervision.
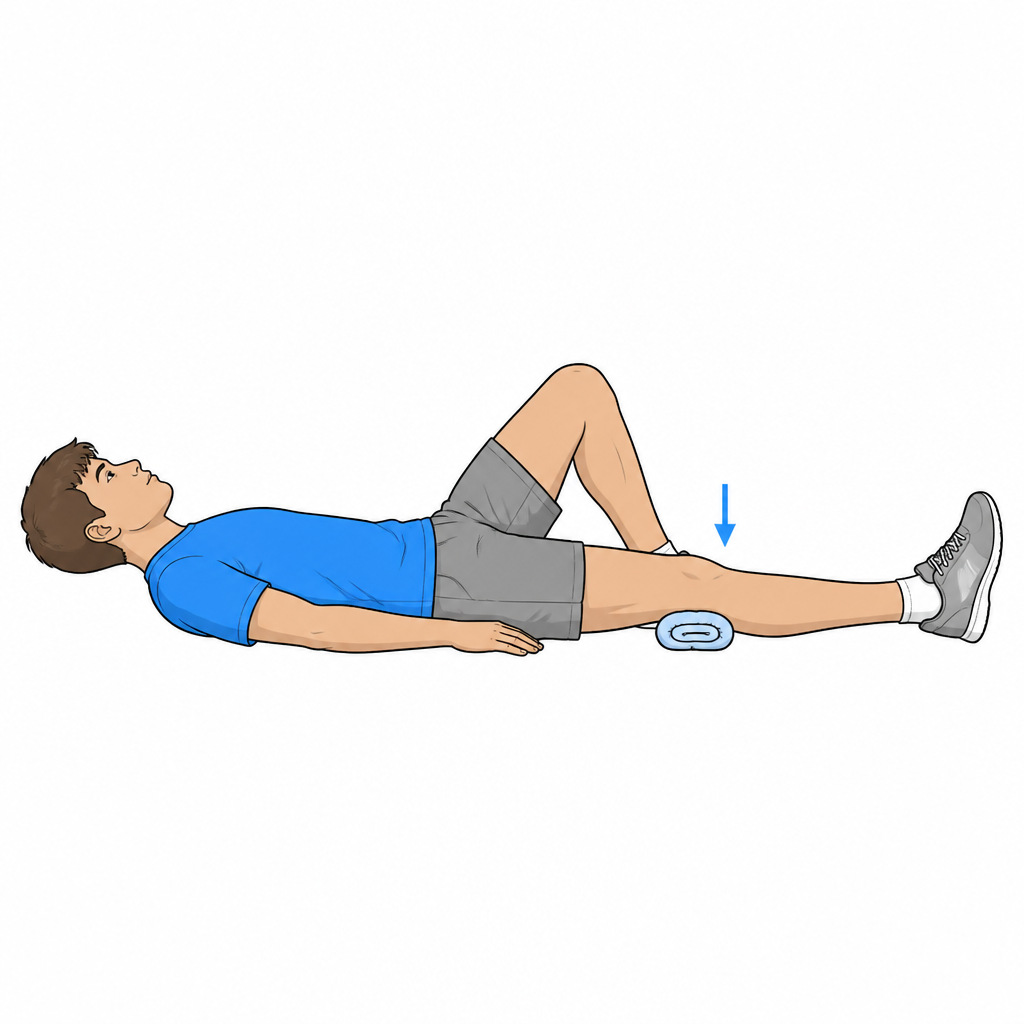
1.Isometric knee extension (quad set)
Quadriceps activation only at the authorised stage.
Only after individual authorisation for this movement and loading, based on healing at follow-up. Lying on your back with the leg supported, gently tighten the thigh without moving the knee. The rectus femoris originates at the injured AIIS: an isometric contraction can still create traction. Perform it only at the authorised stage and intensity, with no pain at the injury site.
10-15 reps × 5-10 seconds, 3 sets, 2-3 times daily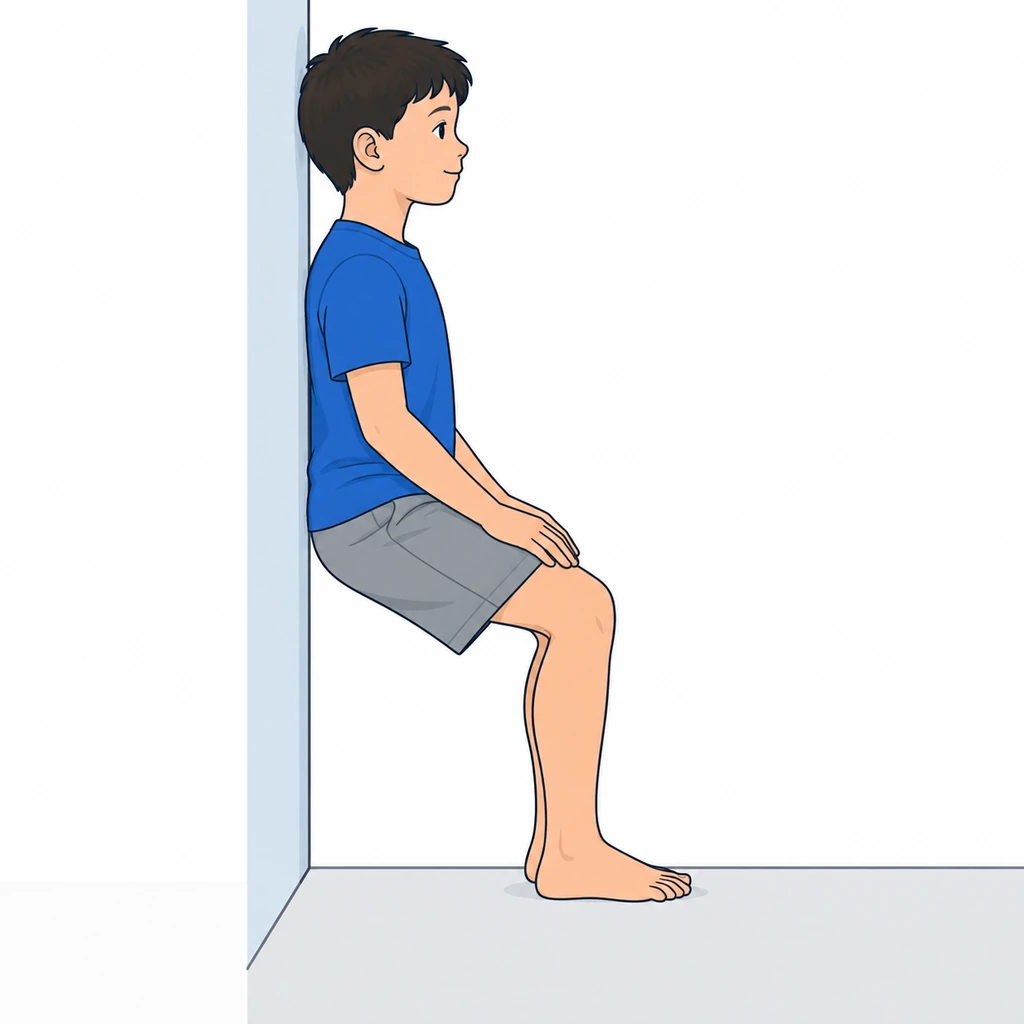
2.Partial wall squat (wall sit)
Progressive knee and hip loading after authorisation.
Only after individual authorisation for this movement and loading, based on healing at follow-up. Lean with back against wall. Lower by bending knees to about 45° (NOT 90° in the first weeks). Feet shoulder-width apart, slightly ahead of knees. Hold position. Gradually increase flexion and duration over the following weeks.
3-4 sets × 15-30 seconds (gradually increase)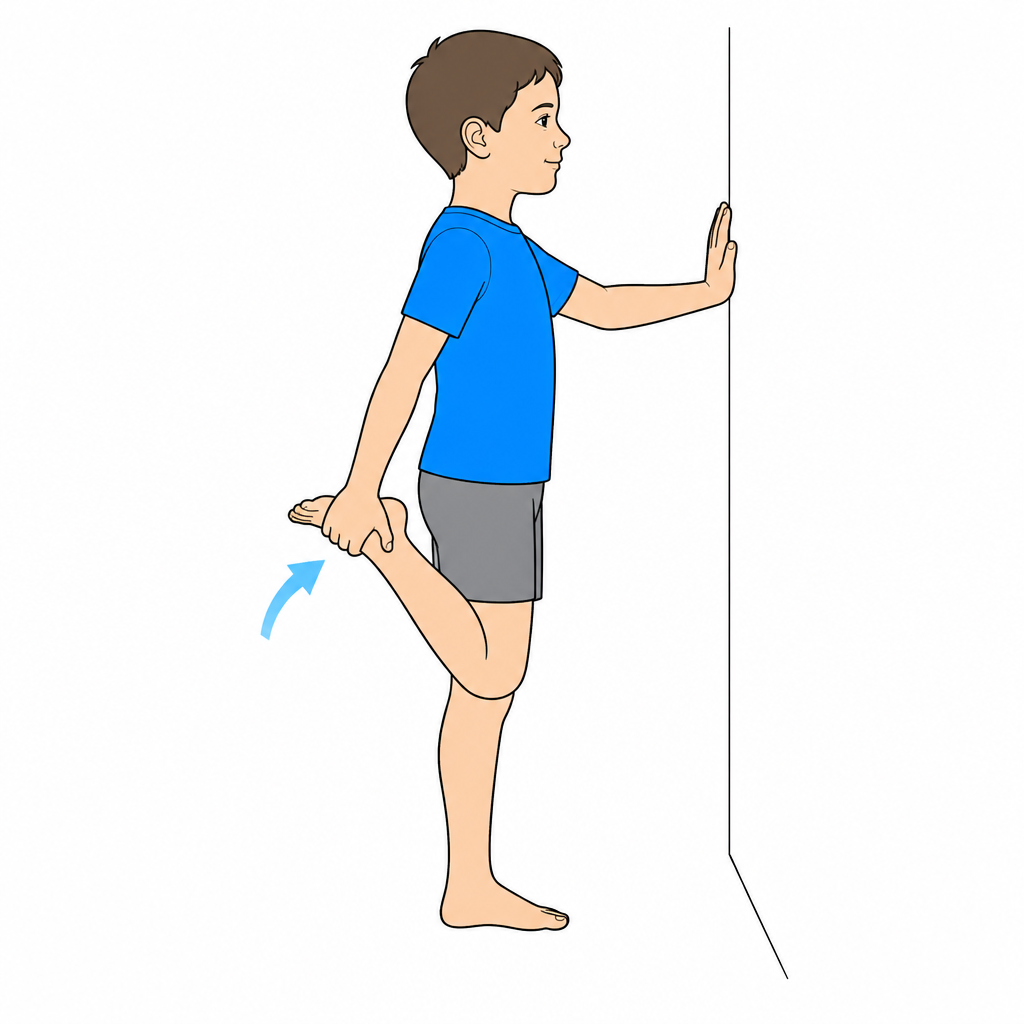
3.Quadriceps stretch (prone)
Progressive rectus femoris stretching after healing
Only after individual authorisation for this movement and loading, based on healing at follow-up. Lie face down (prone). Bend knee and grasp ankle with same-side hand. GENTLY pull heel toward buttock. NEVER force in the first weeks post-avulsion. Stretch should be light and painless. Alternative: standing, grasping ankle behind.
3 × 20-30 seconds per side, only if pain-free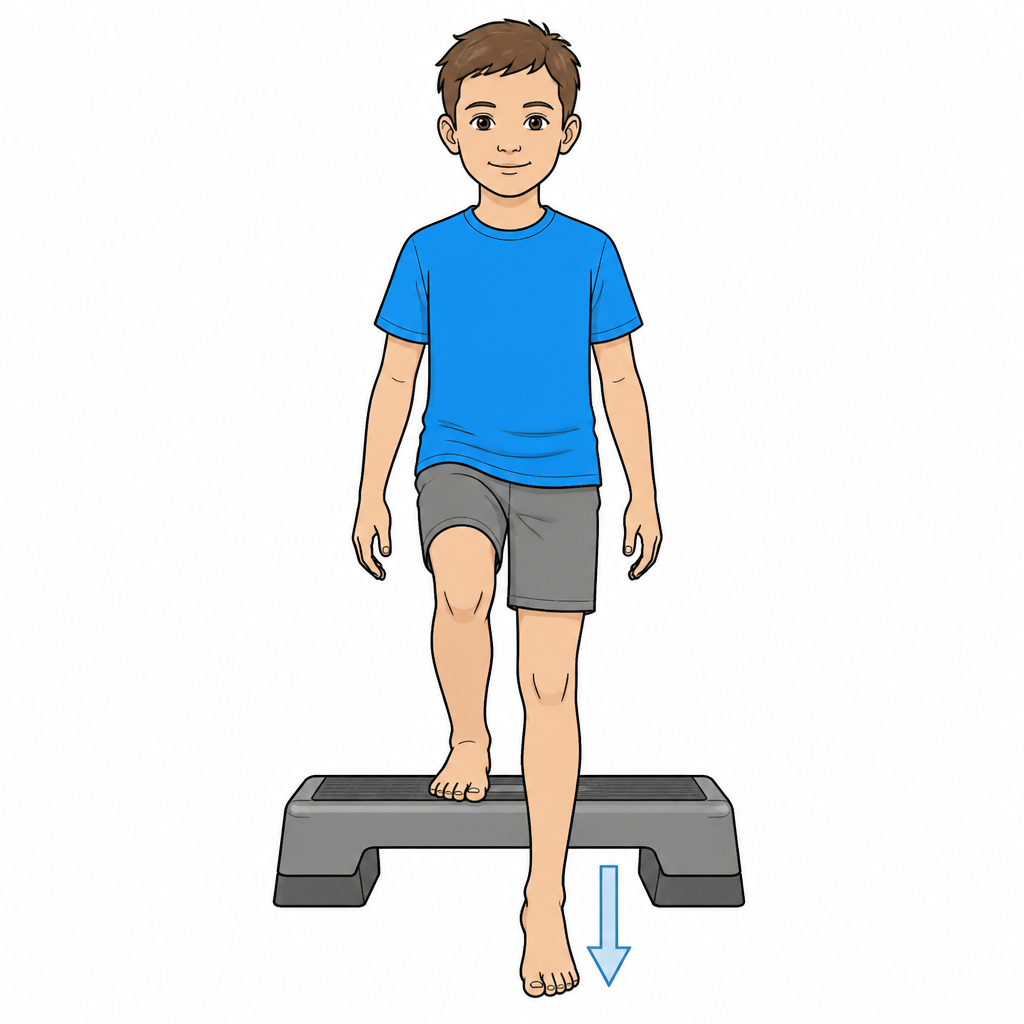
4.Eccentric step-down (advanced phase)
Eccentric quadriceps strengthening, preparation for sports movements
Only after individual authorisation for this movement and loading, based on healing at follow-up. Stand on a step (10-15 cm) with the foot of the leg to strengthen on the edge. SLOWLY lower the other foot toward the ground, controlling the movement with the quadriceps of the supporting leg. Don't touch the ground — rise back up. Focus is on CONTROLLED DESCENT (eccentric phase). Start this exercise only after 6-8 weeks.
8-10 reps per side, 3 sets. Advanced phase only (>6-8 weeks)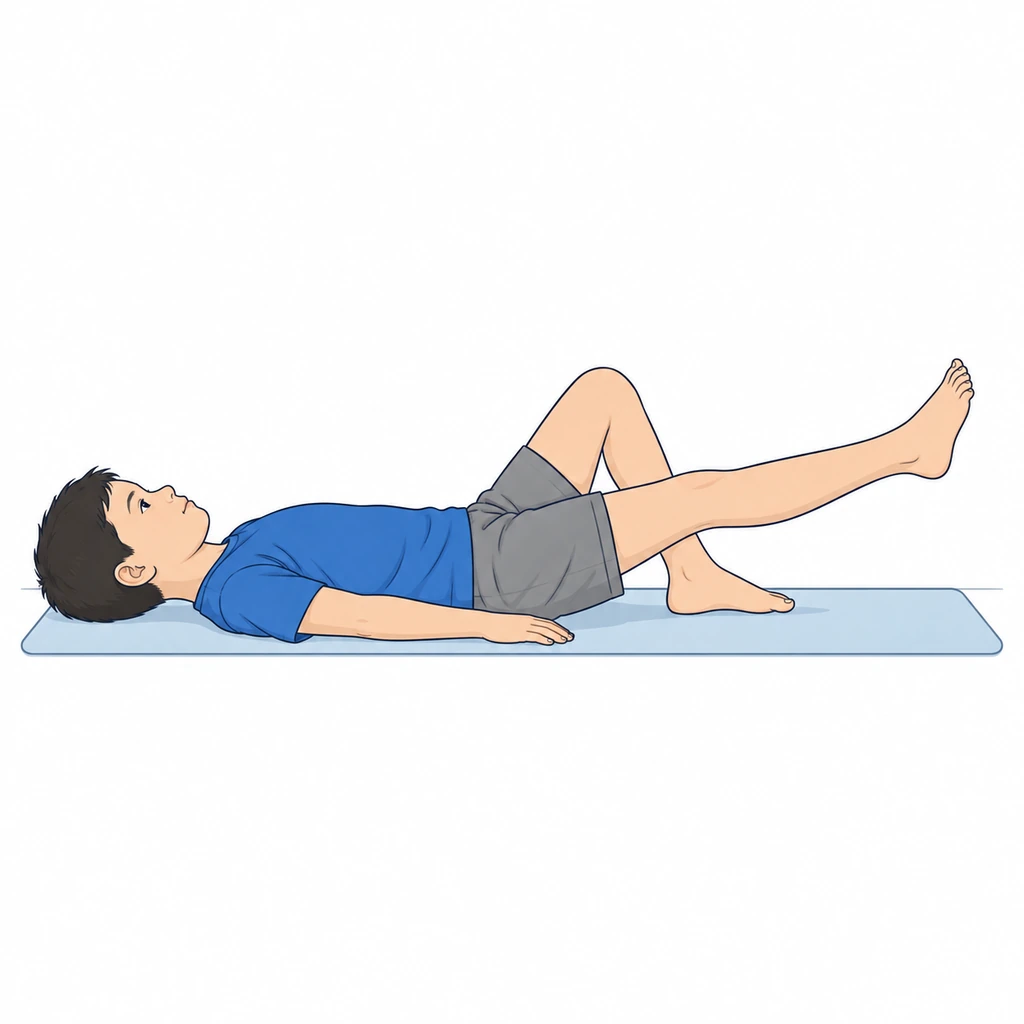
5.Straight leg raise
Controlled-load rectus femoris strengthening without extreme range
Only after individual authorisation for this movement and loading, based on healing at follow-up. Lie supine with one knee bent and the other leg straight. First contract the quadriceps of the straight leg, then lift it about 30 cm keeping the knee perfectly straight. Hold 2 seconds and lower over 3-4 seconds without dropping the leg. The pelvis must not tilt.
10-12 reps per side, 3 sets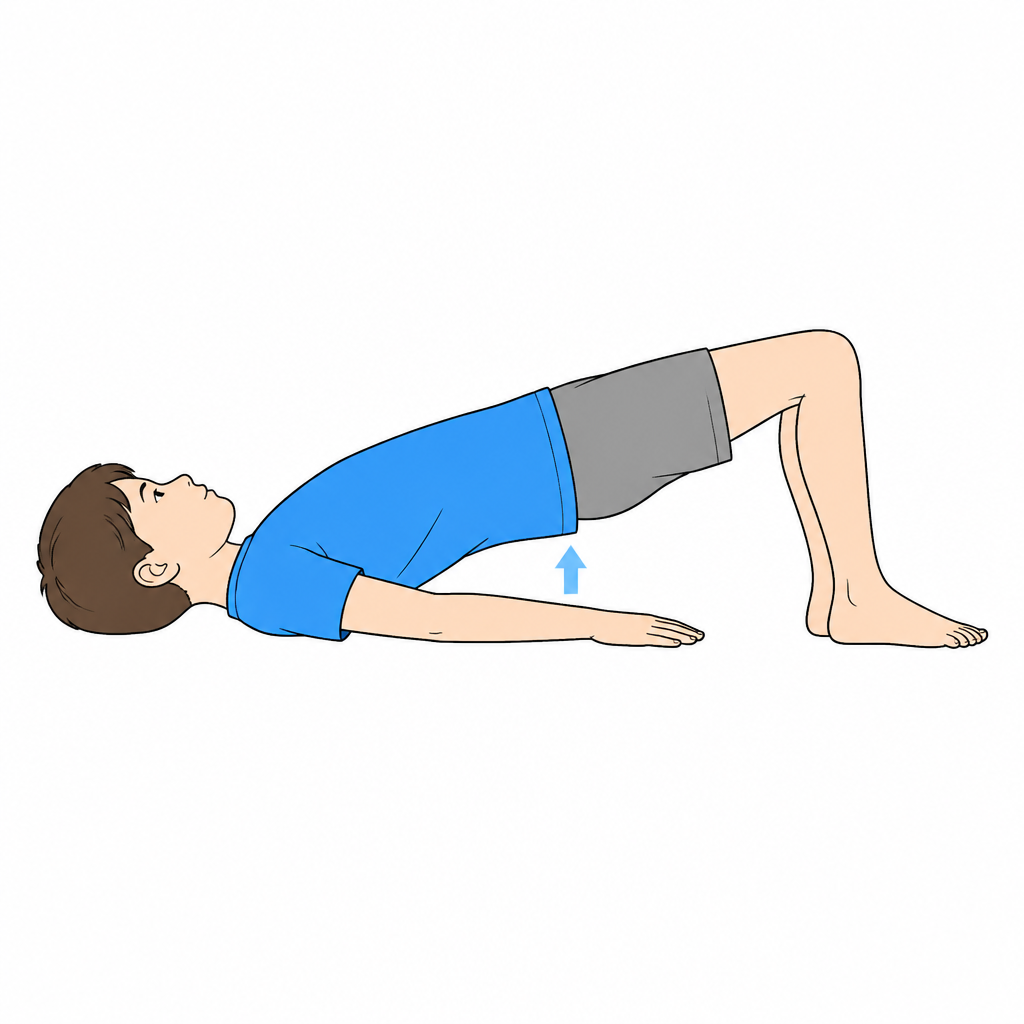
6.Glute bridge
Glute and hamstring strengthening to rebalance the anterior chain
Only after individual authorisation for this movement and loading, based on healing at follow-up. Lie supine with knees bent and feet hip-width apart. Lift the pelvis squeezing the glutes until knees, hips and shoulders are aligned. Hold 3 seconds and lower slowly. The exercise should not create tension at the front of the hip.
12-15 reps, 3 sets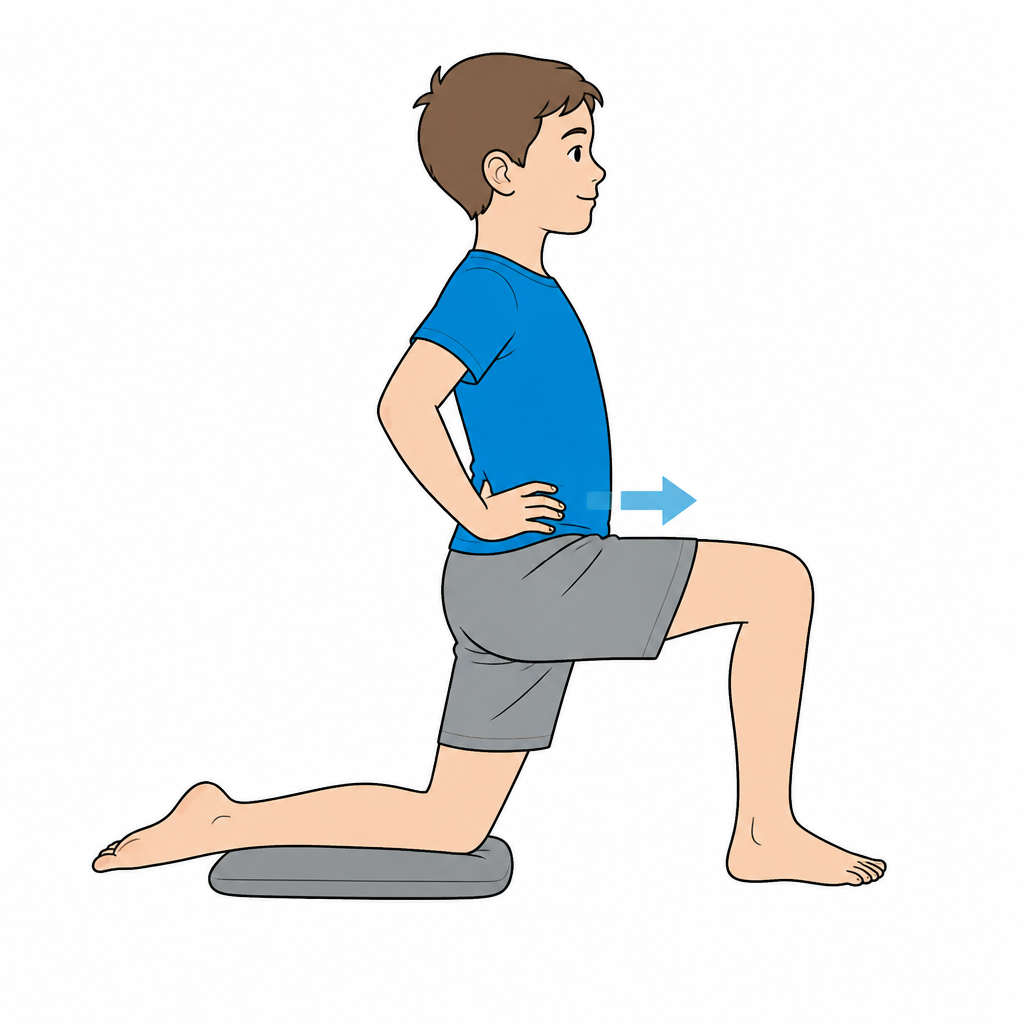
7.Kneeling hip flexor (iliopsoas) stretch
Gentle hip-flexor lengthening after the healing phase
Only after individual authorisation for this movement and loading, based on healing at follow-up. Half-kneeling lunge with one knee on the floor (on a mat) and the other foot forward. Squeeze the glute on the kneeling side to tilt the pelvis posteriorly, then GENTLY shift weight forward until you feel tension at the front of the hip. Trunk upright, no lumbar arching. Only if pain-free.
3 × 30 seconds per side, once or twice daily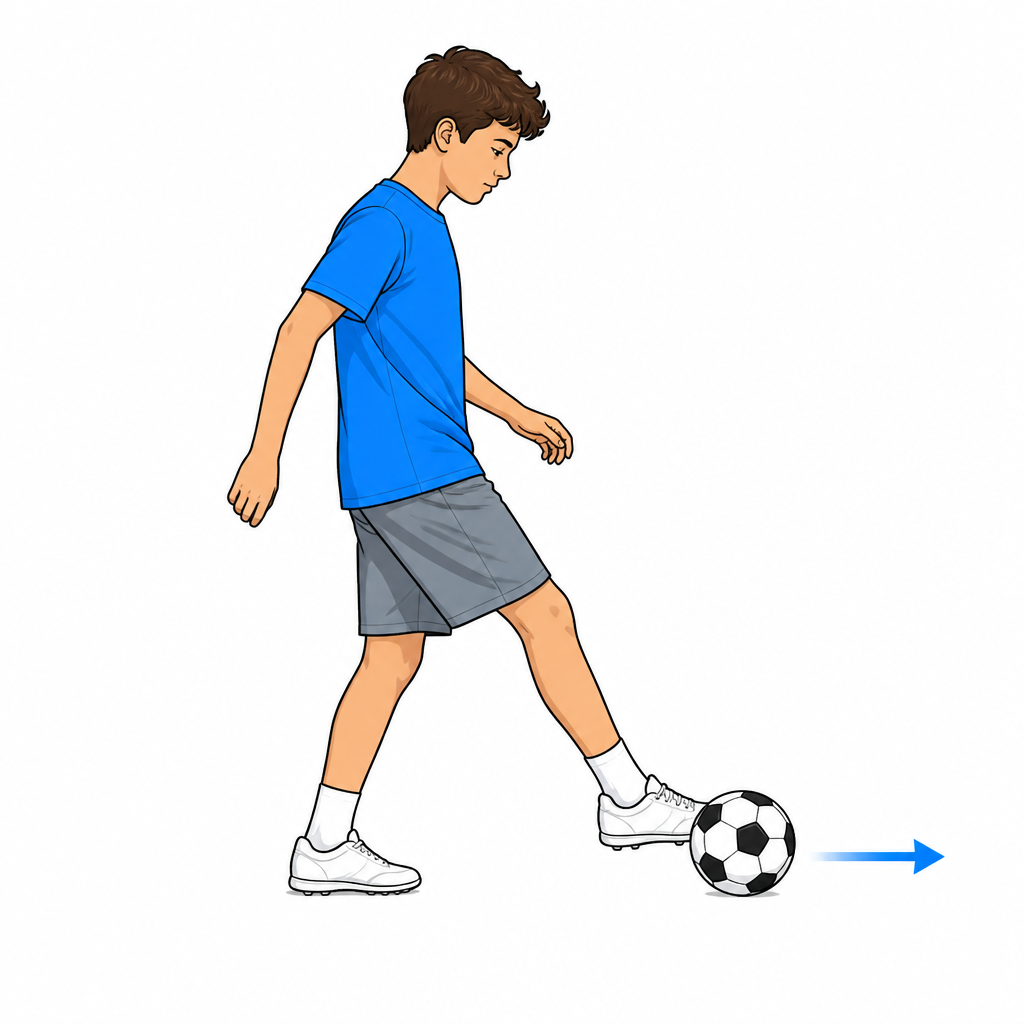
8.Progressive kicking (return to sport)
Gradual reintroduction of the kicking movement
Only after individual authorisation for this movement and loading, based on healing at follow-up. Resume sport-specific loading only after the treating team confirms adequate healing, pain-free movement and strength, and readiness to progress. Begin with easy straight-line activity, then increase speed and finally direction changes or kicking power. Do not progress by calendar alone. Pain during or after a session requires reducing loading and reassessment.
Follow progressive phases, 2-3 sessions per week
RED FLAGS - When to stop and contact the doctor immediately
Stop the exercises immediately and contact the specialist (or go to the emergency department if severe) if any of the following occur:
- Acute or sudden pain during exercise
- Significant swelling after exercises
- Pain that progressively worsens over days
- Fever or general malaise
- Difficulty walking or using the limb after exercises
- Any neurological symptoms (tingling, numbness, sudden weakness)
- A red or hot joint, or inability to bear weight: seek prompt assessment; use emergency care if severe.
In case of doubt, always prefer a check-up over continuing the exercises.
Dott. Daniele Priano
Paediatric Orthopaedics - ASST Gaetano Pini-CTO
Content version: 9 September 2026
ortopediaevolutiva.com • Printed: 13/09/2026
 Web version
 Google
 MioDottore
Prepare the visit handout
Use the condition and phase indicated by your clinician. You can leave out individual exercises; instructions, illustrations and safety advice remain together.
Exclude exercises if needed
8 of 8 exercise cards included
The full web page remains available. Your selection is not saved or shared.
Before You Start
Who is this guide for?
After an apophyseal avulsion, only with individual clearance for movement, stretching, resistance and loading based on verified healing. Absence of pain alone does not authorise progression.
What you need
A stable, clear surface, comfortable clothing and a secure support. Check resistance-band anchors. Adult supervision; avoid marbles and small objects if the child may put them in their mouth, using a towel instead.
Suggested frequency
Perform only the exercises selected during the visit. The listed dosages are examples to adapt: follow the dose, frequency, rest and progression prescribed for age, symptoms and phase. Do not automatically perform the whole list.
Common mistakes to avoid
- •Forcing a painful or unauthorised movement
- •Increasing load, resistance or frequency without the agreed rest periods
- •Doing balance exercises without stable support or supervision
⚠️ Red flags — when to stop and contact the doctor immediately
Stop exercises immediately and contact the specialist if any of the following occur:
- Acute or sudden pain during exercise
- Significant swelling after exercises
- Pain that progressively worsens over days
- Fever or general malaise
- Difficulty walking or using the limb after exercises
- Any neurological symptoms (tingling, numbness, sudden weakness)
- A red or hot joint, or inability to bear weight: seek prompt assessment; use emergency care if severe.
Detailed Exercises
- 1
Isometric knee extension (quad set)
Quadriceps activation only at the authorised stage.
Only after individual authorisation for this movement and loading, based on healing at follow-up. Lying on your back with the leg supported, gently tighten the thigh without moving the knee. The rectus femoris originates at the injured AIIS: an isometric contraction can still create traction. Perform it only at the authorised stage and intensity, with no pain at the injury site.
10-15 reps × 5-10 seconds, 3 sets, 2-3 times daily - 2
Partial wall squat (wall sit)
Progressive knee and hip loading after authorisation.
Only after individual authorisation for this movement and loading, based on healing at follow-up. Lean with back against wall. Lower by bending knees to about 45° (NOT 90° in the first weeks). Feet shoulder-width apart, slightly ahead of knees. Hold position. Gradually increase flexion and duration over the following weeks.
3-4 sets × 15-30 seconds (gradually increase) - 3
Quadriceps stretch (prone)
Progressive rectus femoris stretching after healing
Only after individual authorisation for this movement and loading, based on healing at follow-up. Lie face down (prone). Bend knee and grasp ankle with same-side hand. GENTLY pull heel toward buttock. NEVER force in the first weeks post-avulsion. Stretch should be light and painless. Alternative: standing, grasping ankle behind.
3 × 20-30 seconds per side, only if pain-free - 4
Eccentric step-down (advanced phase)
Eccentric quadriceps strengthening, preparation for sports movements
Only after individual authorisation for this movement and loading, based on healing at follow-up. Stand on a step (10-15 cm) with the foot of the leg to strengthen on the edge. SLOWLY lower the other foot toward the ground, controlling the movement with the quadriceps of the supporting leg. Don't touch the ground — rise back up. Focus is on CONTROLLED DESCENT (eccentric phase). Start this exercise only after 6-8 weeks.
8-10 reps per side, 3 sets. Advanced phase only (>6-8 weeks) - 5
Straight leg raise
Controlled-load rectus femoris strengthening without extreme range
Only after individual authorisation for this movement and loading, based on healing at follow-up. Lie supine with one knee bent and the other leg straight. First contract the quadriceps of the straight leg, then lift it about 30 cm keeping the knee perfectly straight. Hold 2 seconds and lower over 3-4 seconds without dropping the leg. The pelvis must not tilt.
10-12 reps per side, 3 sets - 6
Glute bridge
Glute and hamstring strengthening to rebalance the anterior chain
Only after individual authorisation for this movement and loading, based on healing at follow-up. Lie supine with knees bent and feet hip-width apart. Lift the pelvis squeezing the glutes until knees, hips and shoulders are aligned. Hold 3 seconds and lower slowly. The exercise should not create tension at the front of the hip.
12-15 reps, 3 sets - 7
Kneeling hip flexor (iliopsoas) stretch
Gentle hip-flexor lengthening after the healing phase
Only after individual authorisation for this movement and loading, based on healing at follow-up. Half-kneeling lunge with one knee on the floor (on a mat) and the other foot forward. Squeeze the glute on the kneeling side to tilt the pelvis posteriorly, then GENTLY shift weight forward until you feel tension at the front of the hip. Trunk upright, no lumbar arching. Only if pain-free.
3 × 30 seconds per side, once or twice daily - 8
Progressive kicking (return to sport)
Gradual reintroduction of the kicking movement
Only after individual authorisation for this movement and loading, based on healing at follow-up. Resume sport-specific loading only after the treating team confirms adequate healing, pain-free movement and strength, and readiness to progress. Begin with easy straight-line activity, then increase speed and finally direction changes or kicking power. Do not progress by calendar alone. Pain during or after a session requires reducing loading and reassessment.
Follow progressive phases, 2-3 sessions per week
Frequently Asked Questions
When can I start quadriceps strengthening after an AIIS avulsion?
Gentle isometric strengthening can start after 3-4 weeks if pain-free. Eccentric strengthening (more specific for rectus femoris) generally starts after 5-6 weeks. Kicking is gradually reintroduced only after 8-10 weeks.