Paediatric Orthopaedic Specialist
Pubalgia / groin pain
Home Exercise Program
Not every exercise listed here is suitable for every child: the selection is individual and is defined during the consultation.
For whom: After assessment of adolescent groin pain: exclude apophyseal injuries and other hip conditions. Copenhagen exercise requires demonstration and an appropriate lever; it is not an initial exercise for acute pain.
Dose and frequency: Perform only the exercises selected during the visit. The listed dosages are examples to adapt: follow the dose, frequency, rest and progression prescribed for age, symptoms and phase. Do not automatically perform the whole list.
Equipment and supervision: A stable, clear surface, comfortable clothing and a secure support. Check resistance-band anchors. Adult supervision; avoid marbles and small objects if the child may put them in their mouth, using a towel instead.
Avoid: Forcing a painful or unauthorised movement; Increasing load, resistance or frequency without the agreed rest periods; Doing balance exercises without stable support or supervision.
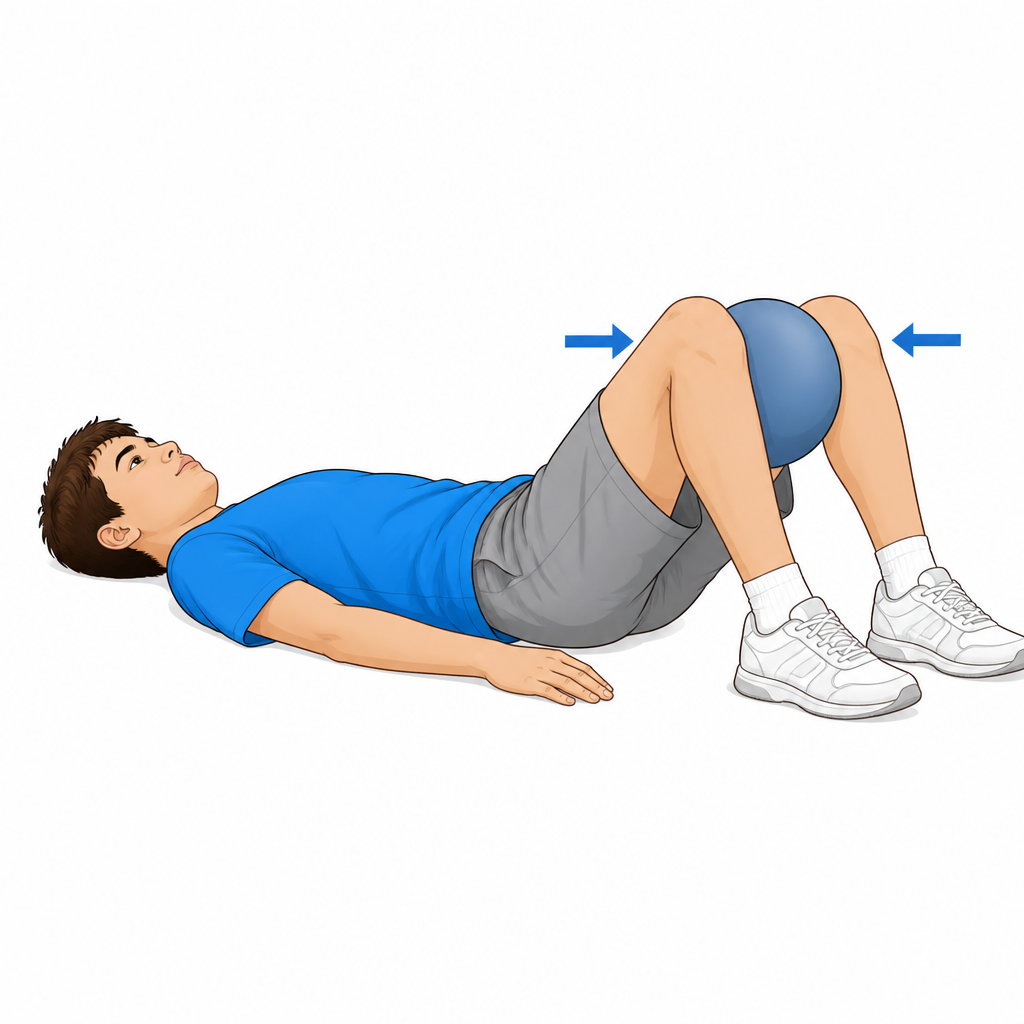
1.Isometric adductor squeeze
Isometric adductor strengthening, foundation of pubalgia rehabilitation
Lie on your back with knees bent and feet on the floor. Place a pillow or ball between knees. Squeeze knees against the pillow holding the contraction for 5-10 seconds. Contraction should be submaximal (60-70% of maximum effort), pain-free. Breathe normally during contraction.
10 reps × 5-10 seconds, 3 sets, twice daily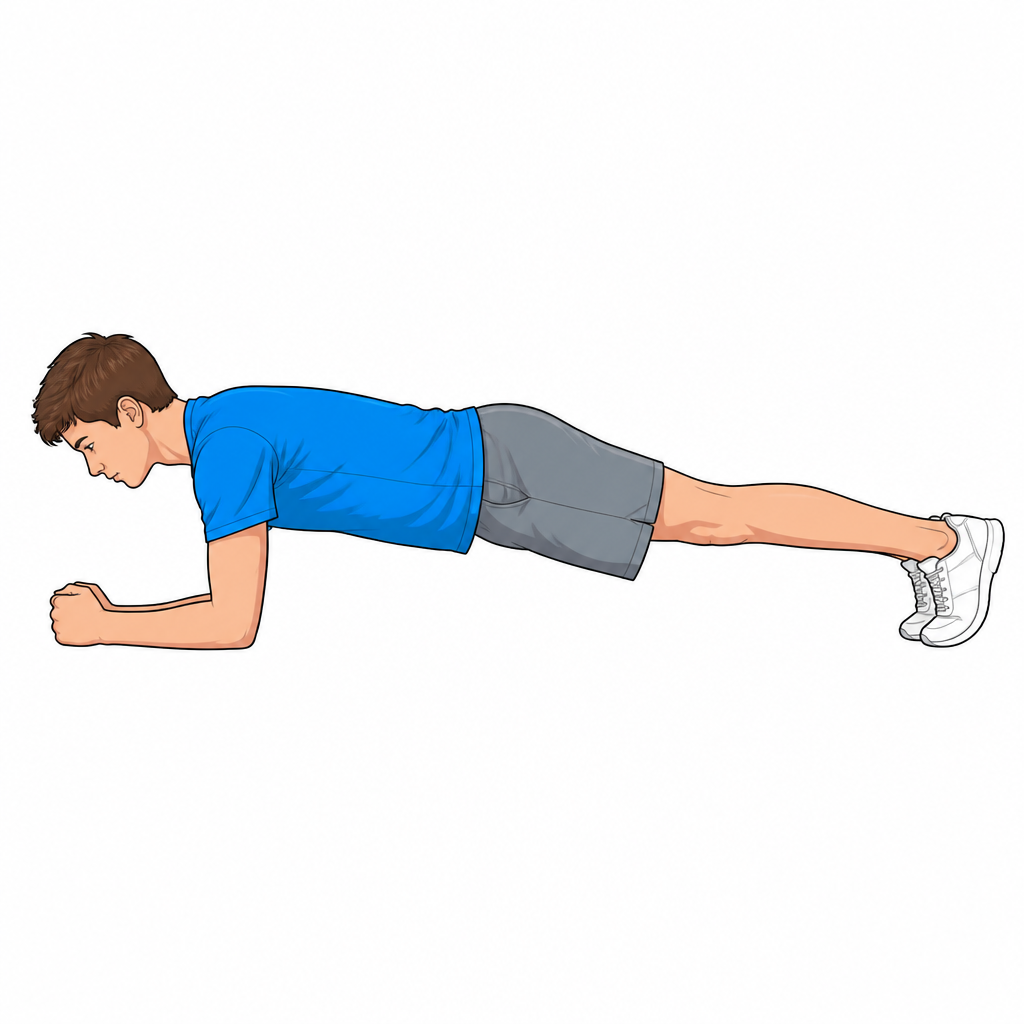
2.Front plank
Core and pelvis stabilization, essential in pubalgia
Place forearms on the ground with elbows under shoulders. Lift body maintaining a straight line from head to feet. Engage abdominals and glutes. Don't let pelvis sag or rise too high. Hold position while breathing normally.
3-4 sets × 20-30 seconds (gradually increase to 60 seconds)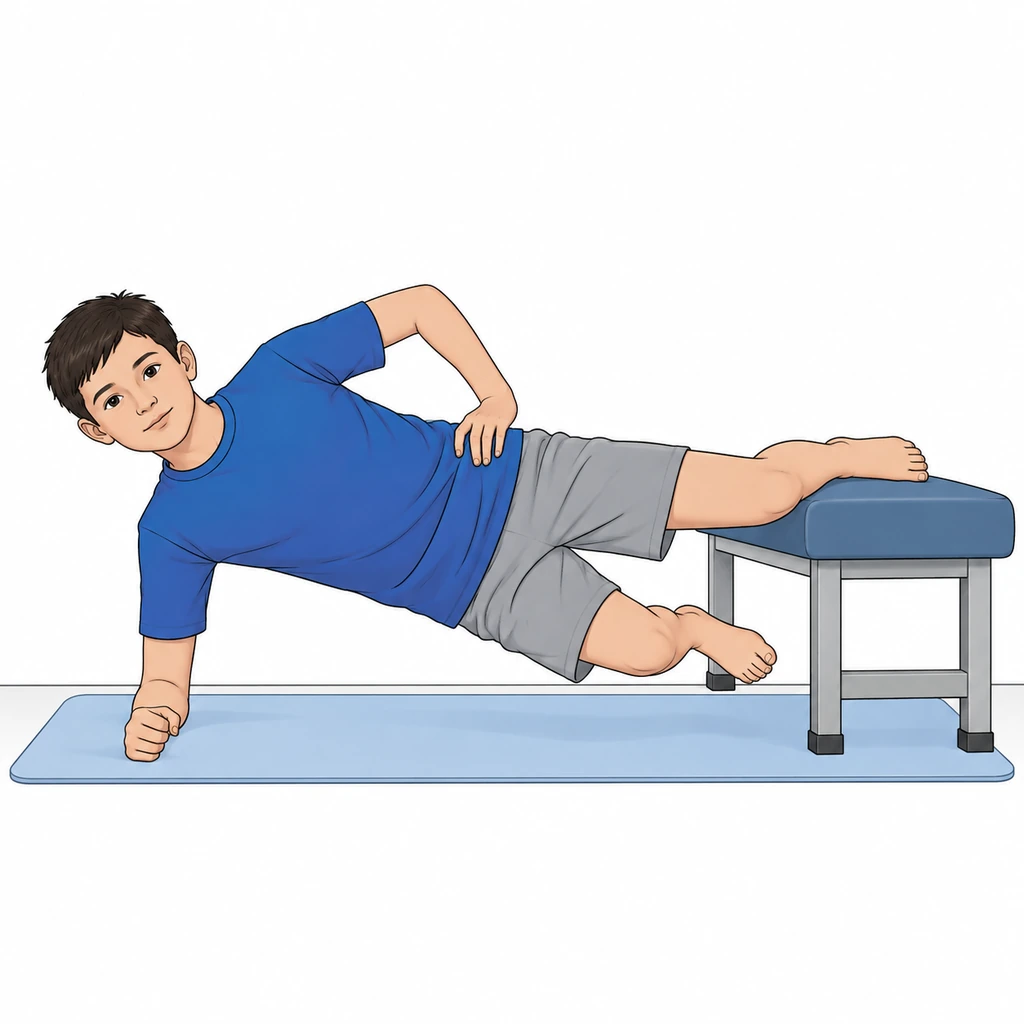
3.Modified Copenhagen adductor
Adductor strengthening: learn the short-lever version with the physiotherapist.
Only after demonstration and if pain-free. Lie on your side with the forearm under the shoulder and the bent knee of the UPPER leg resting on a stable, padded support. Lift the pelvis by pressing the upper knee into the support using that leg’s adductors; the lower leg is not the main support. Keep the trunk and pelvis aligned and lower with control. Do not start with the more demanding ankle-supported version.
Individualise lever length and dosage; stop if groin pain occurs.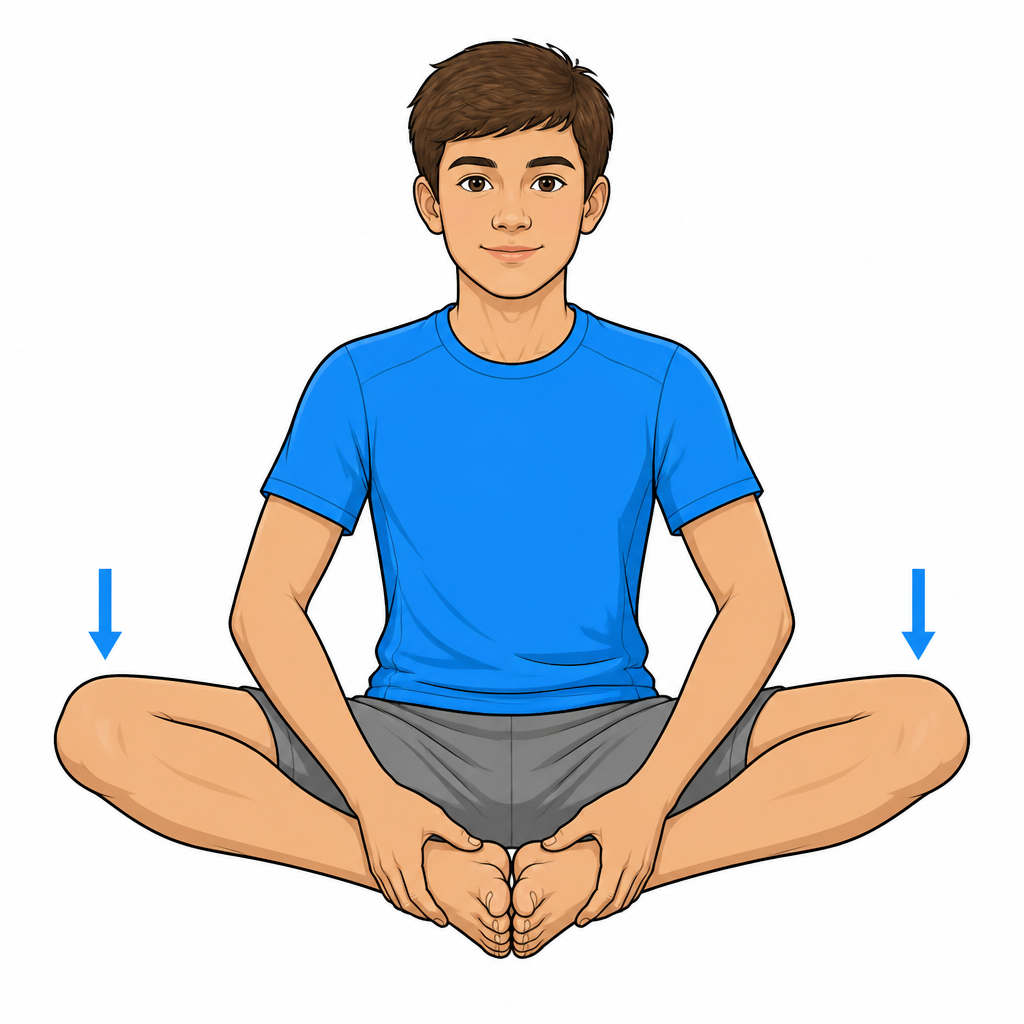
4.Adductor stretch (butterfly)
Adductor stretching to improve groin flexibility
Sit comfortably with the soles together and let the knees open without pressure. Do not push down on the knees with the elbows. Stop at a gentle stretch without groin pain. After trauma or an apophyseal avulsion, perform this only if authorised.
3 sets × 30 seconds, twice daily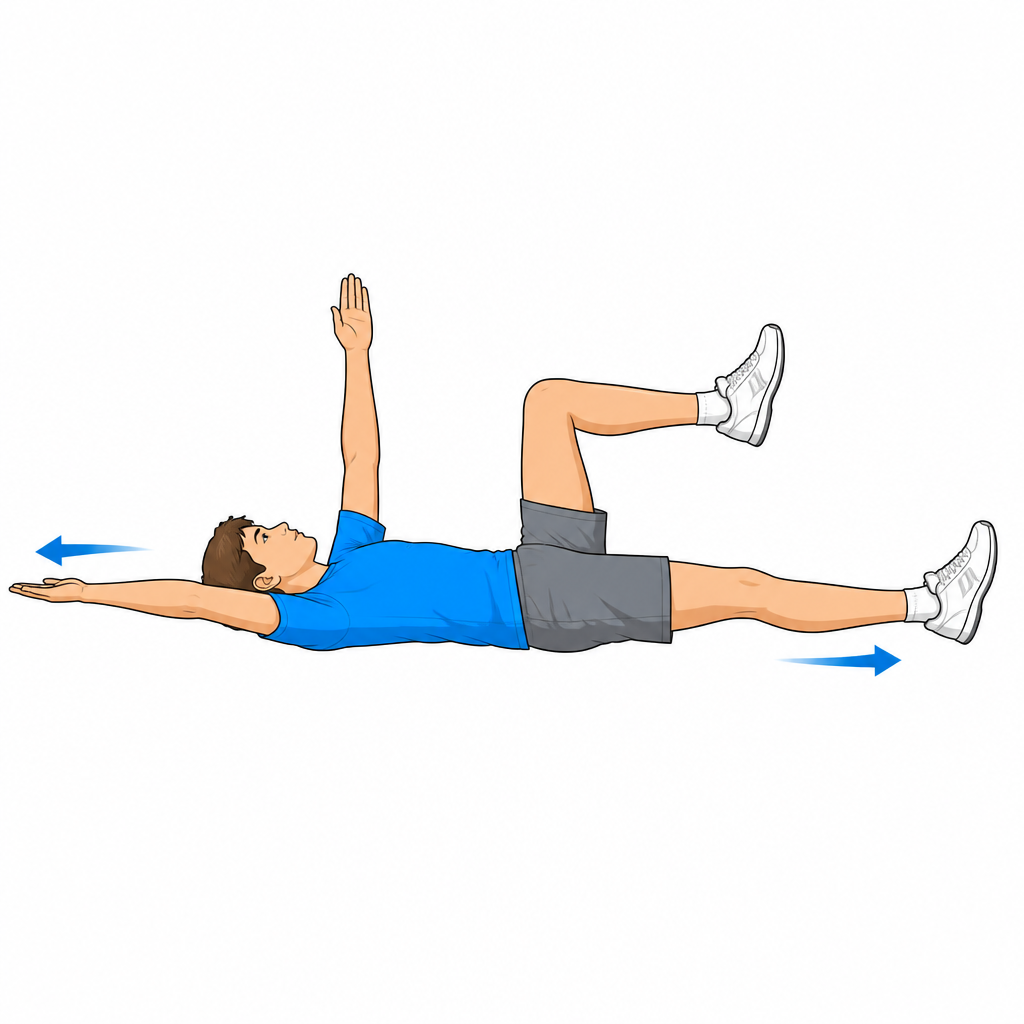
5.Dead bug (lumbopelvic stabilization)
Deep core activation with limb dissociation, prevents recurrence
Lie on back with arms extended toward ceiling and hips/knees bent at 90°. SLOWLY extend one arm overhead and opposite leg toward floor, without touching ground. Back must stay firmly pressed to floor — do NOT arch. Return to starting position and repeat on other side.
8-10 reps per side, 3 sets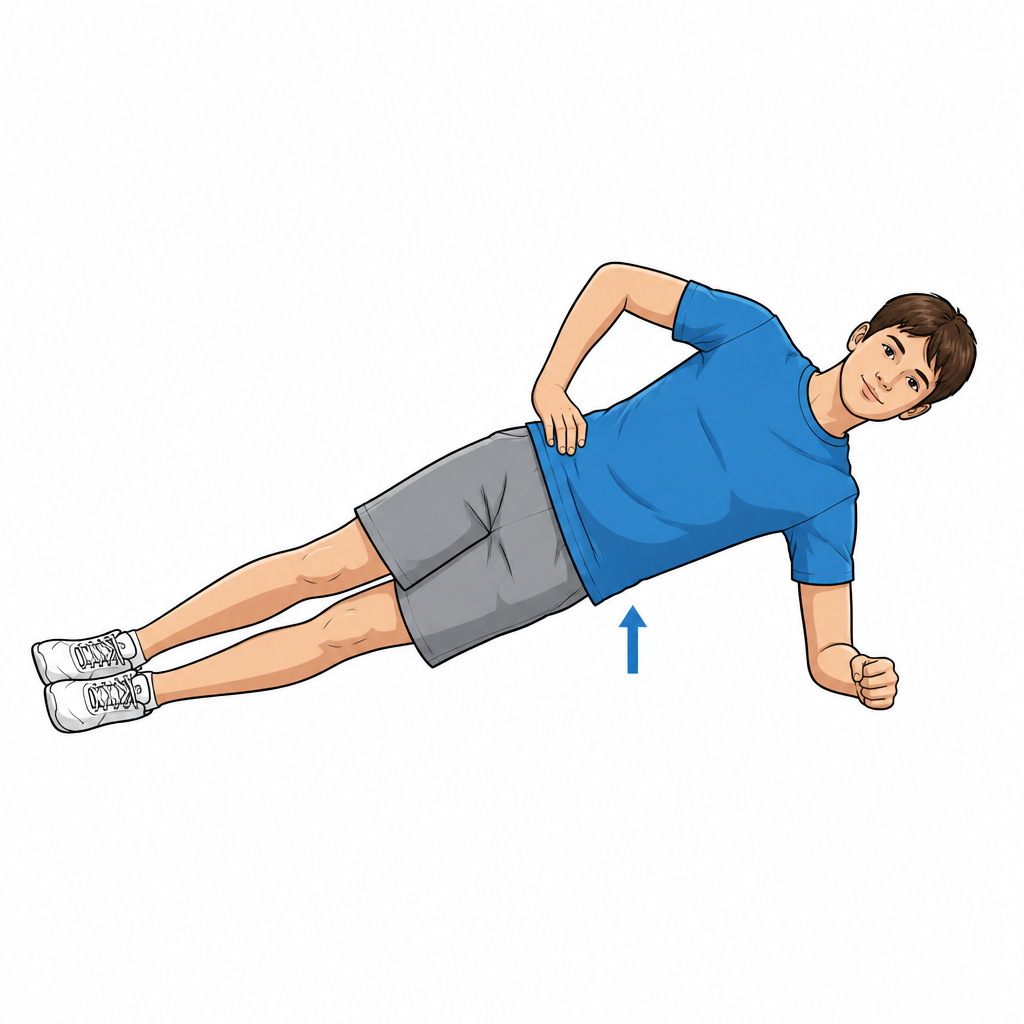
6.Side plank
Lateral chain strengthening and frontal-plane pelvic control
Lie on your side resting on the forearm, elbow exactly under the shoulder. Lift the pelvis until ankle, hip and shoulder are aligned. Do not let the pelvis drop or the trunk rotate. Easier version: rest on the knees instead of the feet. Breathe normally.
3 sets × 15-30 seconds per side (progress up to 45 seconds)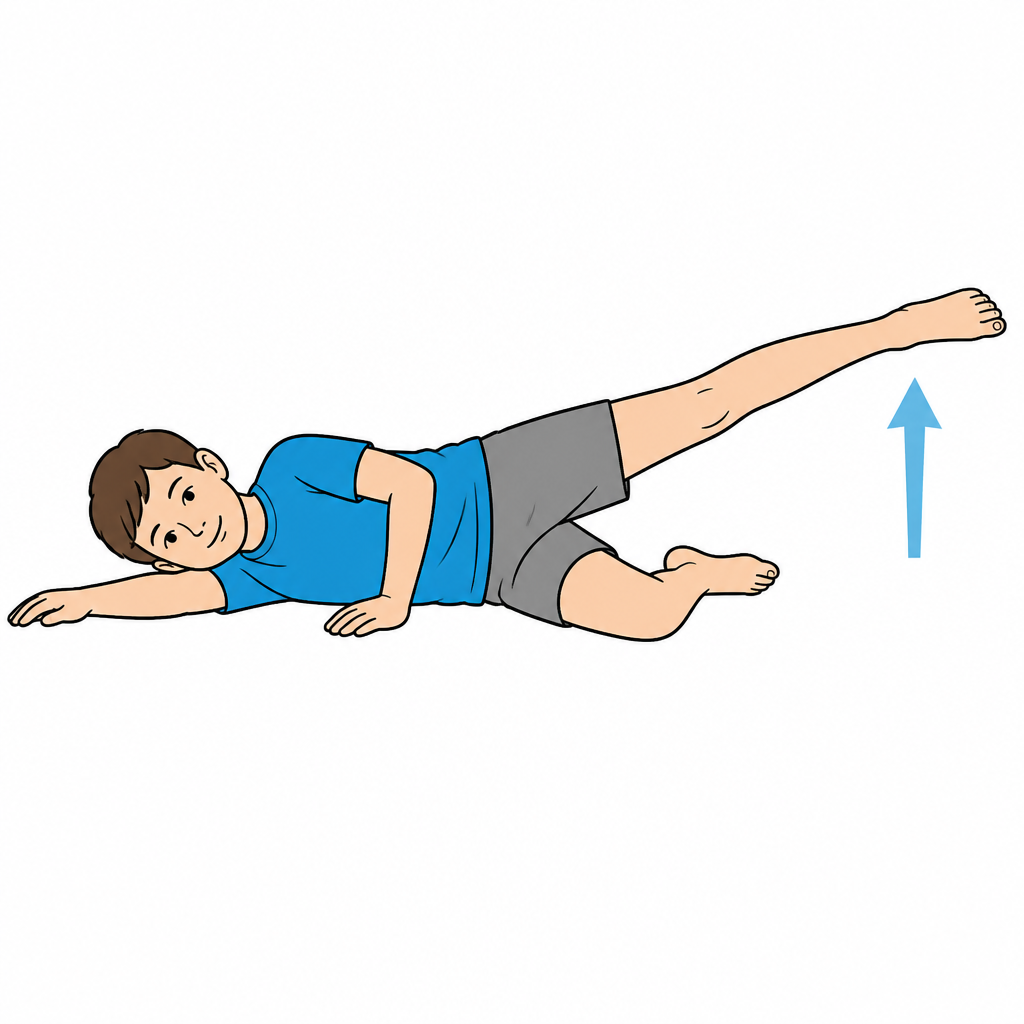
7.Side-lying hip abduction
Gluteus medius strengthening: a stable pelvis reduces adductor overload
Lie on your side with legs straight and aligned with the trunk. Slowly lift the top leg (about 30-40 cm) keeping the foot parallel to the floor with toes pointing forward, not up. Do not roll the pelvis backwards. Lower slowly over 3 seconds.
12-15 reps per side, 3 sets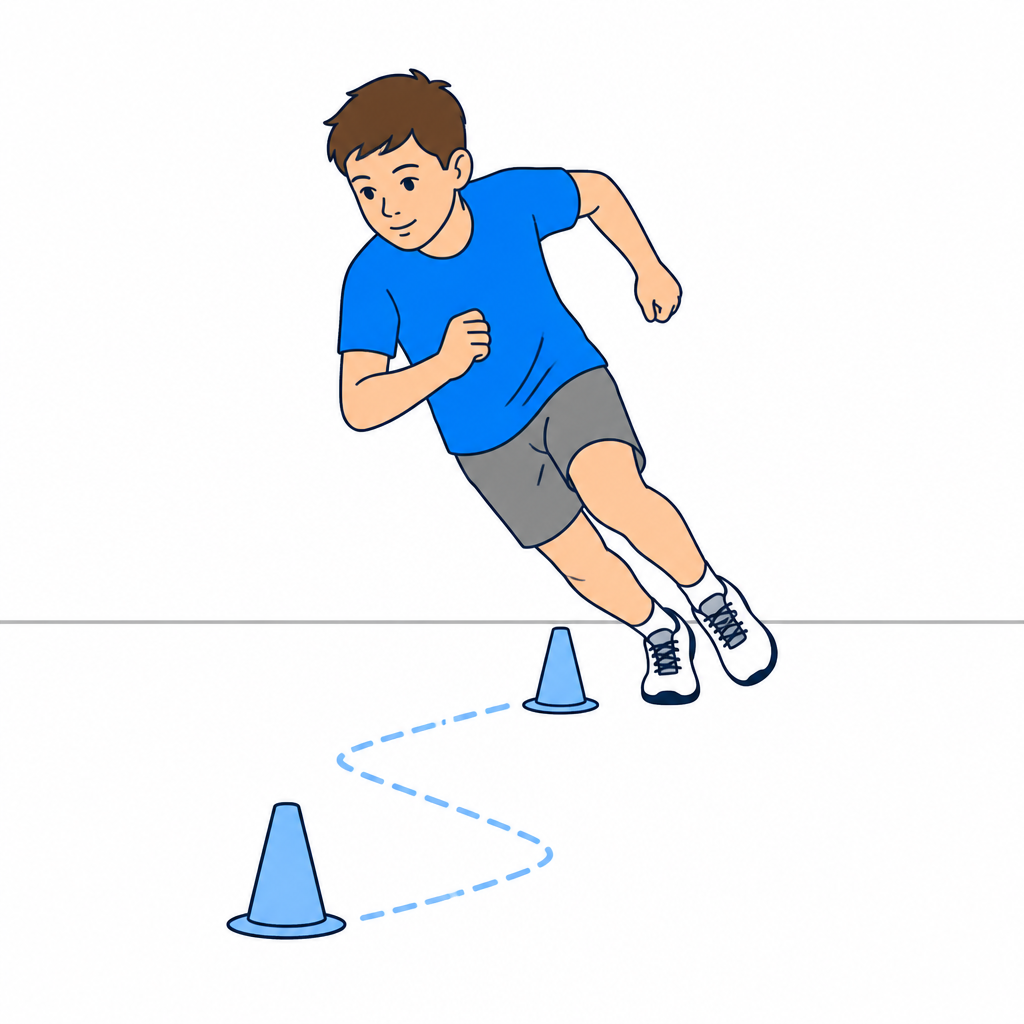
8.Gradual return to running and change of direction
Progression criteria toward full sports activity
Progress only if the isometric adductor squeeze is pain-free and strength is similar on both sides. Phase 1: light linear running 10-15 min. Phase 2: running with accelerations and decelerations. Phase 3: wide then sharp changes of direction. Phase 4: sport-specific gestures (kicking, repeated sprints). Rule: pain ≤ 3/10 during activity and no worsening the next day, otherwise step back one phase.
One phase every 5-7 days, 3 sessions per week
RED FLAGS - When to stop and contact the doctor immediately
Stop the exercises immediately and contact the specialist (or go to the emergency department if severe) if any of the following occur:
- Acute or sudden pain during exercise
- Significant swelling after exercises
- Pain that progressively worsens over days
- Fever or general malaise
- Difficulty walking or using the limb after exercises
- Any neurological symptoms (tingling, numbness, sudden weakness)
- A red or hot joint, or inability to bear weight: seek prompt assessment; use emergency care if severe.
In case of doubt, always prefer a check-up over continuing the exercises.
Dott. Daniele Priano
Paediatric Orthopaedics - ASST Gaetano Pini-CTO
Content version: 9 September 2026
ortopediaevolutiva.com • Printed: 14/09/2026
 Web version
 Google
 MioDottore
Prepare the visit handout
Use the condition and phase indicated by your clinician. You can leave out individual exercises; instructions, illustrations and safety advice remain together.
Exclude exercises if needed
8 of 8 exercise cards included
The full web page remains available. Your selection is not saved or shared.
Before You Start
Who is this guide for?
After assessment of adolescent groin pain: exclude apophyseal injuries and other hip conditions. Copenhagen exercise requires demonstration and an appropriate lever; it is not an initial exercise for acute pain.
What you need
A stable, clear surface, comfortable clothing and a secure support. Check resistance-band anchors. Adult supervision; avoid marbles and small objects if the child may put them in their mouth, using a towel instead.
Suggested frequency
Perform only the exercises selected during the visit. The listed dosages are examples to adapt: follow the dose, frequency, rest and progression prescribed for age, symptoms and phase. Do not automatically perform the whole list.
Common mistakes to avoid
- •Forcing a painful or unauthorised movement
- •Increasing load, resistance or frequency without the agreed rest periods
- •Doing balance exercises without stable support or supervision
⚠️ Red flags — when to stop and contact the doctor immediately
Stop exercises immediately and contact the specialist if any of the following occur:
- Acute or sudden pain during exercise
- Significant swelling after exercises
- Pain that progressively worsens over days
- Fever or general malaise
- Difficulty walking or using the limb after exercises
- Any neurological symptoms (tingling, numbness, sudden weakness)
- A red or hot joint, or inability to bear weight: seek prompt assessment; use emergency care if severe.
Detailed Exercises
- 1
Isometric adductor squeeze
Isometric adductor strengthening, foundation of pubalgia rehabilitation
Lie on your back with knees bent and feet on the floor. Place a pillow or ball between knees. Squeeze knees against the pillow holding the contraction for 5-10 seconds. Contraction should be submaximal (60-70% of maximum effort), pain-free. Breathe normally during contraction.
10 reps × 5-10 seconds, 3 sets, twice daily - 2
Front plank
Core and pelvis stabilization, essential in pubalgia
Place forearms on the ground with elbows under shoulders. Lift body maintaining a straight line from head to feet. Engage abdominals and glutes. Don't let pelvis sag or rise too high. Hold position while breathing normally.
3-4 sets × 20-30 seconds (gradually increase to 60 seconds) - 3
Modified Copenhagen adductor
Adductor strengthening: learn the short-lever version with the physiotherapist.
Only after demonstration and if pain-free. Lie on your side with the forearm under the shoulder and the bent knee of the UPPER leg resting on a stable, padded support. Lift the pelvis by pressing the upper knee into the support using that leg’s adductors; the lower leg is not the main support. Keep the trunk and pelvis aligned and lower with control. Do not start with the more demanding ankle-supported version.
Individualise lever length and dosage; stop if groin pain occurs. - 4
Adductor stretch (butterfly)
Adductor stretching to improve groin flexibility
Sit comfortably with the soles together and let the knees open without pressure. Do not push down on the knees with the elbows. Stop at a gentle stretch without groin pain. After trauma or an apophyseal avulsion, perform this only if authorised.
3 sets × 30 seconds, twice daily - 5
Dead bug (lumbopelvic stabilization)
Deep core activation with limb dissociation, prevents recurrence
Lie on back with arms extended toward ceiling and hips/knees bent at 90°. SLOWLY extend one arm overhead and opposite leg toward floor, without touching ground. Back must stay firmly pressed to floor — do NOT arch. Return to starting position and repeat on other side.
8-10 reps per side, 3 sets - 6
Side plank
Lateral chain strengthening and frontal-plane pelvic control
Lie on your side resting on the forearm, elbow exactly under the shoulder. Lift the pelvis until ankle, hip and shoulder are aligned. Do not let the pelvis drop or the trunk rotate. Easier version: rest on the knees instead of the feet. Breathe normally.
3 sets × 15-30 seconds per side (progress up to 45 seconds) - 7
Side-lying hip abduction
Gluteus medius strengthening: a stable pelvis reduces adductor overload
Lie on your side with legs straight and aligned with the trunk. Slowly lift the top leg (about 30-40 cm) keeping the foot parallel to the floor with toes pointing forward, not up. Do not roll the pelvis backwards. Lower slowly over 3 seconds.
12-15 reps per side, 3 sets - 8
Gradual return to running and change of direction
Progression criteria toward full sports activity
Progress only if the isometric adductor squeeze is pain-free and strength is similar on both sides. Phase 1: light linear running 10-15 min. Phase 2: running with accelerations and decelerations. Phase 3: wide then sharp changes of direction. Phase 4: sport-specific gestures (kicking, repeated sprints). Rule: pain ≤ 3/10 during activity and no worsening the next day, otherwise step back one phase.
One phase every 5-7 days, 3 sessions per week
Frequently Asked Questions
How long does it take to recover from pubalgia with exercises?
With a consistent strengthening and stretching program, first improvements are usually noticed after 2-3 weeks. Full recovery generally requires 4-8 weeks. It's essential not to resume sports activity too early.
Can I do exercises even if I have pain?
Exercises should not cause sharp pain. Mild discomfort is acceptable, but if pain is significant, reduce intensity or stop the exercise. The principle is "do it but without pain".