Paediatric Orthopaedic Specialist
Ankle sprain (rehabilitation)
Home Exercise Program
Not every exercise listed here is suitable for every child: the selection is individual and is defined during the consultation.
For whom: Adolescents recovering from ankle sprain, after the acute phase. Proprioception exercises are key to preventing recurrence.
Dose and frequency: Perform only the exercises selected during the visit. The listed dosages are examples to adapt: follow the dose, frequency, rest and progression prescribed for age, symptoms and phase. Do not automatically perform the whole list.
Equipment and supervision: A stable, clear surface, comfortable clothing and a secure support. Check resistance-band anchors. Adult supervision; avoid marbles and small objects if the child may put them in their mouth, using a towel instead.
Avoid: Forcing a painful or unauthorised movement; Increasing load, resistance or frequency without the agreed rest periods; Doing balance exercises without stable support or supervision.
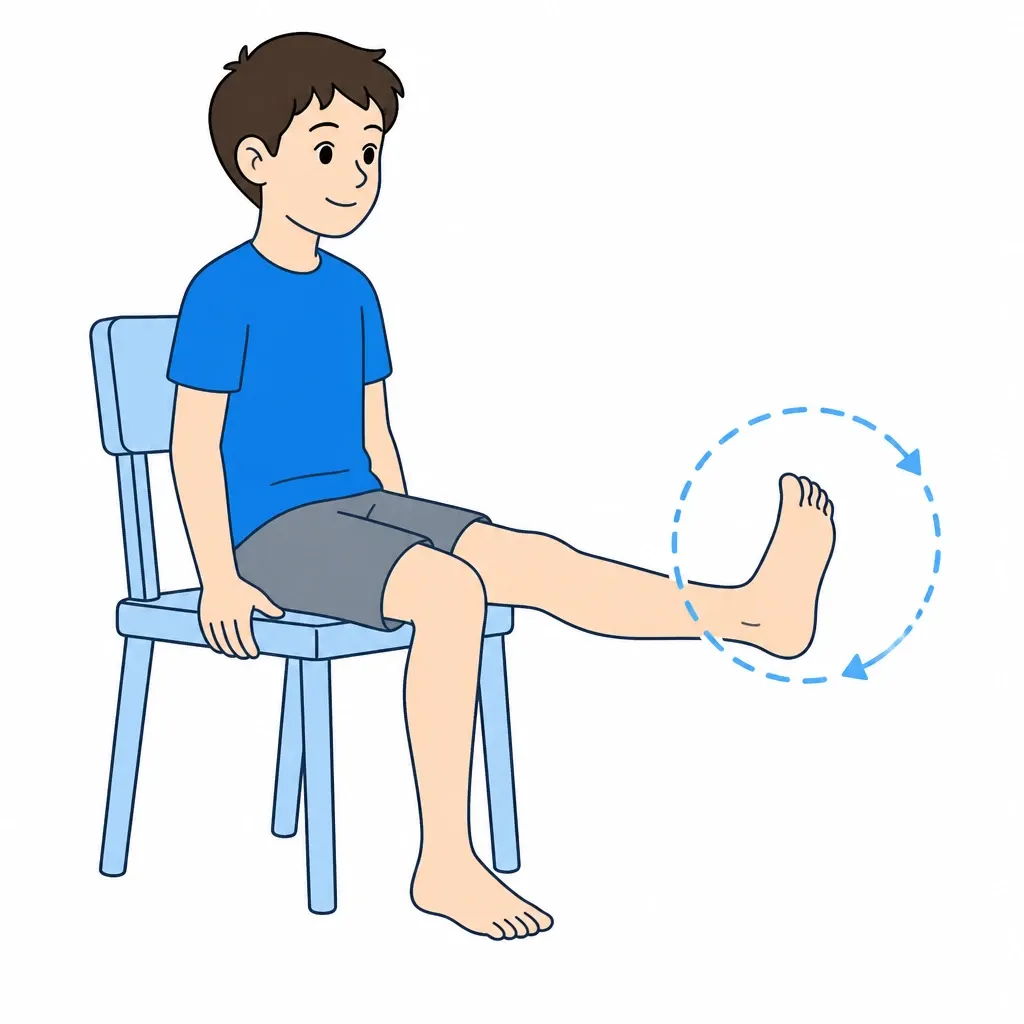
1.Early mobility (alphabet)
INITIAL NON-WEIGHT BEARING PHASE - Start as soon as acute pain allows
As soon as acute pain subsides (usually 2-3 days after injury): seated with raised foot, "write" alphabet letters with toe tip. This moves ankle in all directions without loading. Small controlled movements, never painful.
Complete alphabet, 2-3 times daily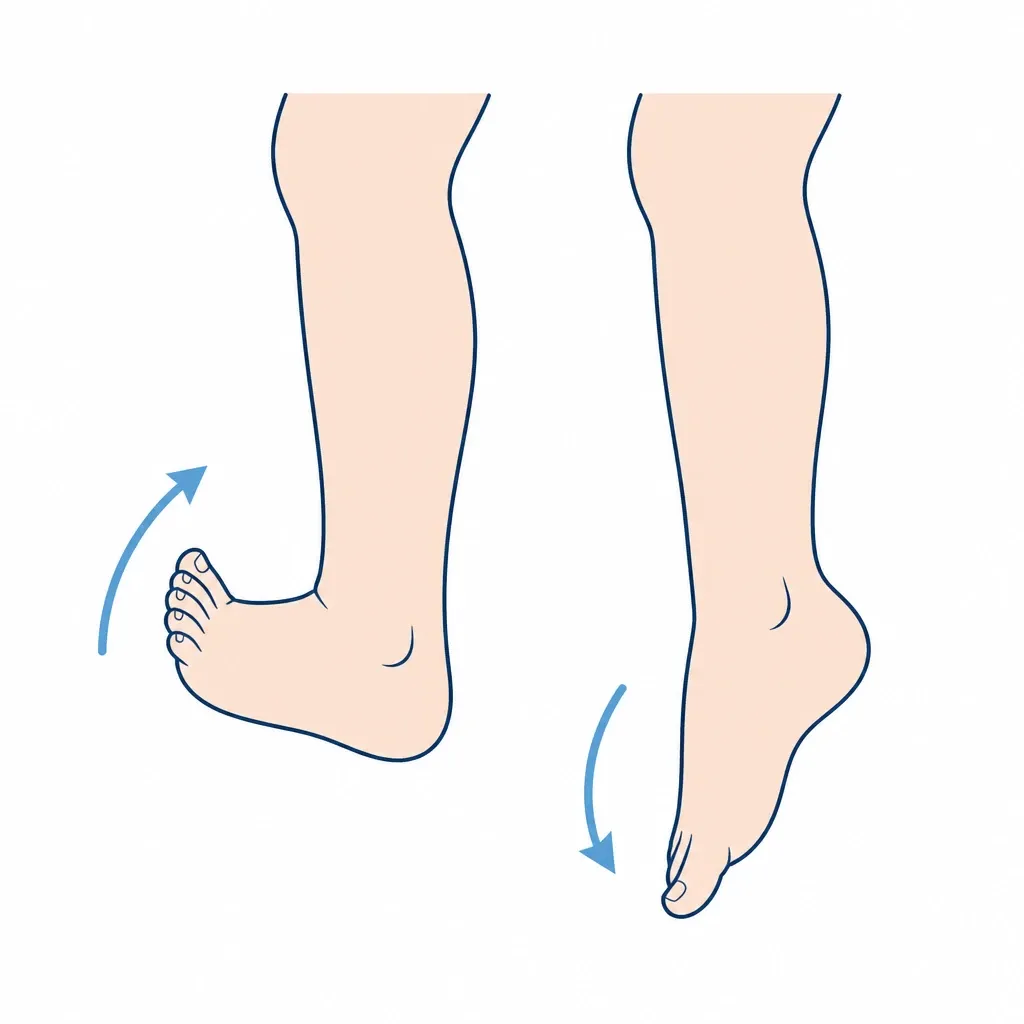
2.Active mobility (flexion/extension)
NON-WEIGHT BEARING - Recover ankle range of motion
Seated with leg extended. Actively move foot up (dorsiflexion) and down (plantarflexion) without forcing. Try to gradually increase range of motion. Add inversion/eversion movements (rotate foot in/out). All movements should be pain-free.
15-20 reps each direction, 3-4 times daily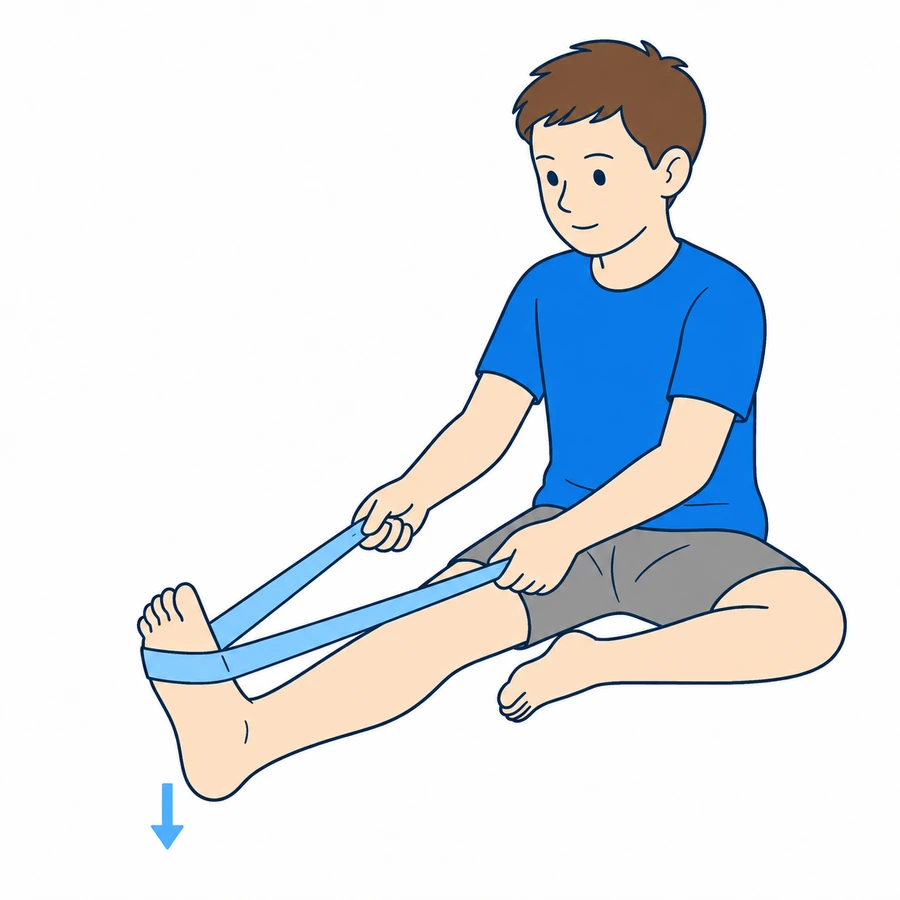
3.Band strengthening (4 directions)
NON-WEIGHT BEARING - Progressive strengthening seated, especially eversion
The figure shows the plantarflexion setup: the foot pushes against a band held towards the body. Dorsiflexion, inversion and eversion require different positions and anchors, taught by the physiotherapist.
Only in authorised directions and after demonstration: change the anchor to oppose each movement, rather than assist it. Dorsiflexion: forefoot towards the shin; plantarflexion: toes away from the shin; inversion: inner border rises; eversion: outer border rises. Do not force inversion after a lateral sprain. Use a light band with a secure anchor and control the return.
3 × 15 each direction. Emphasis on EVERSION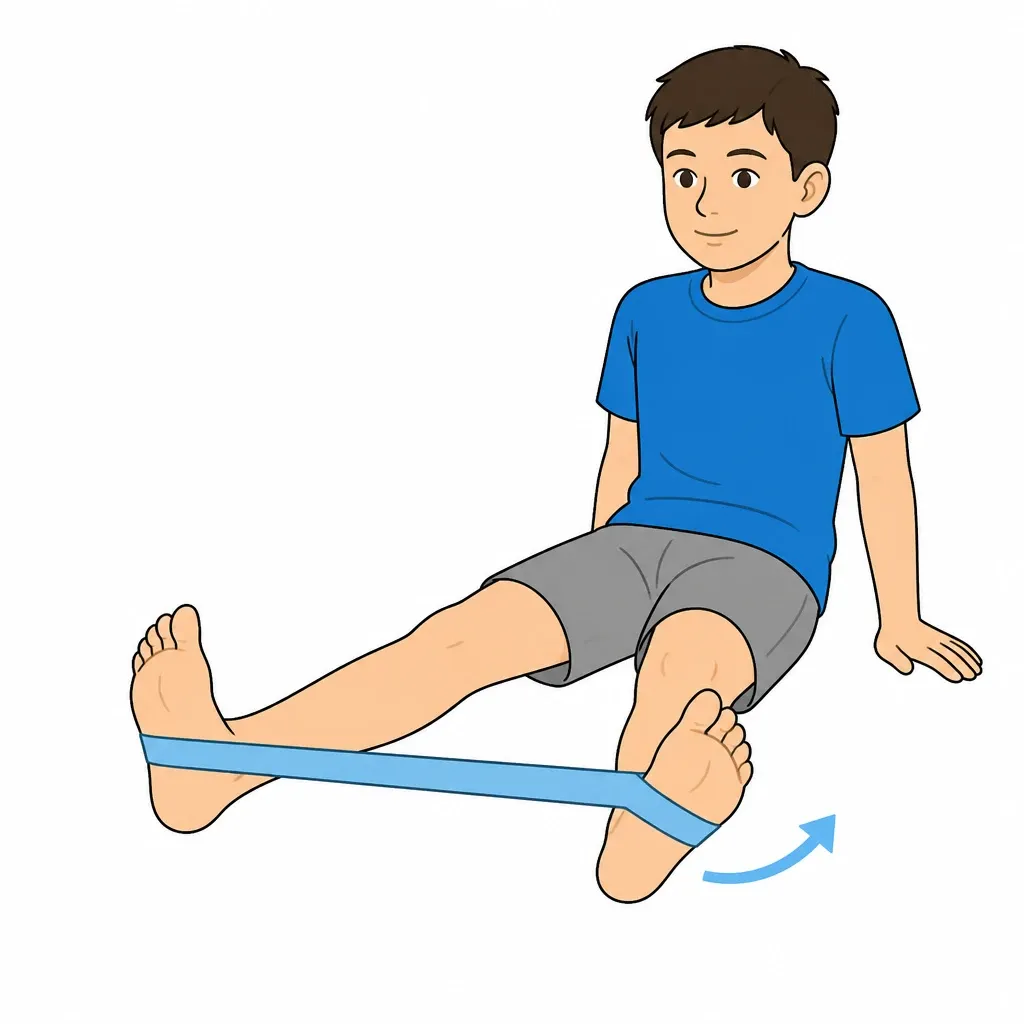
4.Peroneal strengthening (band eversion)
NON-WEIGHT BEARING - Key exercise to prevent recurrence
Seated, secure the band on the inner side relative to the affected foot so it pulls inward and resists outward movement. Wrap it around the forefoot. From neutral, move the outer border outward within the permitted range without turning the knee or hip, then return slowly. Ask the physiotherapist to demonstrate and check the anchor.
3 × 15-20 reps per foot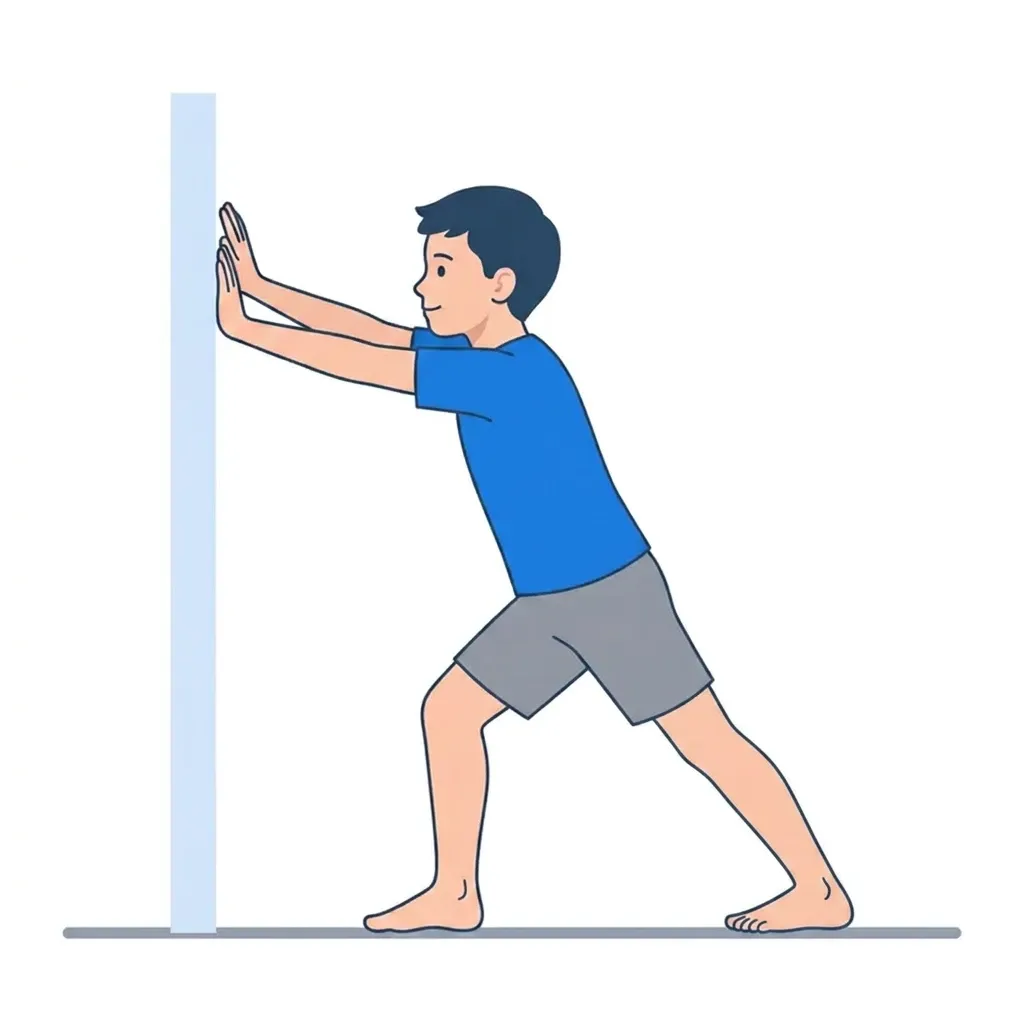
5.Calf stretch (standing)
AUTHORISED WEIGHT BEARING — Recover mobility without forcing
Only after clearance for loading and stretching. Place your hands on a wall, the affected leg behind and heel down. Slowly move the pelvis forwards within a gentle stretch, first with the knee straight, then slightly bent if prescribed. Do not seek pain or increase movement to meet a deadline.
3 × 30 seconds per position, twice daily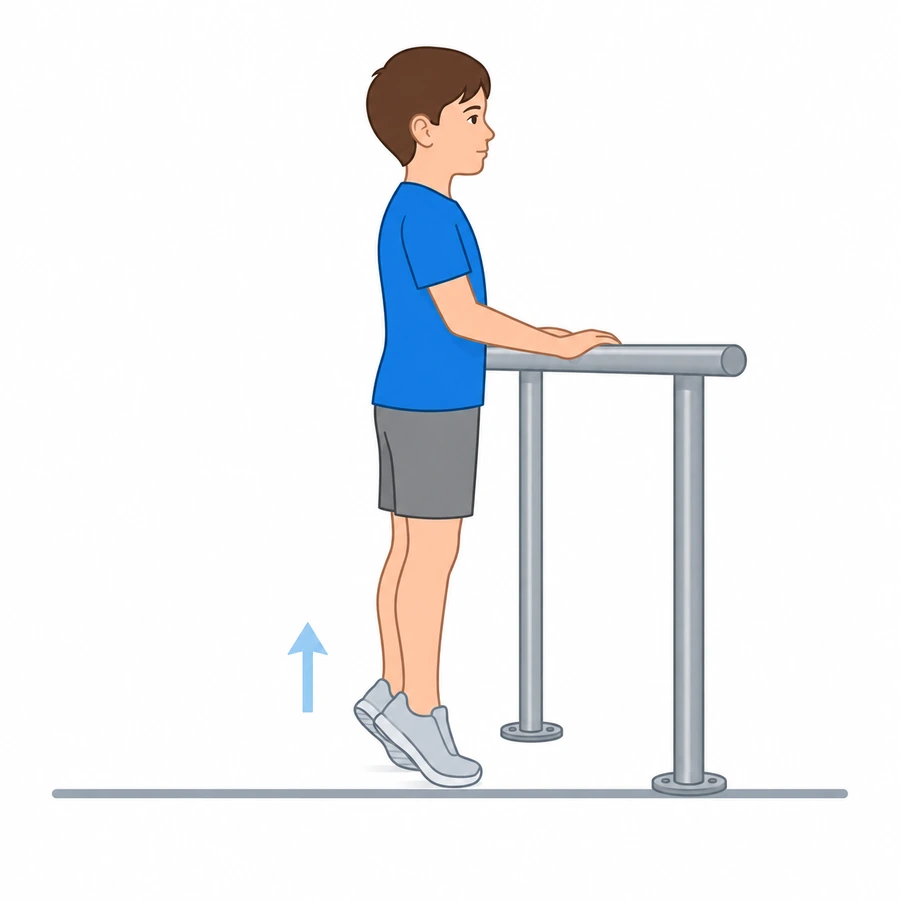
6.Progressive calf raises
PROGRESSIVE LOADING - Calf and ankle strengthening
After clearance for loading and strengthening, start with both feet on the floor and hands on a stable support. Raise the heels and lower slowly. Shifting more weight onto the affected side, single-leg work and step exercises are separate progressions to agree with the physiotherapist according to control, symptoms and next-day response.
Indicative starting dose: 2-3 sets of 10-15 in the selected variant, adapted individually. No automatic progression every 1-2 weeks.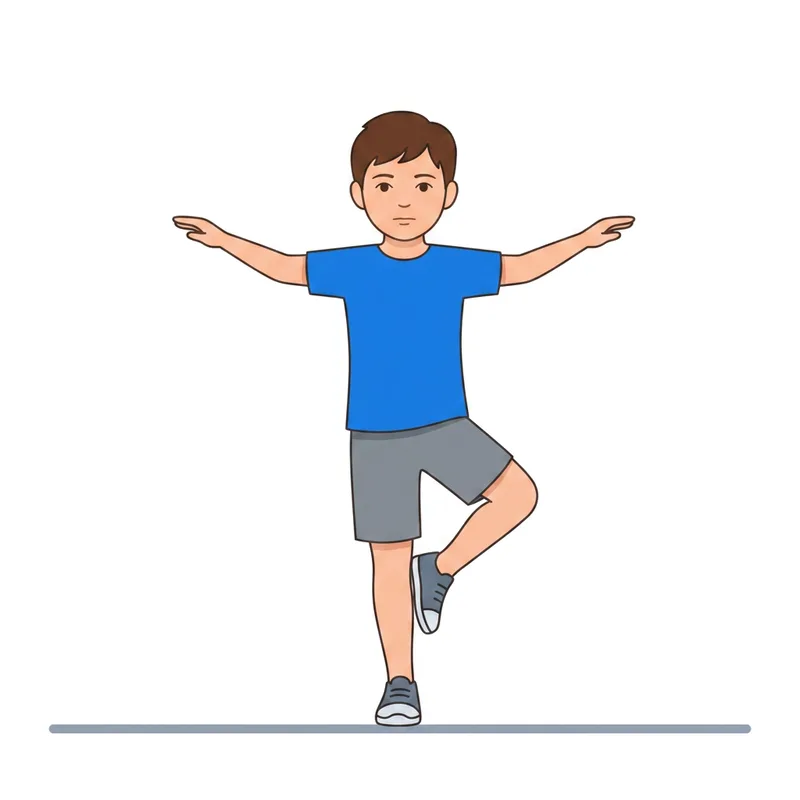
7.Proprioception (progressive balance)
WEIGHT BEARING - ESSENTIAL to prevent recurrence
After clearance for weight bearing, start on firm ground with eyes open, next to a secure support and with adult supervision. Place the other foot down before losing balance. Progress to an unstable surface or eyes-closed work only under direct professional supervision; do not add these challenges independently. Stop for pain or instability.
3 × 30 seconds per level, progressing gradually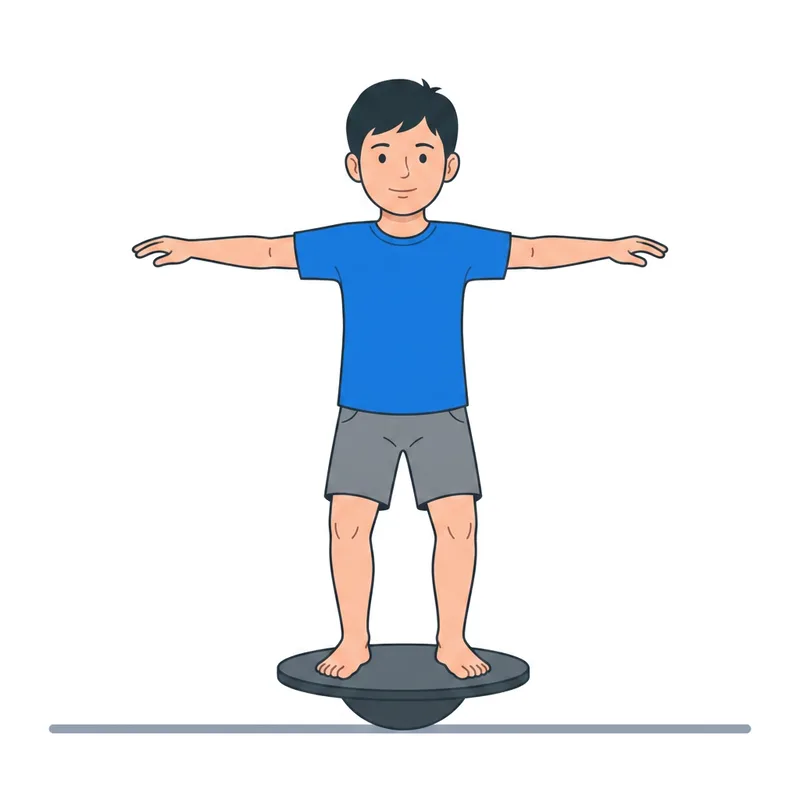
8.Balance board training (wobble board)
ADVANCED WEIGHT BEARING - Exercise for complete stability recovery
Only under direct physiotherapy supervision, after clearance and recovery of balance on firm ground. On the selected board, keep your eyes open and a stable hand support within reach. The professional chooses two-foot or single-leg work: do not add closed eyes or perturbations independently. At home, use the demonstrated firm-ground version.
Brief attempts with rests for the duration selected by the physiotherapist; stop before losing control.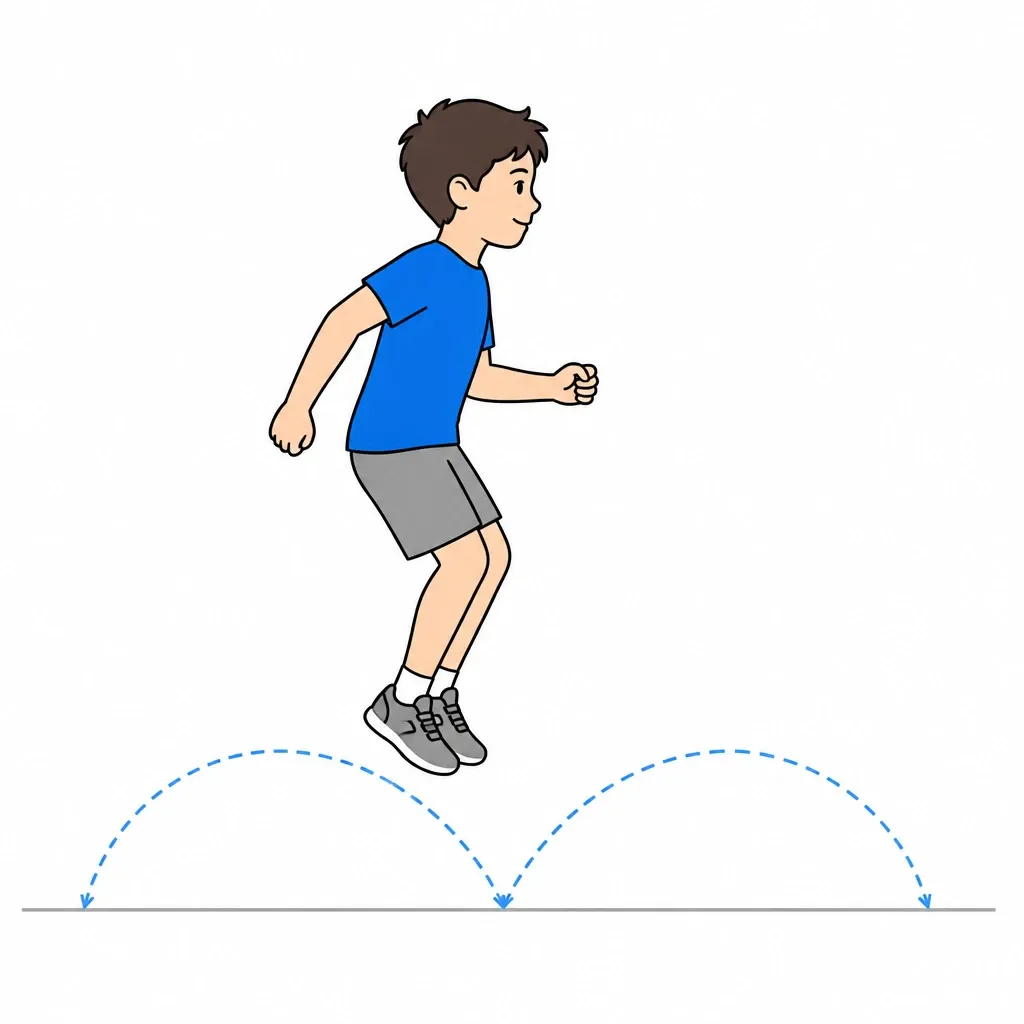
9.Light hopping and plyometrics
ADVANCED PHASE - Preparation for return to dynamic activities
Only after clearance for impact and demonstration by the physiotherapist. Start with small two-foot hops on a firm, even surface. Agree progressions to single-leg or sideways hopping, one challenge at a time. Stop for pain, giving way or loss of control; report swelling or worsening over the next 24 hours.
2-3 sets of 10-15 hops, progressing gradually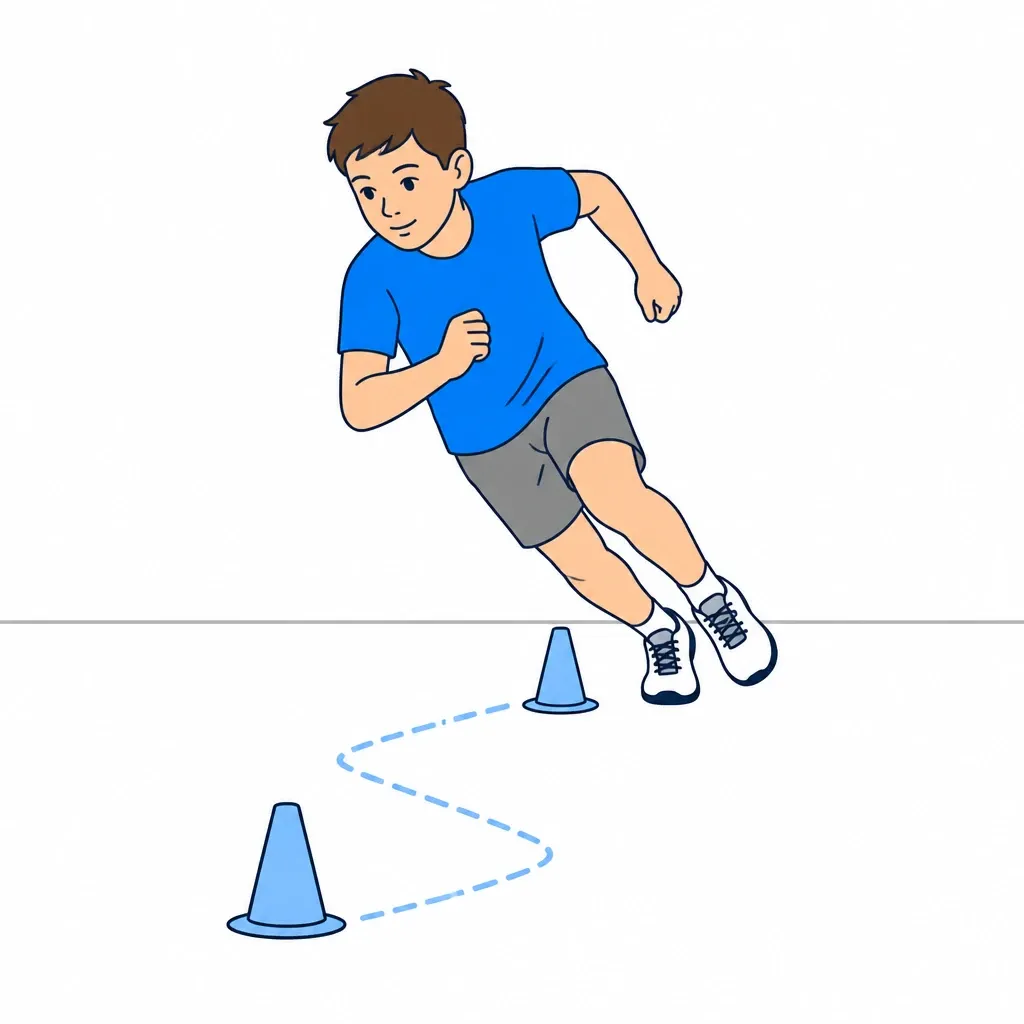
10.Running with direction changes
PRE-SPORT PHASE - Before return to sport
After assessment of running readiness and clearance: straight-line intervals, then wide curves and later sharper changes. Practise unanticipated reactions with the professional supervising the return. Completing the whole catalogue is unnecessary: use the exercises selected for the individual case. Pain, giving way or swelling after a session require reduced loading and discussion with the treating clinician.
Duration and intensity selected by the physiotherapist; monitor the response over the next 24 hours before increasing.11.Sport-specific exercises
FINAL PHASE - Last step before full return to sport
With the physiotherapist and coach, gradually resume the skills of the sport: for example dribbling and shooting in football, stopping in basketball, jumping and landing in volleyball. Increase volume, intensity and unpredictability according to the agreed plan. Competition requires tolerance of a full training session, confidence in the ankle and clinical clearance; also monitor pain and swelling over the next 24 hours.
Gradual plan to agree with specialist
RED FLAGS - When to stop and contact the doctor immediately
Stop the exercises immediately and contact the specialist (or go to the emergency department if severe) if any of the following occur:
- Acute or sudden pain during exercise
- Significant swelling after exercises
- Pain that progressively worsens over days
- Fever or general malaise
- Difficulty walking or using the limb after exercises
- Any neurological symptoms (tingling, numbness, sudden weakness)
- A red or hot joint, or inability to bear weight: seek prompt assessment; use emergency care if severe.
In case of doubt, always prefer a check-up over continuing the exercises.
Dott. Daniele Priano
Paediatric Orthopaedics - ASST Gaetano Pini-CTO
Content version: 21 September 2026
ortopediaevolutiva.com • Printed: 18/10/2026
 Full sheet and videos
https://ortopediaevolutiva.com/en/parents-kids/exercises/foot-ankle/ankle-sprain
Prepare the visit handout
Use the condition and phase indicated by your clinician. You can leave out individual exercises; instructions, illustrations and safety advice remain together.
Exclude exercises if needed
11 of 11 exercise cards included
The full web page remains available. Your selection is not saved or shared.
Before You Start
Who is this guide for?
Adolescents recovering from ankle sprain, after the acute phase. Proprioception exercises are key to preventing recurrence.
What you need
A stable, clear surface, comfortable clothing and a secure support. Check resistance-band anchors. Adult supervision; avoid marbles and small objects if the child may put them in their mouth, using a towel instead.
Suggested frequency
Perform only the exercises selected during the visit. The listed dosages are examples to adapt: follow the dose, frequency, rest and progression prescribed for age, symptoms and phase. Do not automatically perform the whole list.
Common mistakes to avoid
- •Forcing a painful or unauthorised movement
- •Increasing load, resistance or frequency without the agreed rest periods
- •Doing balance exercises without stable support or supervision
⚠️ Red flags — when to stop and contact the doctor immediately
Stop exercises immediately and contact the specialist if any of the following occur:
- Acute or sudden pain during exercise
- Significant swelling after exercises
- Pain that progressively worsens over days
- Fever or general malaise
- Difficulty walking or using the limb after exercises
- Any neurological symptoms (tingling, numbness, sudden weakness)
- A red or hot joint, or inability to bear weight: seek prompt assessment; use emergency care if severe.
Detailed Exercises
- 1
Early mobility (alphabet)
INITIAL NON-WEIGHT BEARING PHASE - Start as soon as acute pain allows
As soon as acute pain subsides (usually 2-3 days after injury): seated with raised foot, "write" alphabet letters with toe tip. This moves ankle in all directions without loading. Small controlled movements, never painful.
Complete alphabet, 2-3 times daily - 2
Active mobility (flexion/extension)
NON-WEIGHT BEARING - Recover ankle range of motion
Seated with leg extended. Actively move foot up (dorsiflexion) and down (plantarflexion) without forcing. Try to gradually increase range of motion. Add inversion/eversion movements (rotate foot in/out). All movements should be pain-free.
15-20 reps each direction, 3-4 times dailyAnkle up-and-down movement — OrtopediaEvolutiva exercises
Illustrated video with a synthetic voice and English text in the film. Press Play to load YouTube. Follow the instructions and precautions on this exercise sheet. Open on YouTube
Shows only ankle up-and-down movement without weight bearing. The guide’s inversion and eversion movements are not demonstrated. Use after the acute phase according to individual advice.
- 3
Band strengthening (4 directions)
NON-WEIGHT BEARING - Progressive strengthening seated, especially eversion
The figure shows the plantarflexion setup: the foot pushes against a band held towards the body. Dorsiflexion, inversion and eversion require different positions and anchors, taught by the physiotherapist.
Only in authorised directions and after demonstration: change the anchor to oppose each movement, rather than assist it. Dorsiflexion: forefoot towards the shin; plantarflexion: toes away from the shin; inversion: inner border rises; eversion: outer border rises. Do not force inversion after a lateral sprain. Use a light band with a secure anchor and control the return.
3 × 15 each direction. Emphasis on EVERSIONAnkle plantarflexion with a band
Press Play to load the video. Follow the instructions and precautions on this exercise sheet.
Shows only ankle plantarflexion against a band, with controlled return and a still leg. The other three directions require their own demonstration and anchor.
- 4
Peroneal strengthening (band eversion)
NON-WEIGHT BEARING - Key exercise to prevent recurrence
Seated, secure the band on the inner side relative to the affected foot so it pulls inward and resists outward movement. Wrap it around the forefoot. From neutral, move the outer border outward within the permitted range without turning the knee or hip, then return slowly. Ask the physiotherapist to demonstrate and check the anchor.
3 × 15-20 reps per foot - 5
Calf stretch (standing)
AUTHORISED WEIGHT BEARING — Recover mobility without forcing
Only after clearance for loading and stretching. Place your hands on a wall, the affected leg behind and heel down. Slowly move the pelvis forwards within a gentle stretch, first with the knee straight, then slightly bent if prescribed. Do not seek pain or increase movement to meet a deadline.
3 × 30 seconds per position, twice daily - 6
Progressive calf raises
PROGRESSIVE LOADING - Calf and ankle strengthening
After clearance for loading and strengthening, start with both feet on the floor and hands on a stable support. Raise the heels and lower slowly. Shifting more weight onto the affected side, single-leg work and step exercises are separate progressions to agree with the physiotherapist according to control, symptoms and next-day response.
Indicative starting dose: 2-3 sets of 10-15 in the selected variant, adapted individually. No automatic progression every 1-2 weeks. - 7
Proprioception (progressive balance)
WEIGHT BEARING - ESSENTIAL to prevent recurrence
After clearance for weight bearing, start on firm ground with eyes open, next to a secure support and with adult supervision. Place the other foot down before losing balance. Progress to an unstable surface or eyes-closed work only under direct professional supervision; do not add these challenges independently. Stop for pain or instability.
3 × 30 seconds per level, progressing gradually - 8
Balance board training (wobble board)
ADVANCED WEIGHT BEARING - Exercise for complete stability recovery
Only under direct physiotherapy supervision, after clearance and recovery of balance on firm ground. On the selected board, keep your eyes open and a stable hand support within reach. The professional chooses two-foot or single-leg work: do not add closed eyes or perturbations independently. At home, use the demonstrated firm-ground version.
Brief attempts with rests for the duration selected by the physiotherapist; stop before losing control. - 9
Light hopping and plyometrics
ADVANCED PHASE - Preparation for return to dynamic activities
Only after clearance for impact and demonstration by the physiotherapist. Start with small two-foot hops on a firm, even surface. Agree progressions to single-leg or sideways hopping, one challenge at a time. Stop for pain, giving way or loss of control; report swelling or worsening over the next 24 hours.
2-3 sets of 10-15 hops, progressing graduallySmall two-foot hop
Press Play to load the video. Follow the instructions and precautions on this exercise sheet.
One small two-foot hop only, after impact clearance and demonstration by the physiotherapist. Single-leg or lateral progressions are not demonstrated.
- 10
Running with direction changes
PRE-SPORT PHASE - Before return to sport
After assessment of running readiness and clearance: straight-line intervals, then wide curves and later sharper changes. Practise unanticipated reactions with the professional supervising the return. Completing the whole catalogue is unnecessary: use the exercises selected for the individual case. Pain, giving way or swelling after a session require reduced loading and discussion with the treating clinician.
Duration and intensity selected by the physiotherapist; monitor the response over the next 24 hours before increasing. - 11
Sport-specific exercises
FINAL PHASE - Last step before full return to sport
With the physiotherapist and coach, gradually resume the skills of the sport: for example dribbling and shooting in football, stopping in basketball, jumping and landing in volleyball. Increase volume, intensity and unpredictability according to the agreed plan. Competition requires tolerance of a full training session, confidence in the ankle and clinical clearance; also monitor pain and swelling over the next 24 hours.
Gradual plan to agree with specialistControlled football kick
Press Play to load the video. Follow the instructions and precautions on this exercise sheet.
One illustrative demonstration of a controlled football kick, only if authorised and according to the plan agreed with the treating team. Covers the kick only: it does not demonstrate the complete return-to-sport programme or establish clearance, an individual dose or progression.
Frequently Asked Questions
When can I return to sports after an ankle sprain?
Recovery often takes several weeks, sometimes longer in severe sprains. The calendar alone is insufficient: the clinician and physiotherapist assess pain during activity and over the preceding 24 hours, mobility, strength, balance, ankle confidence and tolerance of a full training session. Fractures, syndesmotic injuries and osteochondral lesions follow separate pathways.
How to prevent ankle sprain recurrence?
A programme of balance and movement control, ankle strengthening and graded return to sport can help. Start on firm ground at home; unstable surfaces and complex variants require professional supervision. Agree bracing or taping and its duration according to severity, previous sprains and sport.
Is an X-ray needed after an ankle sprain?
The clinician decides after examination. The Ottawa rules help in children who can communicate clearly and walked normally before injury: weight-bearing ability and tenderness at specific bony sites are assessed, including the malleoli, navicular and base of the fifth metatarsal. They are not a home test. Persistent pain or difficulty bearing weight require reassessment even after normal initial X-rays.