Paediatric Orthopaedic Specialist
Hyperlordosis / postural habits
Home Exercise Program
Not every exercise listed here is suitable for every child: the selection is individual and is defined during the consultation.
For whom: Adolescents with lumbar hyperlordosis. Exercises aim to rebalance musculature and improve posture.
Dose and frequency: Perform only the exercises selected during the visit. The listed dosages are examples to adapt: follow the dose, frequency, rest and progression prescribed for age, symptoms and phase. Do not automatically perform the whole list.
Equipment and supervision: A stable, clear surface, comfortable clothing and a secure support. Check resistance-band anchors. Adult supervision; avoid marbles and small objects if the child may put them in their mouth, using a towel instead.
Avoid: Forcing a painful or unauthorised movement; Increasing load, resistance or frequency without the agreed rest periods; Doing balance exercises without stable support or supervision.
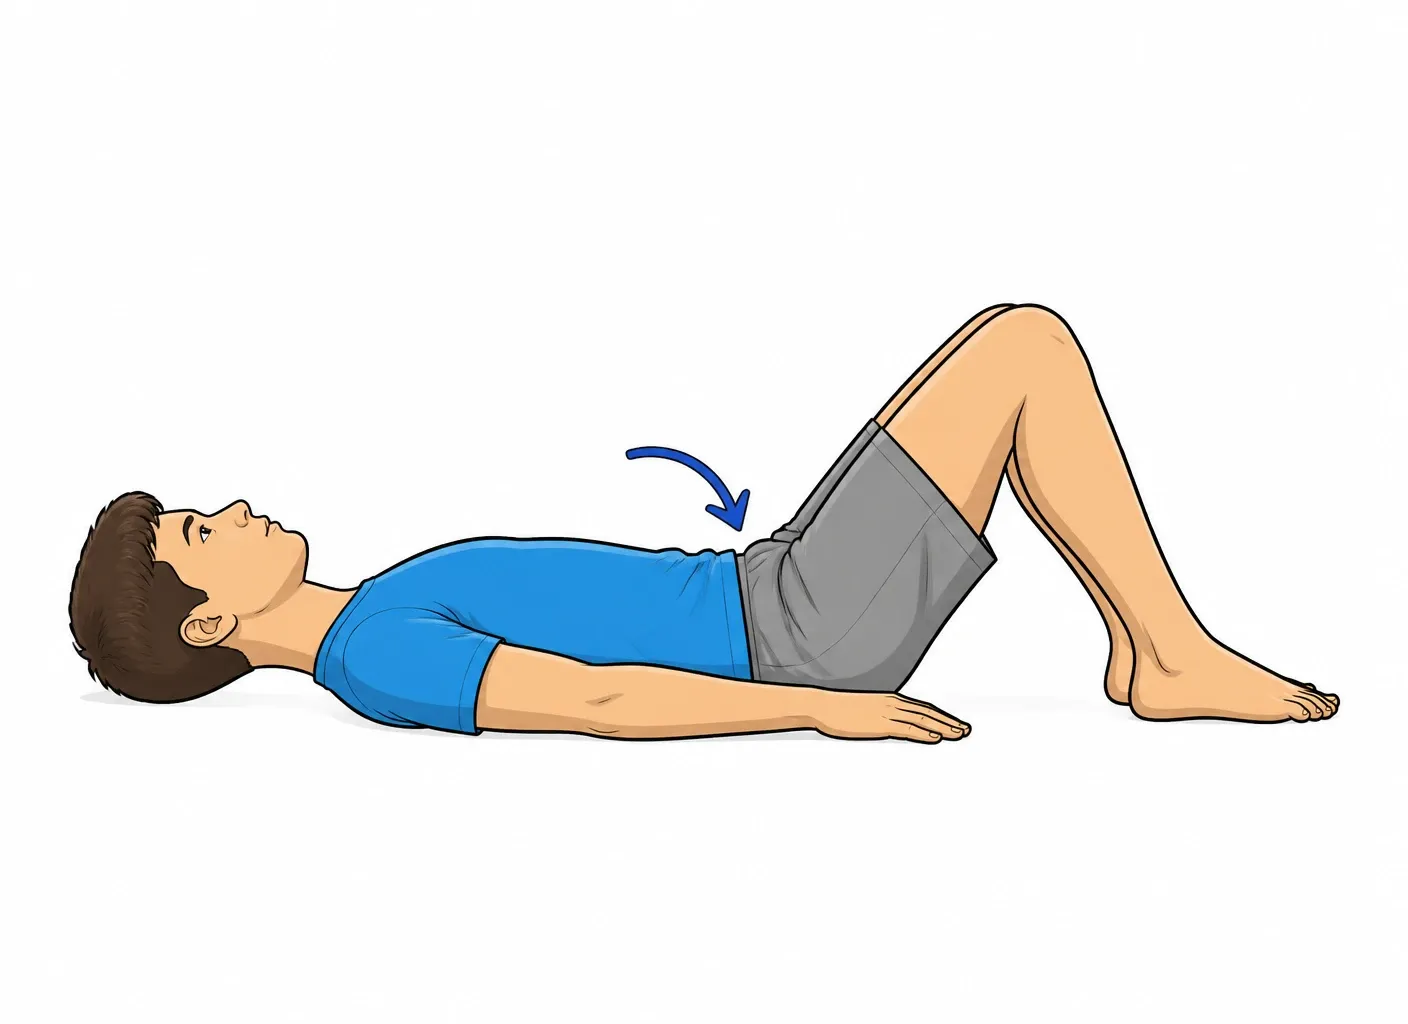
1.Posterior pelvic tilt
The basic movement to learn control of the lumbar curve
Supine with knees bent and feet flat. Rotate the pelvis backward flattening the lower back into the floor, as if "squashing" a hand placed underneath. Hold 5 seconds while breathing, then release. The movement comes from the abdominals and glutes, not the legs.
3 × 10 reps with a 5-second hold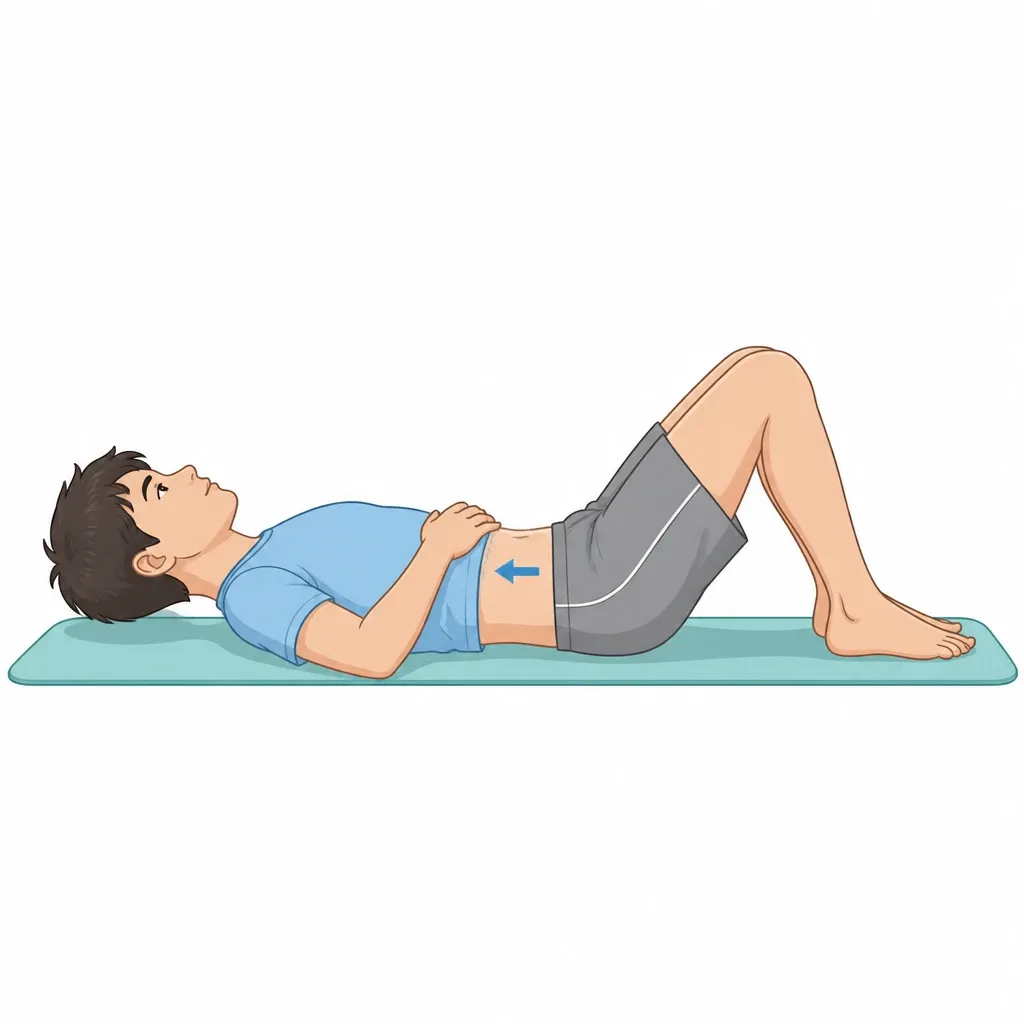
2.Transversus abdominis activation
Abdominal-control and breathing exercise.
Supine with knees bent, hands resting just above the iliac crests. SLOWLY draw the navel toward the spine, as if tightening an internal belt, without holding the breath and without pushing the belly out. The superficial abdominals stay soft: the tension should be deep and light.
3 × 10 reps with a 10-second hold, daily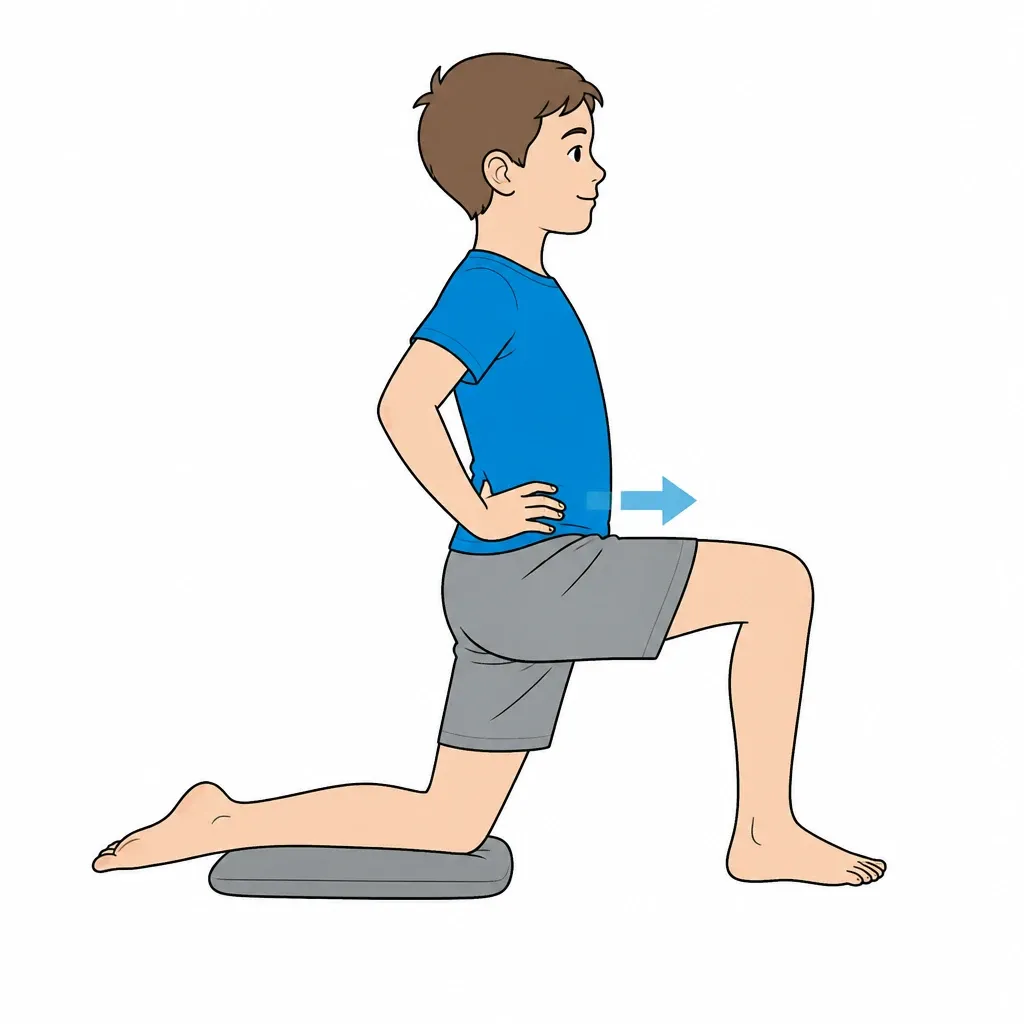
3.Hip flexor (iliopsoas) stretch
Short hip flexors increase anterior pelvic tilt
Lunge with the back knee on a cushion. First SQUEEZE the glute of the back leg (this "locks" the pelvis in posterior tilt), then push the hips forward. Keep the back straight: if it arches, the stretch goes to the spine instead of the flexors.
3 × 30 seconds each side, twice daily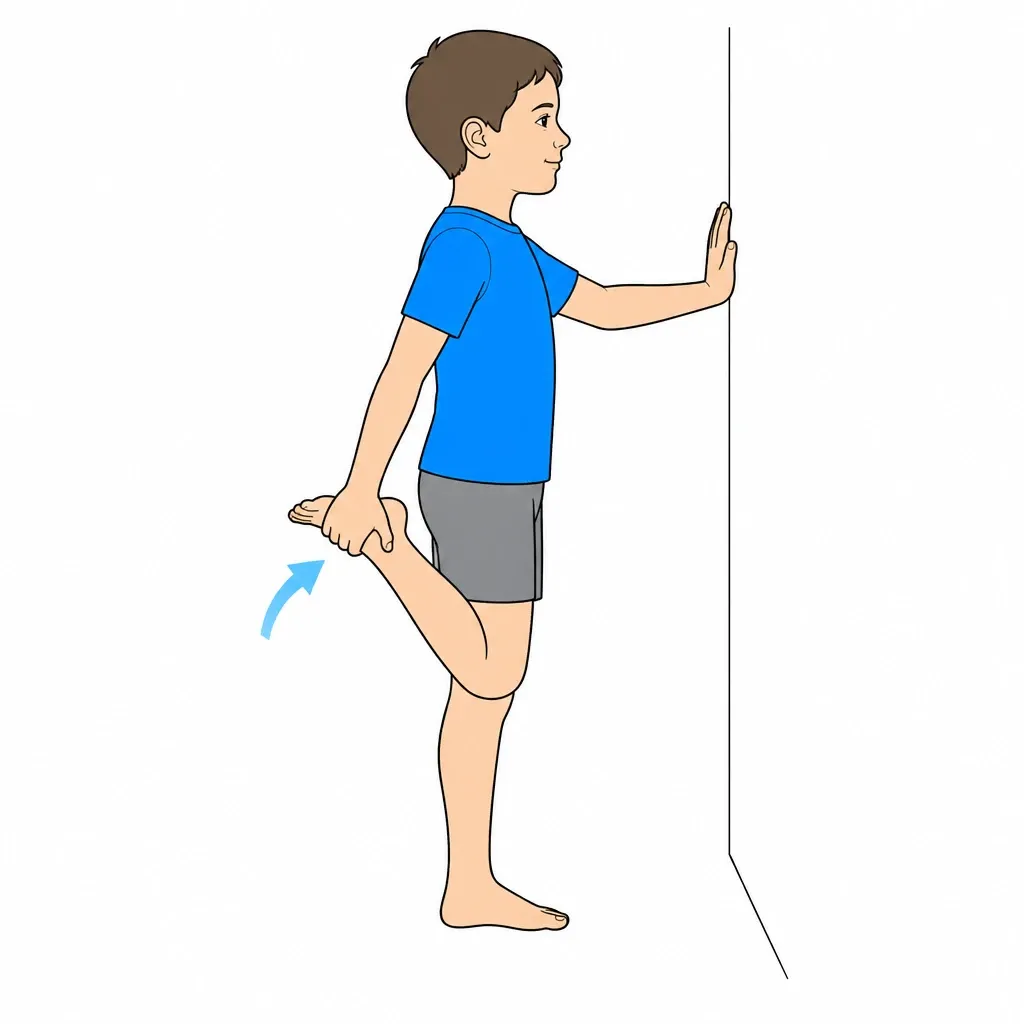
4.Quadriceps stretch
The rectus femoris pulls the pelvis forward
Standing with support on a wall, grasp the ankle and bring the heel toward the buttock. Keep the knees together and the pelvis in posterior tilt (glute engaged): without this the back arches and the stretch is lost. Tension on the front of the thigh, never pain.
3 × 30 seconds each side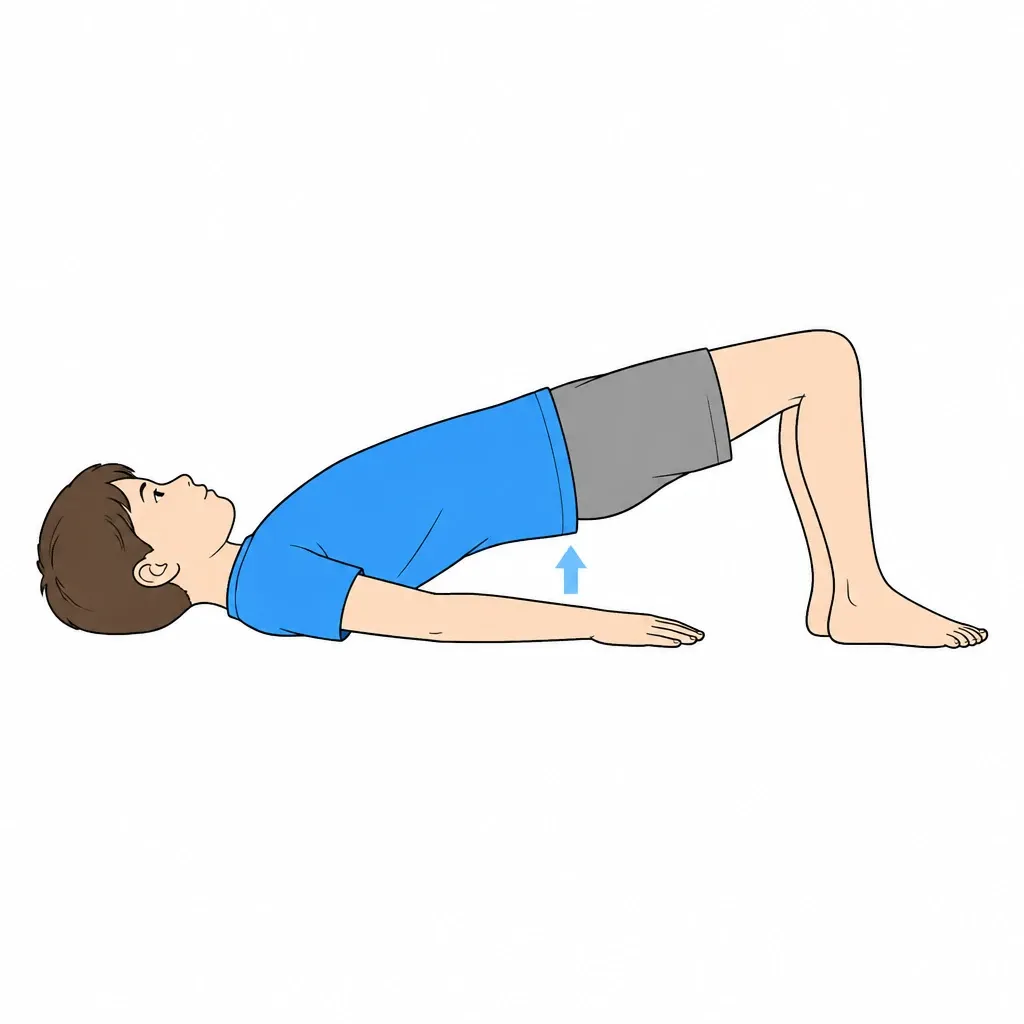
5.Glute bridge with posterior tilt
Strengthens the glutes, antagonists of hyperlordosis
Supine with knees bent. FIRST flatten the back to the floor in posterior tilt, THEN lift the pelvis squeezing the glutes until shoulders-hips-knees are aligned. Do not go higher by arching the back: the movement ends when the push comes from the lumbar area.
3 × 15 reps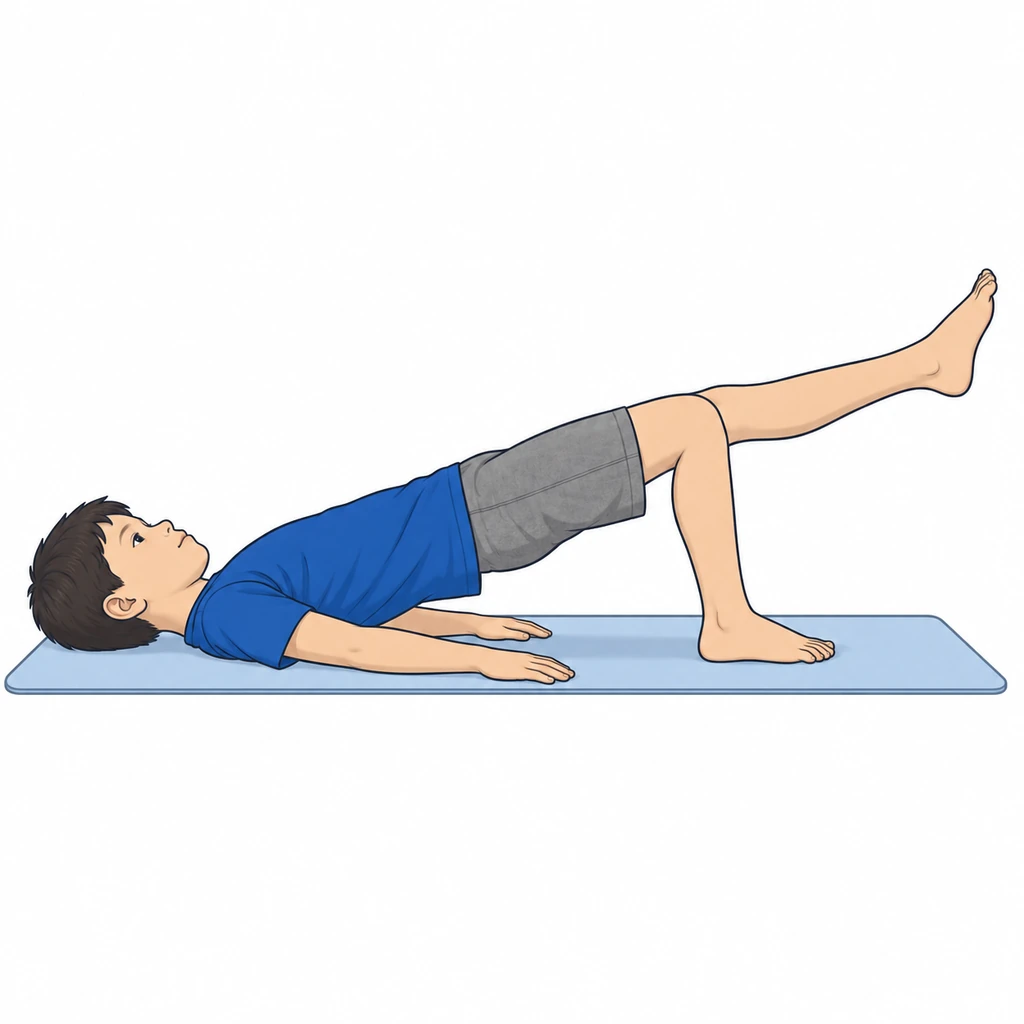
6.Single-leg glute bridge
Strength progression for the gluteus maximus
From the bridge position, extend one leg keeping the thighs parallel. Lift the pelvis pushing through the heel of the supporting leg, without letting the free side drop and without arching the back. Lower slowly over 3 seconds.
3 × 8-12 reps each side, 3 times per week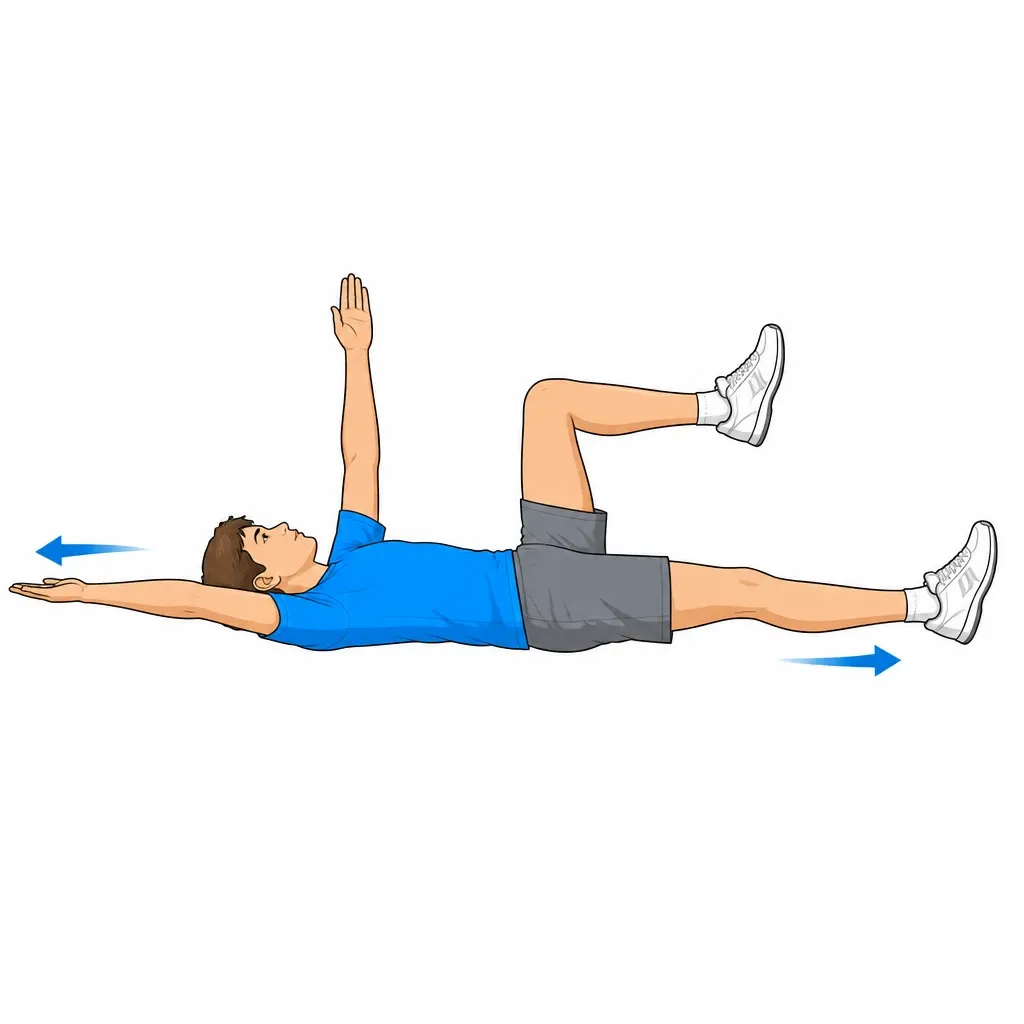
7.Dead bug
Deep abdominals with the lower back protected
Supine, arms toward the ceiling and knees bent 90°. Slowly extend one leg and the opposite arm keeping the lower back ALWAYS in contact with the floor. If the back lifts, reduce the range: that is the sign control has been lost.
3 × 10 reps each side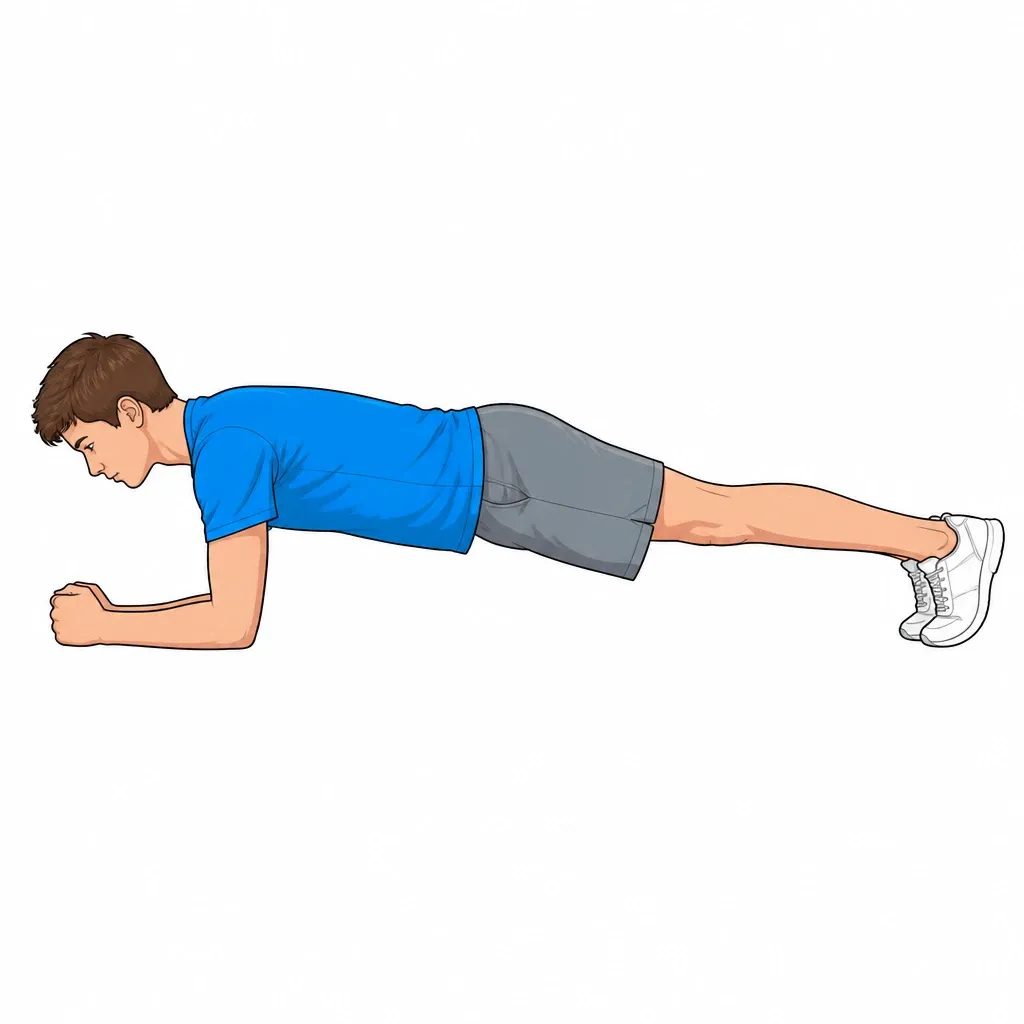
8.Front plank
Abdominal girdle endurance in a neutral position
Prone on forearms, elbows under the shoulders, body in line from head to heels. Engage the abdominals and tilt the pelvis slightly posteriorly to avoid lumbar arching. Start with knees on the floor and progress when 30 seconds feel easy.
3 × 20-40 seconds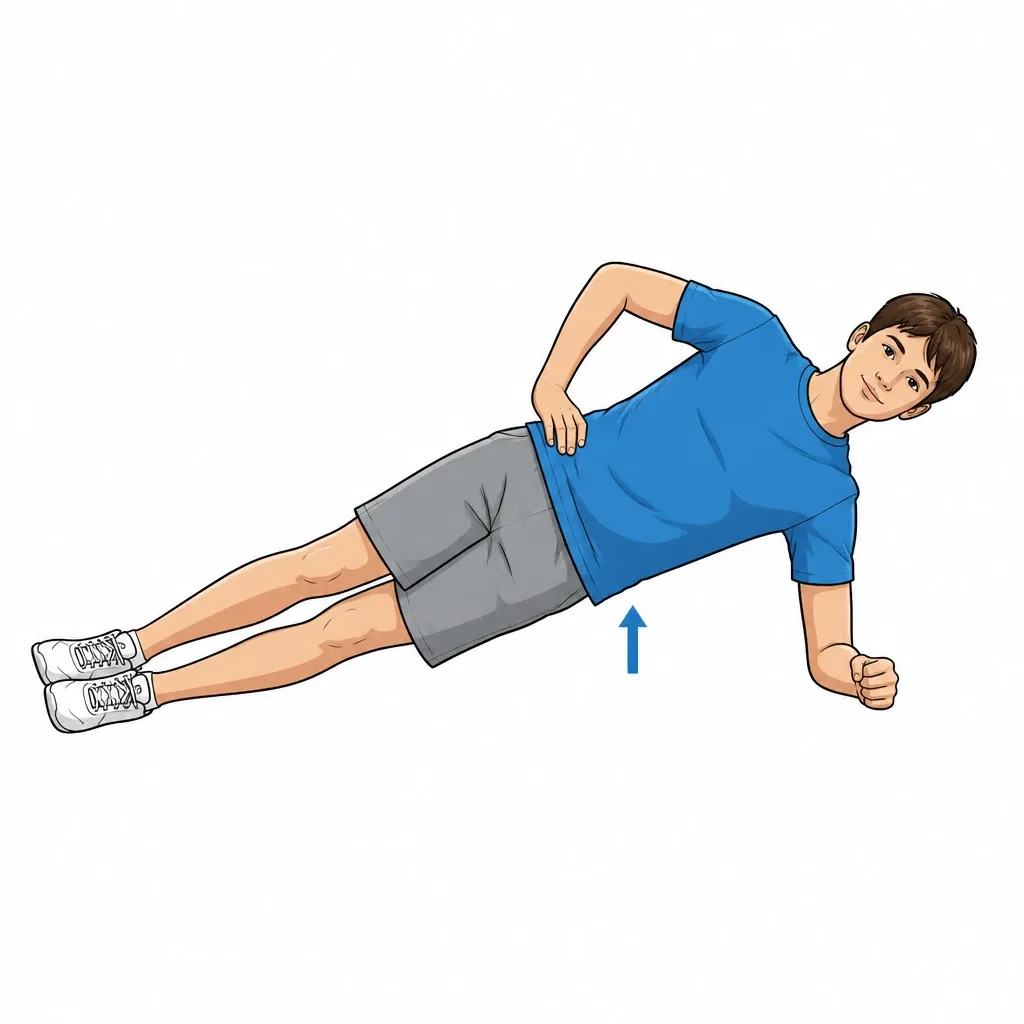
9.Side plank
Strengthening of the obliques and quadratus lumborum
On one side, supported on the forearm with the elbow under the shoulder. Lift the pelvis until ankles, hips and shoulders are aligned. Easier version with the knees bent on the floor. Do not let the pelvis drop or the trunk rotate forward.
3 × 15-30 seconds each side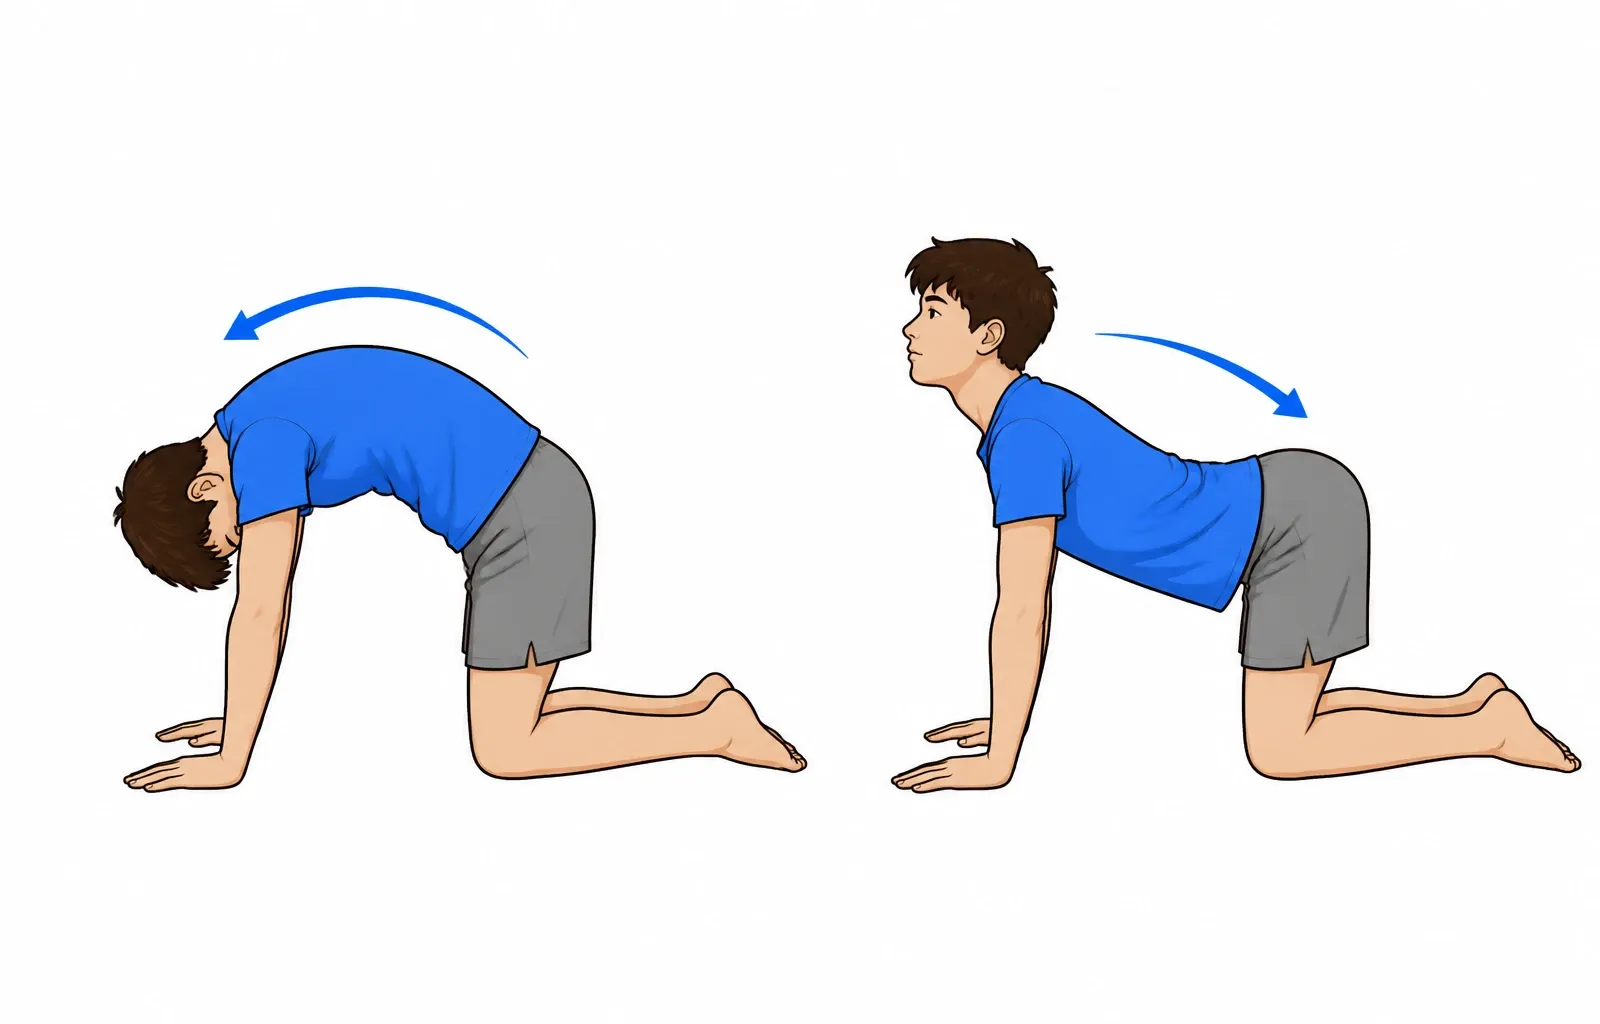
10.Thoracic mobility (cat-cow and rotations)
A stiff thoracic spine is compensated with lumbar hyperlordosis
CAT-COW: on all fours alternate arching and extending with slow movements following the breath. ROTATIONS: seated, arms crossed on the chest, rotate the torso looking behind, alternating sides, keeping the pelvis still.
2 × 10 reps each direction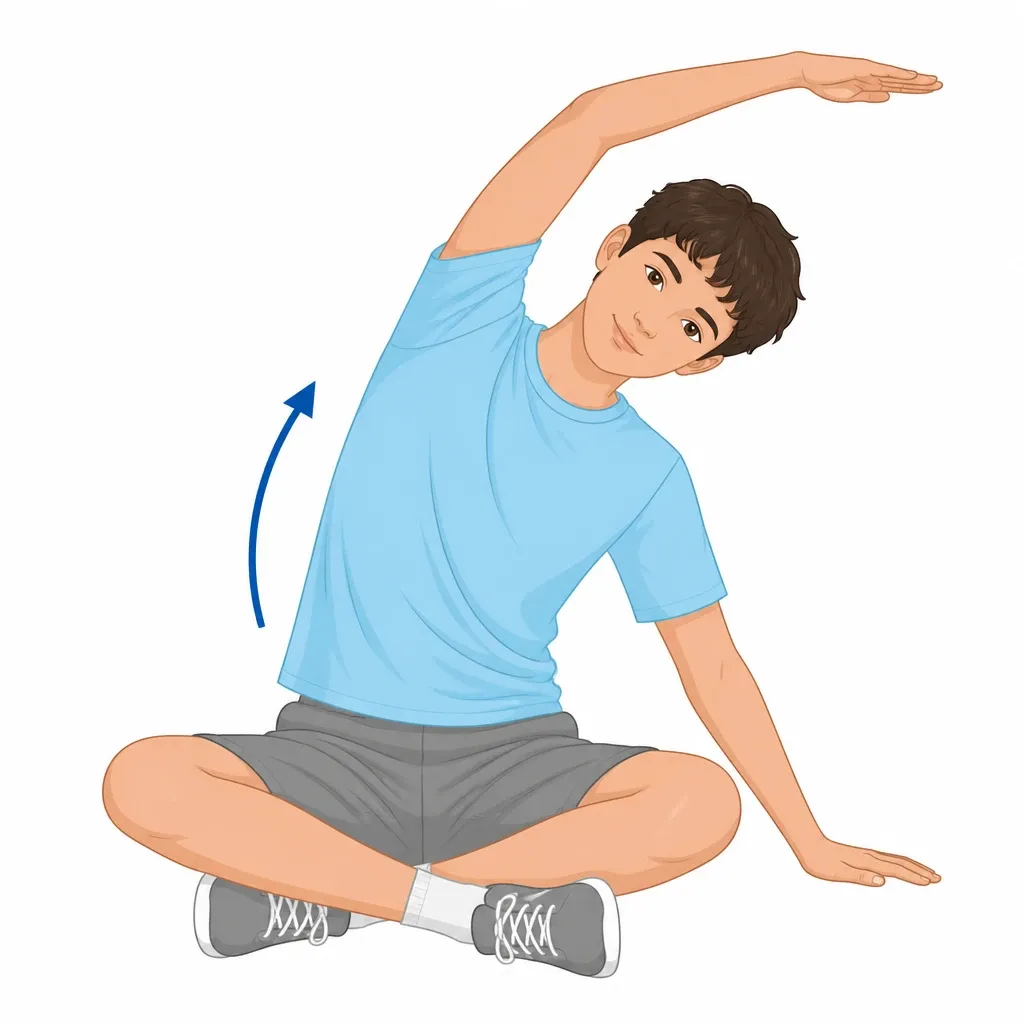
11.Quadratus lumborum stretch
Releases the lateral muscles that maintain the lordosis
Seated cross-legged, one hand resting on the floor to the side. Reach the opposite arm overhead and bend sideways lengthening the whole flank, without rotating the trunk and keeping the pelvis grounded. Breathe slowly during the stretch.
3 × 20-30 seconds each side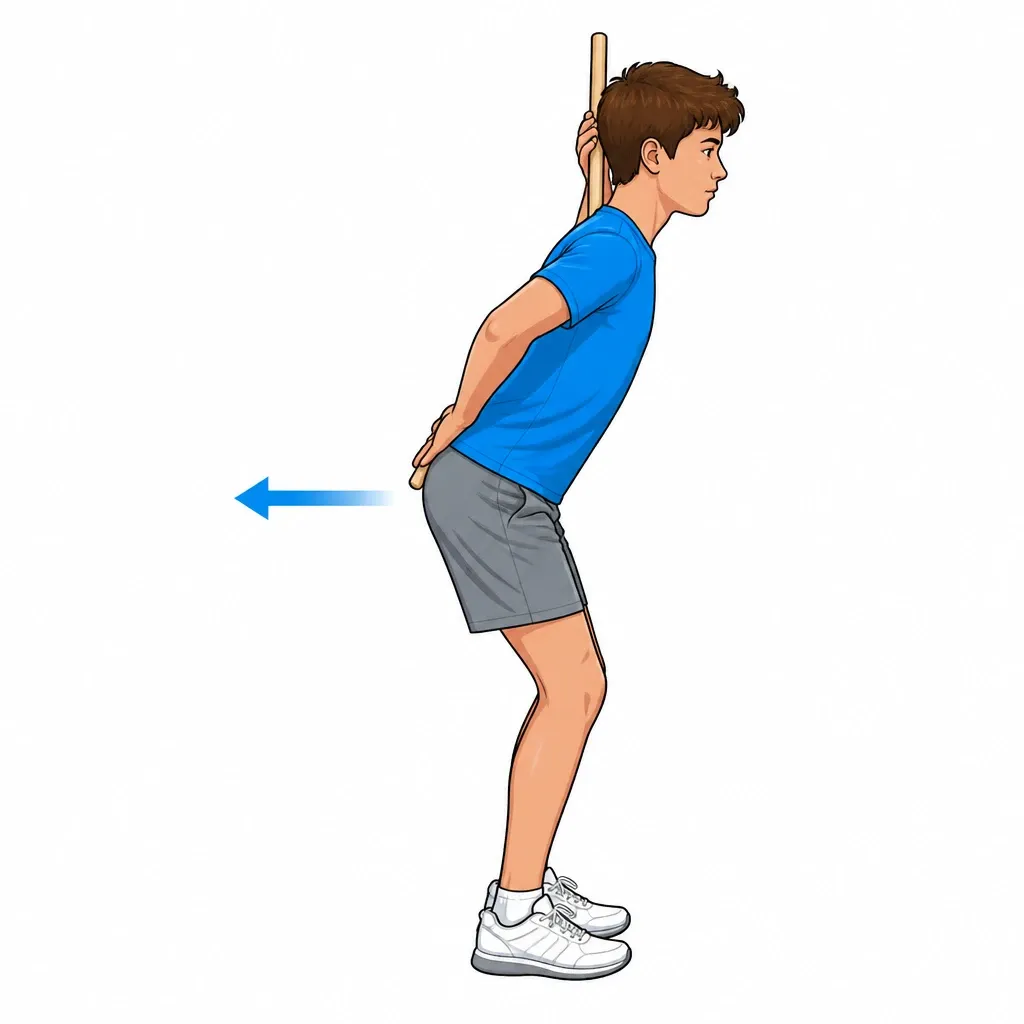
12.Hip hinge with a stick
Learning to bend from the hips, not the back
Standing with a stick along the back: it must touch the back of the head, the upper back and the sacrum. Bend forward pushing the bottom back with knees slightly bent, keeping contact at all 3 points. Come up by driving through the glutes.
3 × 10-15 reps focusing on technique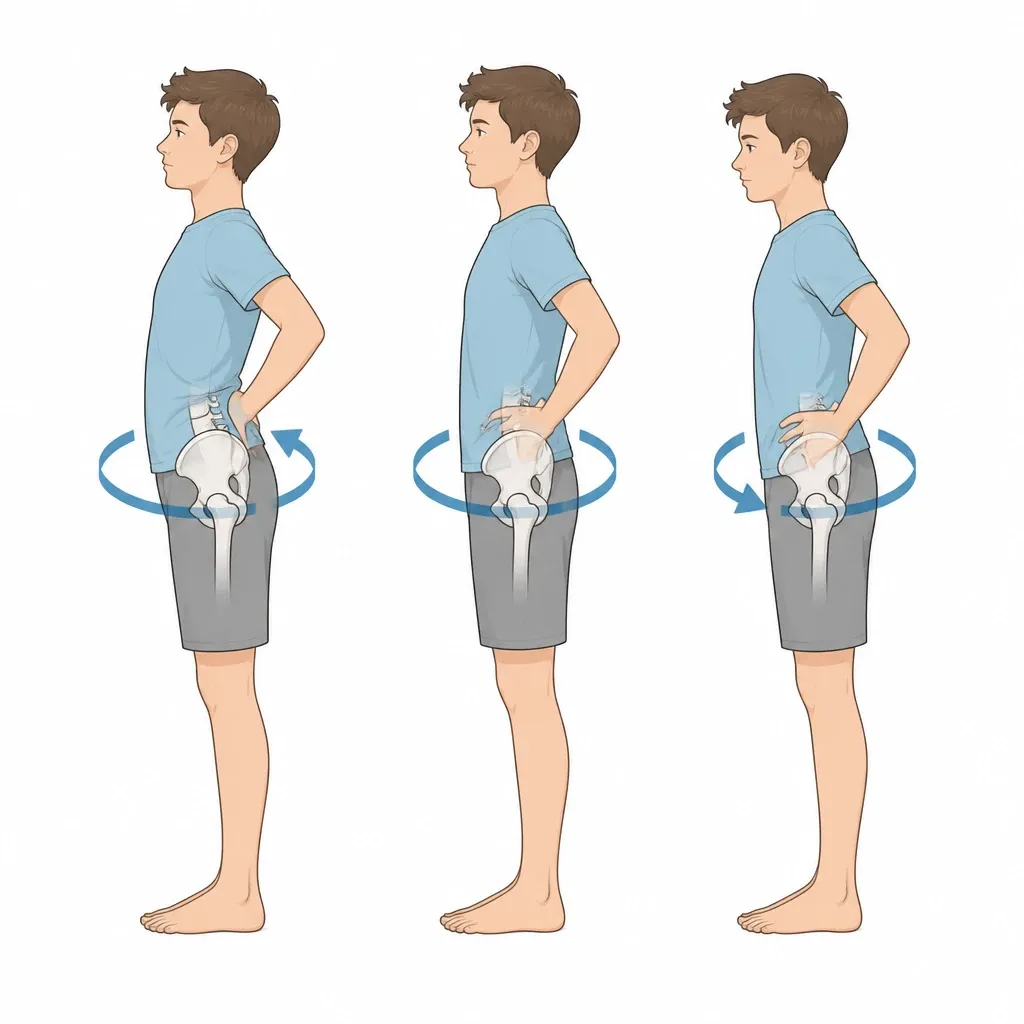
13.Standing pelvic clock (finding neutral)
Explores pelvic control; neutral is not necessarily the geometric midpoint between two extremes.
Standing near a support, explore small forwards and backwards pelvic movements without seeking end range or provoking pain. Find the comfortable, controlled position taught by the physiotherapist and breathe normally. Neutral is not necessarily halfway between two extremes and need not be held rigidly throughout the day.
10 full ranges + 5 holds of 10 seconds, daily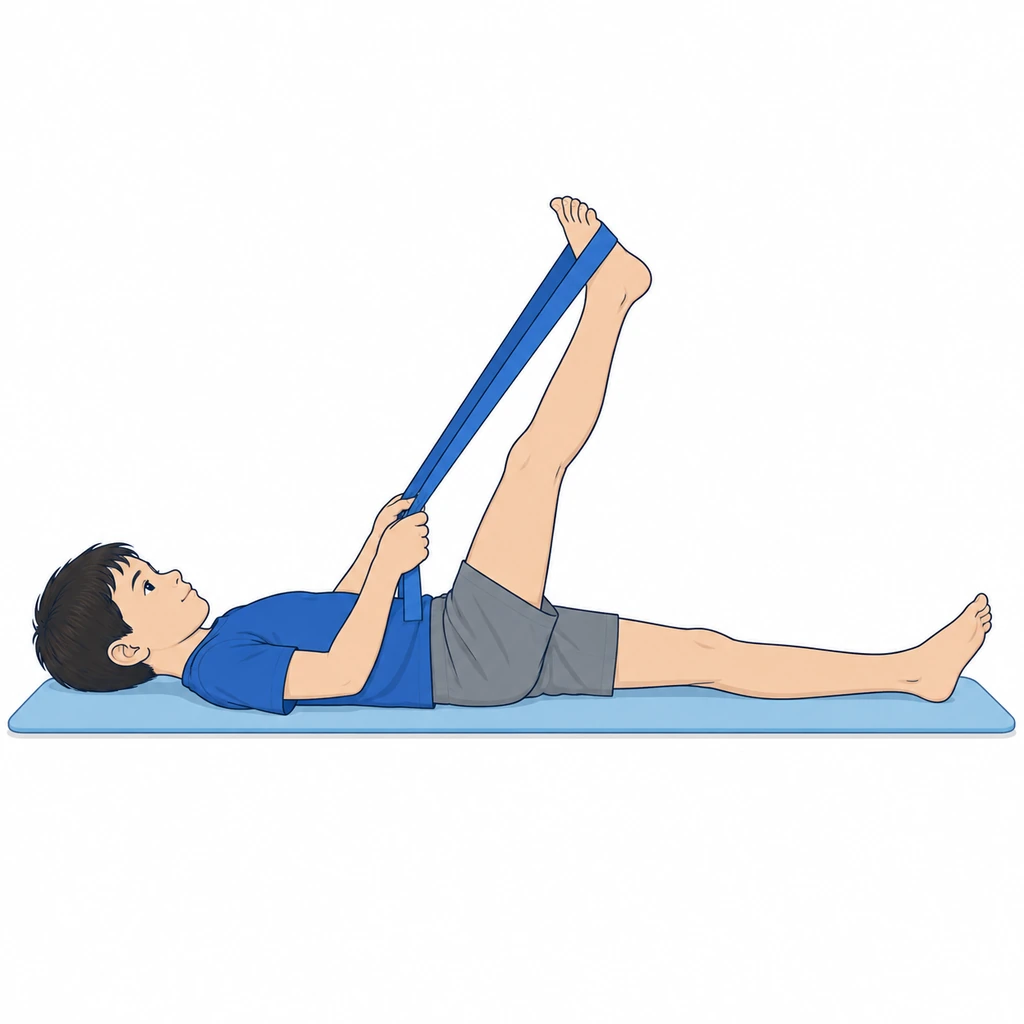
14.Hamstring stretching
Restores posterior flexibility useful for the hip hinge
Supine, one leg extended on the floor and the other lifted with a strap or towel around the foot. Straighten the raised knee until tension is felt behind the thigh, keeping the lower back down and without lifting the pelvis.
3 × 30 seconds each side, daily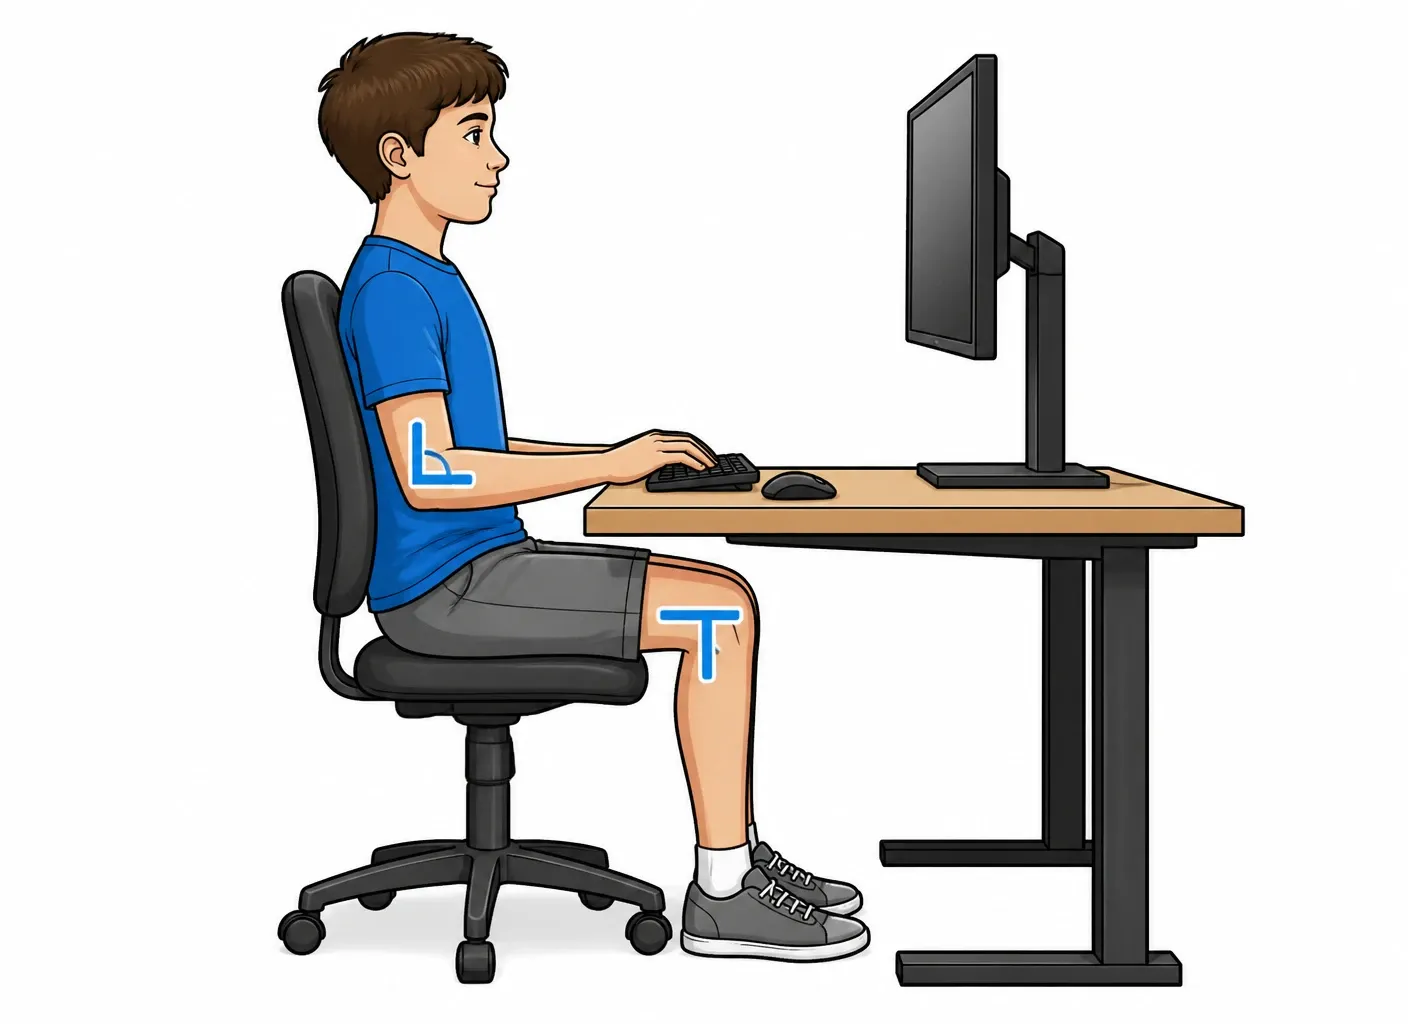
15.Daily posture and active breaks
The correct habit repeated matters more than a single set of exercises
At the desk: backrest supporting the back, feet flat, elbows and knees at 90°. Standing for long periods: alternate resting one foot on a step to reduce lordosis. Active breaks every 20-30 minutes with a few standing pelvic tilts.
Every day, breaks every 20-30 minutes
RED FLAGS - When to stop and contact the doctor immediately
Stop the exercises immediately and contact the specialist (or go to the emergency department if severe) if any of the following occur:
- Acute or sudden pain during exercise
- Significant swelling after exercises
- Pain that progressively worsens over days
- Fever or general malaise
- Difficulty walking or using the limb after exercises
- Any neurological symptoms (tingling, numbness, sudden weakness)
- A red or hot joint, or inability to bear weight: seek prompt assessment; use emergency care if severe.
In case of doubt, always prefer a check-up over continuing the exercises.
Dott. Daniele Priano
Paediatric Orthopaedics - ASST Gaetano Pini-CTO
Content version: 21 September 2026
ortopediaevolutiva.com • Printed: 18/10/2026
 Full sheet and videos
https://ortopediaevolutiva.com/en/parents-kids/exercises/spine-posture/hyperlordosis
Prepare the visit handout
Use the condition and phase indicated by your clinician. You can leave out individual exercises; instructions, illustrations and safety advice remain together.
Exclude exercises if needed
15 of 15 exercise cards included
The full web page remains available. Your selection is not saved or shared.
Before You Start
Who is this guide for?
Adolescents with lumbar hyperlordosis. Exercises aim to rebalance musculature and improve posture.
What you need
A stable, clear surface, comfortable clothing and a secure support. Check resistance-band anchors. Adult supervision; avoid marbles and small objects if the child may put them in their mouth, using a towel instead.
Suggested frequency
Perform only the exercises selected during the visit. The listed dosages are examples to adapt: follow the dose, frequency, rest and progression prescribed for age, symptoms and phase. Do not automatically perform the whole list.
Common mistakes to avoid
- •Forcing a painful or unauthorised movement
- •Increasing load, resistance or frequency without the agreed rest periods
- •Doing balance exercises without stable support or supervision
⚠️ Red flags — when to stop and contact the doctor immediately
Stop exercises immediately and contact the specialist if any of the following occur:
- Acute or sudden pain during exercise
- Significant swelling after exercises
- Pain that progressively worsens over days
- Fever or general malaise
- Difficulty walking or using the limb after exercises
- Any neurological symptoms (tingling, numbness, sudden weakness)
- A red or hot joint, or inability to bear weight: seek prompt assessment; use emergency care if severe.
Detailed Exercises
- 1
Posterior pelvic tilt
The basic movement to learn control of the lumbar curve
Supine with knees bent and feet flat. Rotate the pelvis backward flattening the lower back into the floor, as if "squashing" a hand placed underneath. Hold 5 seconds while breathing, then release. The movement comes from the abdominals and glutes, not the legs.
3 × 10 reps with a 5-second hold - 2
Transversus abdominis activation
Abdominal-control and breathing exercise.
Supine with knees bent, hands resting just above the iliac crests. SLOWLY draw the navel toward the spine, as if tightening an internal belt, without holding the breath and without pushing the belly out. The superficial abdominals stay soft: the tension should be deep and light.
3 × 10 reps with a 10-second hold, daily - 3
Hip flexor (iliopsoas) stretch
Short hip flexors increase anterior pelvic tilt
Lunge with the back knee on a cushion. First SQUEEZE the glute of the back leg (this "locks" the pelvis in posterior tilt), then push the hips forward. Keep the back straight: if it arches, the stretch goes to the spine instead of the flexors.
3 × 30 seconds each side, twice daily - 4
Quadriceps stretch
The rectus femoris pulls the pelvis forward
Standing with support on a wall, grasp the ankle and bring the heel toward the buttock. Keep the knees together and the pelvis in posterior tilt (glute engaged): without this the back arches and the stretch is lost. Tension on the front of the thigh, never pain.
3 × 30 seconds each side - 5
Glute bridge with posterior tilt
Strengthens the glutes, antagonists of hyperlordosis
Supine with knees bent. FIRST flatten the back to the floor in posterior tilt, THEN lift the pelvis squeezing the glutes until shoulders-hips-knees are aligned. Do not go higher by arching the back: the movement ends when the push comes from the lumbar area.
3 × 15 reps - 6
Single-leg glute bridge
Strength progression for the gluteus maximus
From the bridge position, extend one leg keeping the thighs parallel. Lift the pelvis pushing through the heel of the supporting leg, without letting the free side drop and without arching the back. Lower slowly over 3 seconds.
3 × 8-12 reps each side, 3 times per week - 7
Dead bug
Deep abdominals with the lower back protected
Supine, arms toward the ceiling and knees bent 90°. Slowly extend one leg and the opposite arm keeping the lower back ALWAYS in contact with the floor. If the back lifts, reduce the range: that is the sign control has been lost.
3 × 10 reps each side - 8
Front plank
Abdominal girdle endurance in a neutral position
Prone on forearms, elbows under the shoulders, body in line from head to heels. Engage the abdominals and tilt the pelvis slightly posteriorly to avoid lumbar arching. Start with knees on the floor and progress when 30 seconds feel easy.
3 × 20-40 seconds - 9
Side plank
Strengthening of the obliques and quadratus lumborum
On one side, supported on the forearm with the elbow under the shoulder. Lift the pelvis until ankles, hips and shoulders are aligned. Easier version with the knees bent on the floor. Do not let the pelvis drop or the trunk rotate forward.
3 × 15-30 seconds each side - 10
Thoracic mobility (cat-cow and rotations)
A stiff thoracic spine is compensated with lumbar hyperlordosis
CAT-COW: on all fours alternate arching and extending with slow movements following the breath. ROTATIONS: seated, arms crossed on the chest, rotate the torso looking behind, alternating sides, keeping the pelvis still.
2 × 10 reps each direction - 11
Quadratus lumborum stretch
Releases the lateral muscles that maintain the lordosis
Seated cross-legged, one hand resting on the floor to the side. Reach the opposite arm overhead and bend sideways lengthening the whole flank, without rotating the trunk and keeping the pelvis grounded. Breathe slowly during the stretch.
3 × 20-30 seconds each sideSeated side stretch
Press Play to load the video. Follow the instructions and precautions on this exercise sheet.
Brief demonstration of the approved movement; follow the individual dose and limits in the exercise sheet. The video does not replace the full programme.
- 12
Hip hinge with a stick
Learning to bend from the hips, not the back
Standing with a stick along the back: it must touch the back of the head, the upper back and the sacrum. Bend forward pushing the bottom back with knees slightly bent, keeping contact at all 3 points. Come up by driving through the glutes.
3 × 10-15 reps focusing on technique - 13
Standing pelvic clock (finding neutral)
Explores pelvic control; neutral is not necessarily the geometric midpoint between two extremes.
Standing near a support, explore small forwards and backwards pelvic movements without seeking end range or provoking pain. Find the comfortable, controlled position taught by the physiotherapist and breathe normally. Neutral is not necessarily halfway between two extremes and need not be held rigidly throughout the day.
10 full ranges + 5 holds of 10 seconds, daily - 14
Hamstring stretching
Restores posterior flexibility useful for the hip hinge
Supine, one leg extended on the floor and the other lifted with a strap or towel around the foot. Straighten the raised knee until tension is felt behind the thigh, keeping the lower back down and without lifting the pelvis.
3 × 30 seconds each side, dailyHamstring stretch with a strap
Press Play to load the video. Follow the instructions and precautions on this exercise sheet.
Brief demonstration of the approved movement; follow the individual dose and limits in the exercise sheet. The video does not replace the full programme.
- 15
Daily posture and active breaks
The correct habit repeated matters more than a single set of exercises
At the desk: backrest supporting the back, feet flat, elbows and knees at 90°. Standing for long periods: alternate resting one foot on a step to reduce lordosis. Active breaks every 20-30 minutes with a few standing pelvic tilts.
Every day, breaks every 20-30 minutes