Ankle sprain: conservative protocol
Conservative pathway based on early protected loading, peroneal strengthening and proprioceptive retraining, with objective return-to-sport criteria and prevention of chronic instability.
Uncomplicated lateral ankle sprain: recovery over weeks, with timing and return guided by assessment
Prepare the visit handout
Use the condition and phase indicated by your clinician. You can leave out individual exercises; instructions, illustrations and safety advice remain together.
Changing phase restores its full exercise list. Timing alone does not determine the phase.
Exclude exercises if needed
8 of 8 exercise cards included
The full web page remains available. Your selection is not saved or shared.
This conservative rehabilitation pathway must be adapted to the injury, the treating clinician’s instructions and the individual response.
These documents are protocol templates for information and education only: they do not replace the rehabilitation prescription for the individual case. Timing, loading and progressions must always be adapted to the patient, the lesion pattern, the surgical technique used and the clinical course, in collaboration between orthopaedic surgeon, physiotherapist and, where appropriate, physiatrist. Progression is driven by objective criteria, not by the calendar alone.
At a glance — the full pathway
- Acute phase
- PEACE & LOVE: protect, elevate, compress, educate; then progressive loading, optimism, vascularisation, exercise. Anti-inflammatory drugs are used only on medical advice and never to mask pain in order to load earlier.
- Loading
- Early and protected, as tolerated: prolonged immobilisation is discouraged.
- Brace / taping
- Brace or taping according to severity and sport. For grades II-III, support during sport may be advised for at least 6 months; agree the type and duration with the treating clinician.
- Proprioception
- Started early, continued for at least 6-8 weeks including after return to sport.
- Running
- A graded, authorised start after recovering a non-limping gait, functional mobility, sufficient strength and control. Do not test yourself with hops to obtain clearance.
- Return to sport
- Often over several weeks; severe sprains may take longer. Symptoms, function and tolerance of a full training session determine readiness.
Ankle sprains are common in children and adolescents who play sport. Most mild or moderate sprains recover well; persistent pain, giving way or recurrent sprains require reassessment and an appropriate rehabilitation programme.
Step by step
Each phase offers exercise options: perform only those selected by your clinician, without bringing later phases forward or automatically adding earlier exercises. Dosage, frequency and rests are individualised; the complete catalogue is not a single session.
Phase 1 — Acute: protection and optimal loading
Indicative timing: Days 0-3
The time window is indicative: progression depends on the criteria listed below, not on the calendar.
Goals
- •Control pain and swelling
- •Protect tissues without prolonged immobilisation
- •Start loading as tolerated
What to do
- •Elastic compression and elevation, relative offloading with crutches if gait is antalgic
- •Semi-rigid brace or taping
- •Active unloaded ankle mobility (foot alphabet) within pain limits
- •Education: resume movement and protected loading as advised; a severe sprain may require a short period of immobilisation before progression.
Restrictions and precautions
- •Avoid heat, deep massage and alcohol in the first 48 hours
- •Avoid running, jumping and uneven surfaces
Exercises for this phase
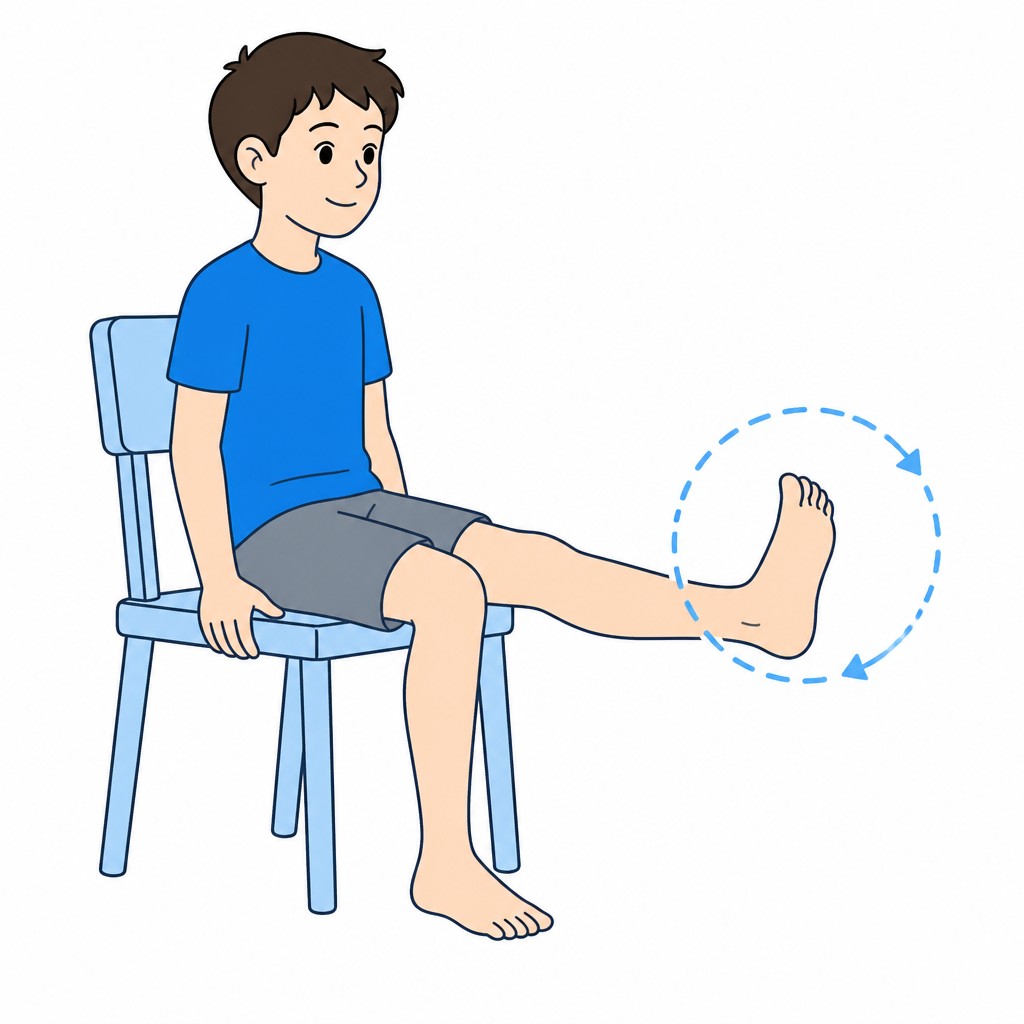
1. Ankle alphabetAfter entering the indicated phase and receiving clearance for this exercise; respect prescribed load and range.
- •Sitting or lying, leg elevated and foot free in the air.
- •Draw the letters of the alphabet with the big toe, moving only the ankle.
- •Slow, wide movements, within pain limits.
Dosage: Full alphabet, 3-4 times a day
Ready for the next phase when
- ☐Decreasing swelling
- ☐Walking possible with partial or full weight bearing, with or without brace
- ☐Pain controlled at rest
Phase 2 — Subacute: mobility and activation
Indicative timing: Days 3-14
The time window is indicative: progression depends on the criteria listed below, not on the calendar.
Goals
- •Restore dorsiflexion
- •Normal gait without aids
- •Activate peroneals and tibialis posterior
What to do
- •Active mobility in all directions, dorsiflexion mobilisation (knee-to-wall)
- •Isometric then elastic-band strengthening in 4 directions, emphasis on eversion
- •Single-leg balance on a firm surface, eyes open and close to a stable support. Eyes-closed variants only under direct professional supervision.
- •Cycling and walking in water
Restrictions and precautions
- •No running or jumping before clearance for the functional phase. Unstable surfaces require professional supervision, even when pain-free.
Exercises for this phase
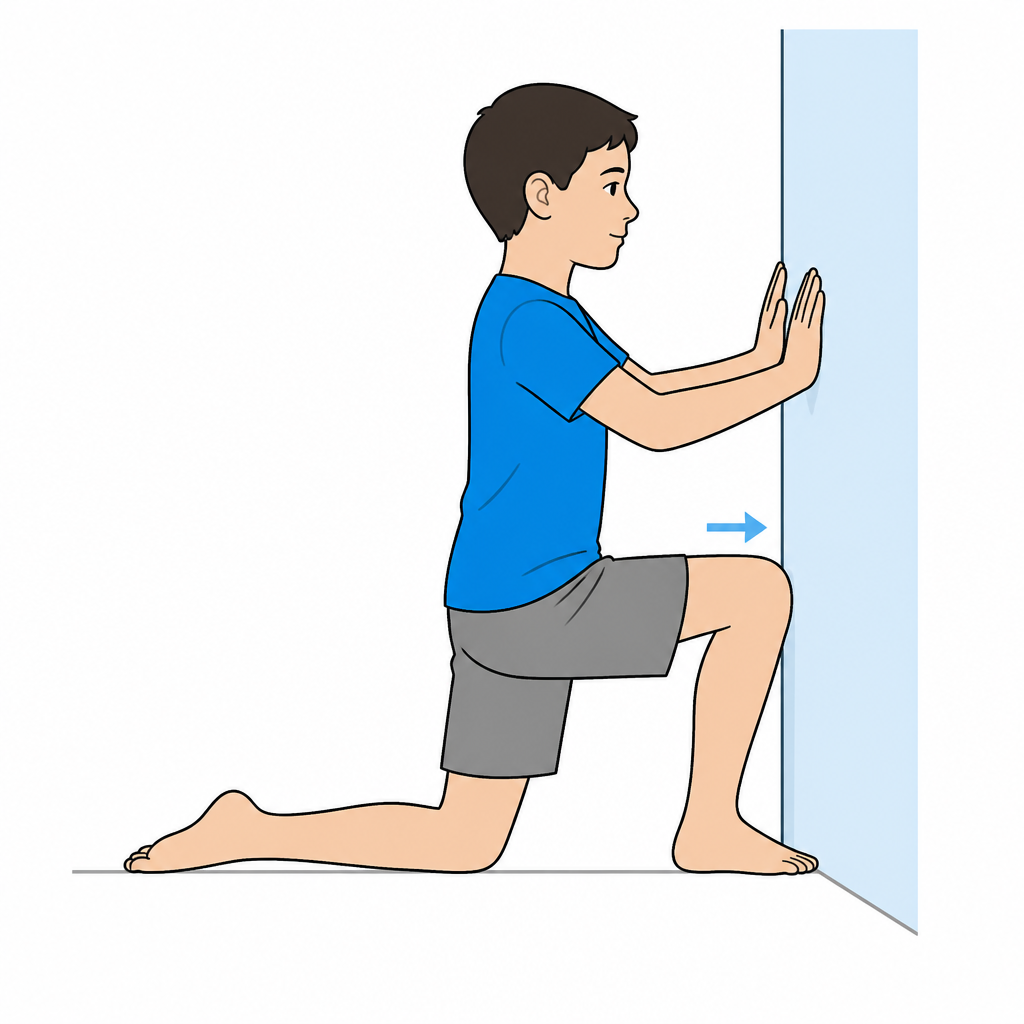
2. Knee-to-wall (dorsiflexion)After entering the indicated phase and receiving clearance for this exercise; respect prescribed load and range.
- •Stand facing a wall with the affected foot forward and the heel down, only when loading and movement in this direction are allowed.
- •Move the knee towards the wall within the permitted range without lifting the heel, forcing or seeking pain.
- •Your physiotherapist may measure the toe-to-wall distance and compare it over time and between sides. Do not force a preset distance: this measurement alone does not provide running or sport clearance.
Dosage: 3 sets of 10 pushes, twice a day
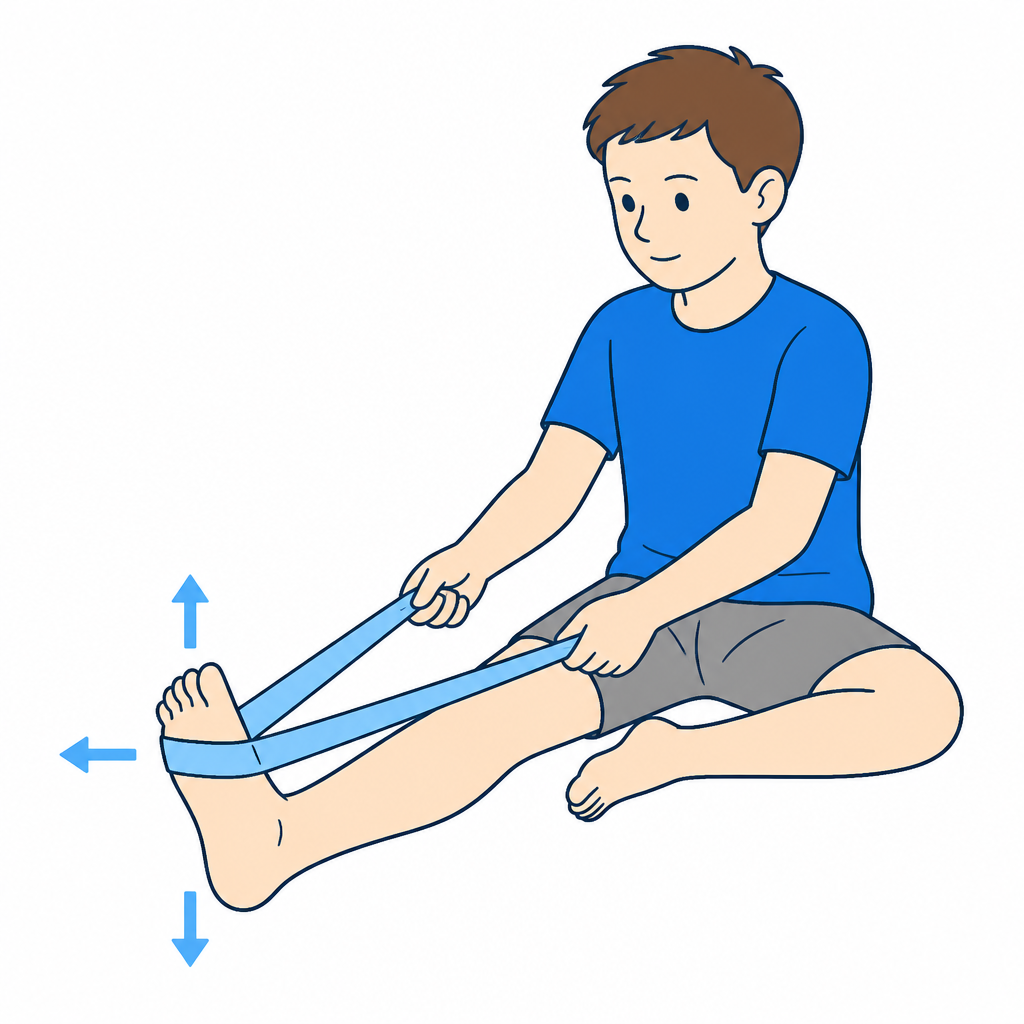
3. Four-direction band workAfter entering the indicated phase and receiving clearance for this exercise; respect prescribed load and range.
- •Sitting with the leg extended and a band around the forefoot.
- •Move in four directions: up, down, inwards, outwards.
- •Move slowly over 2 seconds, return under control over 3 seconds.
- •Have each permitted movement demonstrated: the anchor must change to oppose that direction. Never use a single anchor for all four directions.
Dosage: 3 sets of 15 per direction, daily
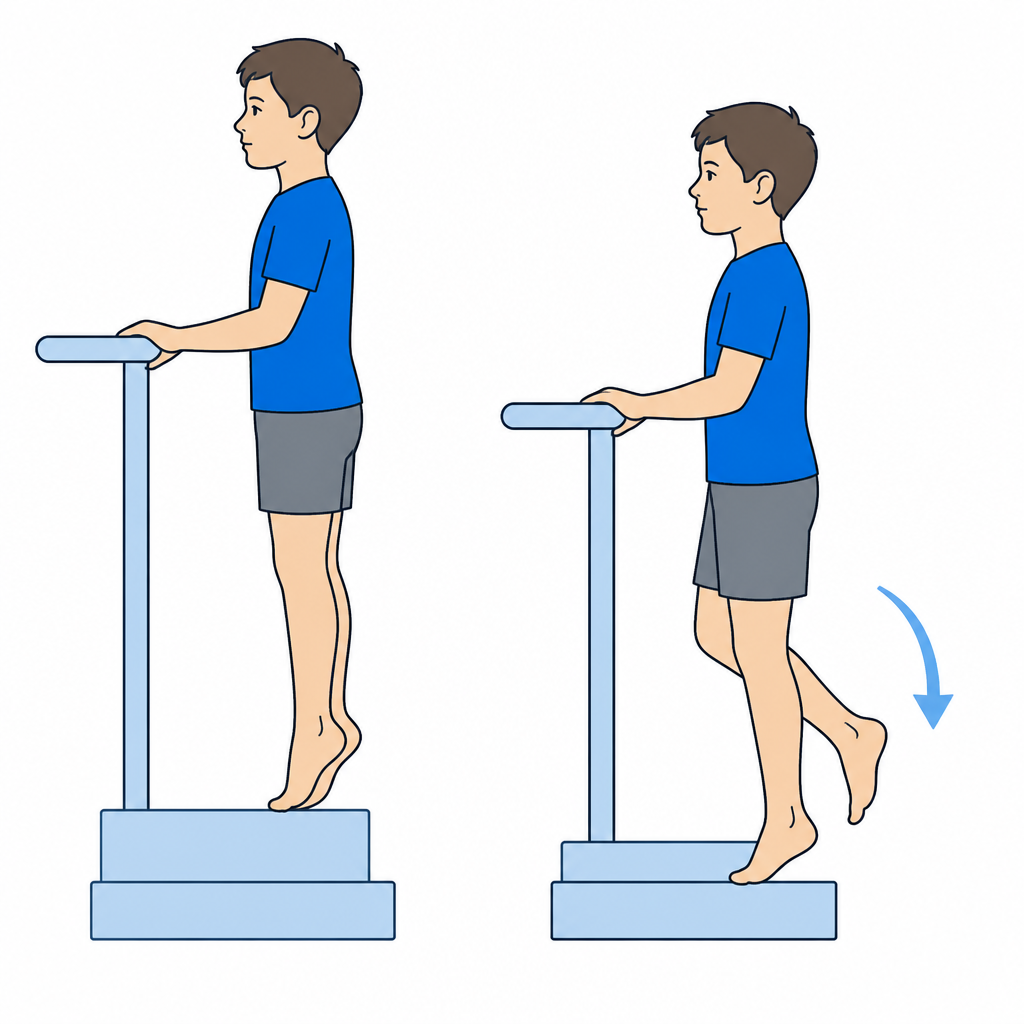
4. Calf raiseAfter entering the indicated phase and receiving clearance for this exercise; respect prescribed load and range.
- •After clearance for loading and strengthening, hold a stable support and rise onto the toes with both feet.
- •Eccentric lowering and single-leg work require an agreed progression: do not start them only because the two-leg version feels easy.
- •Maintain movement height and control for the selected repetitions. Dose, rest and targets must be adapted to age, procedure and ankle response.
Dosage: 3 sets of 15, 4-5 times a week
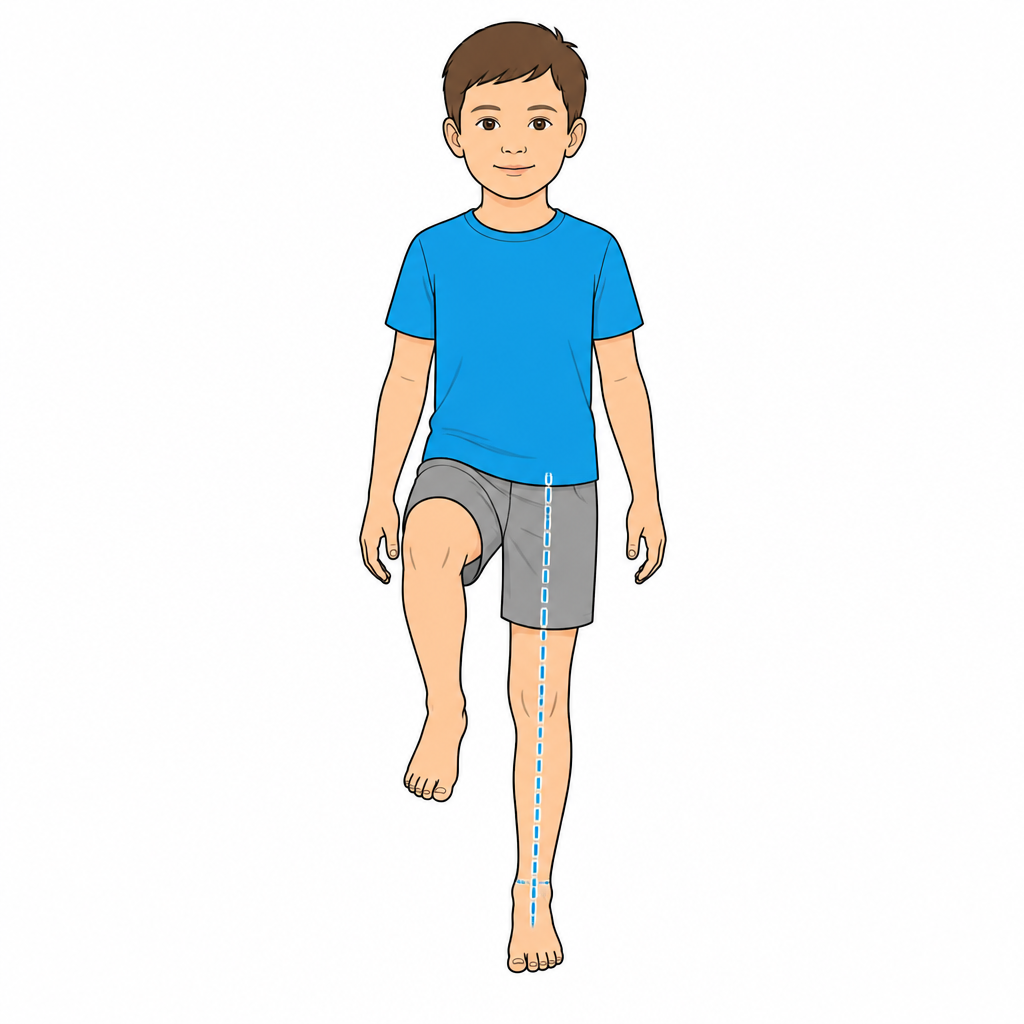
5. Single-leg balanceAfter entering the indicated phase and receiving clearance for this exercise; respect prescribed load and range.
- •Stand on one leg with the knee slightly bent and look ahead, after clearance for weight bearing.
- •Keep your eyes open on firm ground near a stable support; an adult must be able to assist the child.
- •Aim to keep your pelvis steady. If it tilts or you lose balance, put the other foot down, reduce the difficulty and ask your physiotherapist to check the movement.
Dosage: 3 x 30 seconds per side, daily
Ready for the next phase when
- ☐Symmetrical gait without aids or limping
- ☐Weight-bearing mobility and stance control assessed by the physiotherapist against age, the other side and planned activities
- ☐Firm-ground balance recovered for the agreed duration, without pain or giving way
Note for the physiotherapist
Assess dorsiflexion with the weight-bearing lunge test together with pain, strength, balance and movement quality; adapt treatment to the deficits found.
Phase 3 — Functional: strength and proprioception
Indicative timing: Weeks 2-6
The time window is indicative: progression depends on the criteria listed below, not on the calendar.
Goals
- •Symmetrical peroneal and calf strength
- •Proprioceptive control on unstable surfaces
- •Return to running and light jumping
What to do
- •Progressive band and bodyweight strengthening: double-leg then single-leg calf raises
- •Progress balance exercises under physiotherapist supervision. Wobble boards, cushions, closed eyes and perturbations require direct supervision; at home use the demonstrated stable-surface variant.
- •Star Excursion / Y-balance as both exercise and measure
- •Straight-line running intervals after clearance, then small hops on firm ground under physiotherapy guidance; also monitor the response over the next 24 hours
Restrictions and precautions
- •Cutting and sport-specific skills only in the next phase
Exercises for this phase
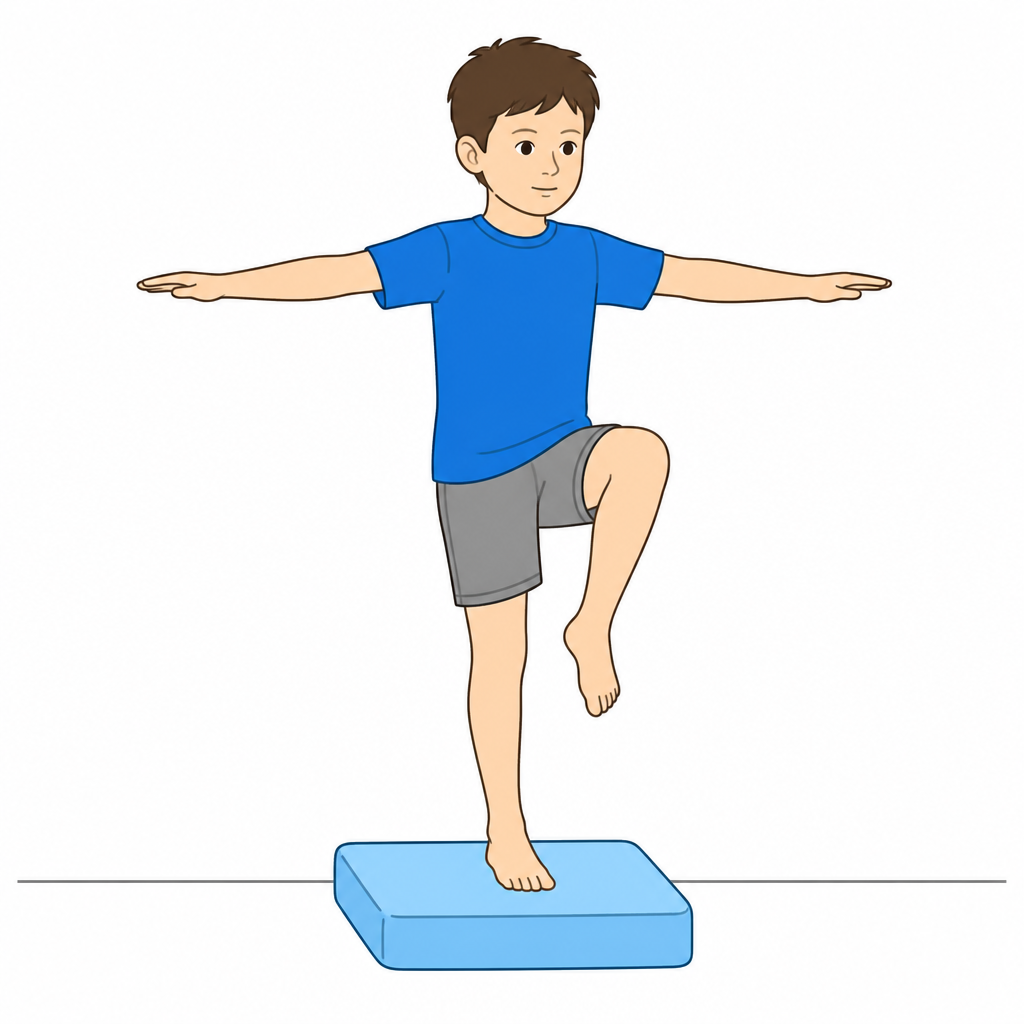
6. Proprioception on an unstable surfaceAfter entering the indicated phase and receiving clearance for this exercise; respect prescribed load and range.
- •Perform this exercise under direct physiotherapy supervision, after recovering safe single-leg support on firm ground and receiving clearance.
- •On the selected cushion or wobble board, keep your eyes open, the knee slightly bent and a stable hand support within reach.
- •Put the other foot down if you lose control. Do not add eyes-closed work or perturbations independently; at home use the firm-ground version prescribed by your physiotherapist.
Dosage: 3 x 30 seconds, daily
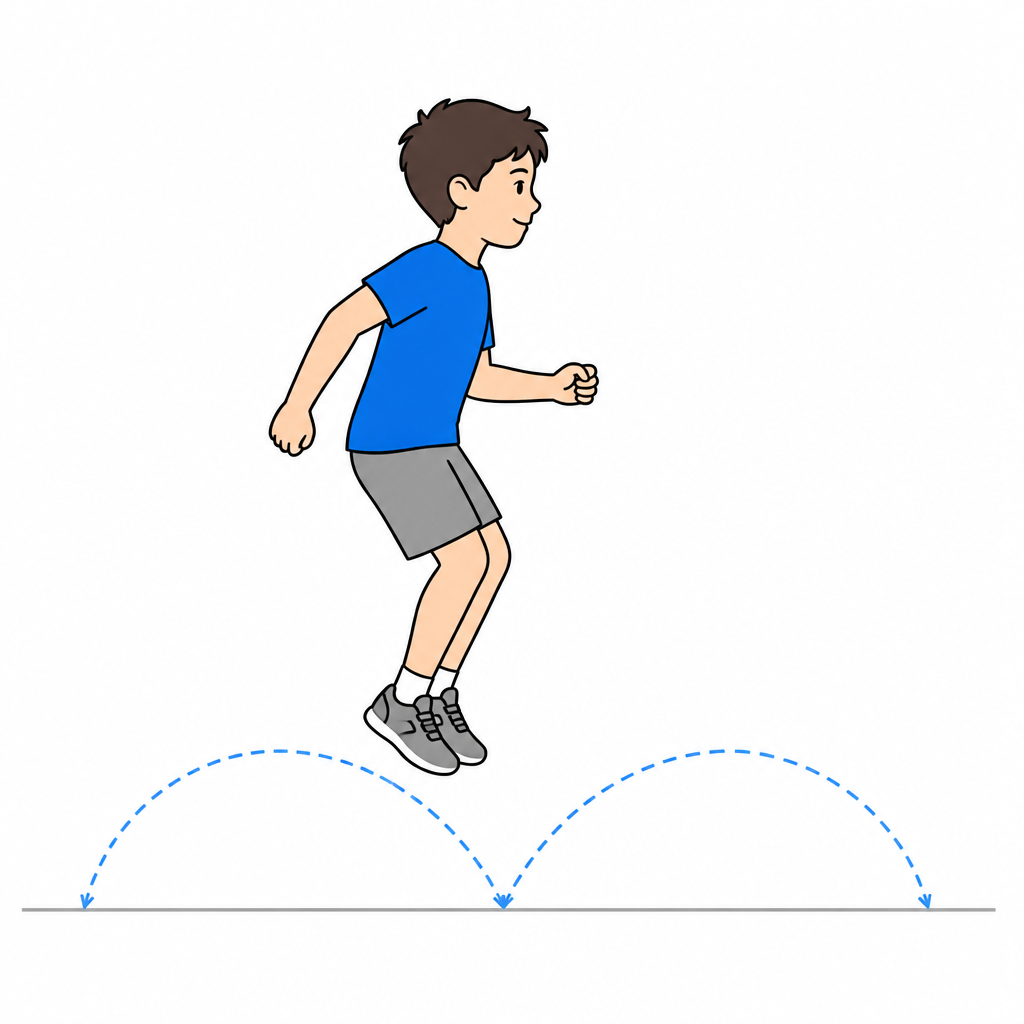
7. Progressive plyometricsAfter entering the indicated phase and receiving clearance for this exercise; respect prescribed load and range.
- •Only after clearance for impact and demonstration by your physiotherapist, start with small two-foot hops on a stable surface.
- •Increase direction, height or single-leg work only within the agreed progression; do not add several challenges at once.
- •Aim for a controlled landing with knees and feet aligned. Stop for pain, giving way or loss of control; report swelling or worsening symptoms afterwards. Landing noise alone does not measure movement safety.
Dosage: 2-3 sets of 10-20 contacts, 2-3 times a week
Ready for the next phase when
- ☐Repeated single-leg calf raise, pain-free and symmetrical
- ☐Dynamic balance control appropriate to age and sport; professional tests have no single threshold applicable to every child
- ☐Pain-free continuous running
- ☐No swelling after sessions
Phase 4 — Return to sport and prevention
Indicative timing: Weeks 4-8 and beyond
The time window is indicative: progression depends on the criteria listed below, not on the calendar.
Goals
- •Safe agility, cutting and sport-specific skills
- •Confidence in the ankle
- •Recurrence prevention
What to do
- •Progressive agility: shuttles, figure-of-8, cutting, decelerations
- •Simulation of sport-specific gestures and graded return to training
- •Ongoing neuromuscular prevention programme (FIFA 11+ or equivalent), taping/bracing in high-risk sports
Exercises for this phase
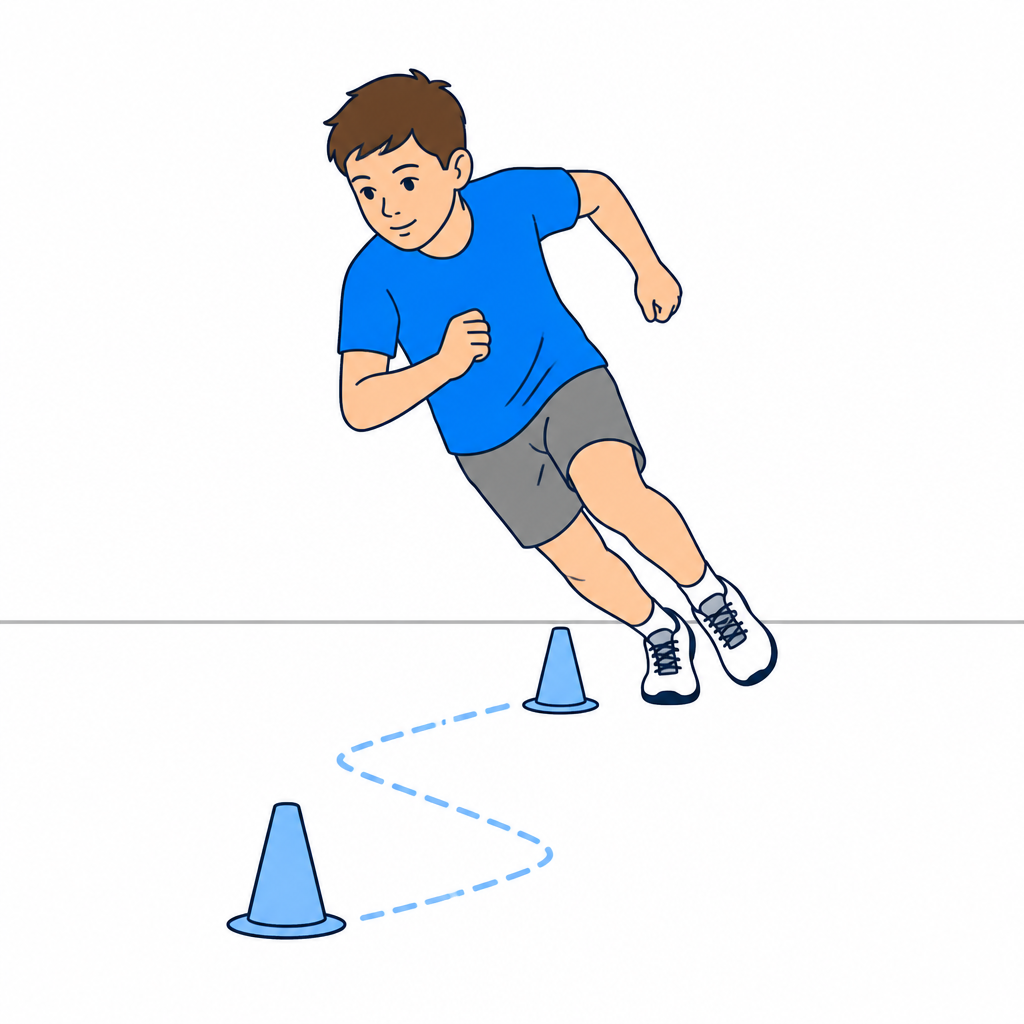
8. Agility and change of directionAfter entering the indicated phase and receiving clearance for this exercise; respect prescribed load and range.
- •After clearance, practise shuttle runs, figure-of-eight runs and cone slaloms: wide turns first, then sharper changes.
- •Add unanticipated direction changes only at the agreed stage, with the physiotherapist or trainer supervising the return to sport.
- •Stop for pain, the limb giving way or loss of movement control.
Dosage: 2 sessions a week, within training
Ready for the next phase when
- ☐Agility and cutting performed without pain or a feeling of instability
- ☐Pain during activity and over the preceding 24 hours assessed, without new swelling or worsening after sessions
- ☐A full training session in the relevant sport tolerated before returning to competition
- ☐The tests and questionnaires required for clearance are listed in the return-to-sport section
If symptoms appear after a progression
If persistent pain, effusion or swelling, or loss of movement appears after moving to a new phase or increasing load, stop progression and contact the treating clinician or physiotherapist to review the programme. Seek prompt assessment for the red flags below. This document does not replace individual clinical assessment.
Return to sport / full activity
Phase windows are indicative and may overlap. Syndesmotic injuries, fractures and osteochondral lesions require a separate pathway: they are not simply slower-recovering sprains.
- ☐Pain during sport and over the preceding 24 hours assessed alongside swelling and load response
- ☐Ankle mobility, strength, endurance and power appropriate to the activity, measured by the physiotherapist
- ☐Confidence in the ankle, no giving way and readiness of the young person to return
- ☐Balance and dynamic control recovered; hop and agility tests only at the authorised stage
- ☐Sport-specific skills and a full training session tolerated without worsening symptoms afterwards
These domains follow the PAASS consensus, which does not establish universal tests or numerical thresholds and is not a paediatric validation. Side-to-side comparisons must be combined with absolute values, movement quality, age and sport: the uninjured side may also be deconditioned. Continue the agreed prevention programme, using a brace or taping where indicated.
Red flags: stop and contact us
- •Inability to bear weight after injury or take four steps at assessment, or focal bony pain at the malleoli, navicular or base of the fifth metatarsal: seek medical assessment to decide which investigations are needed.
- •Pain above the ankle: a possible syndesmotic injury needs clinical assessment, without performing tests at home.
- •Deep pain, locking or catching (suspected osteochondral lesion)
- •Pain or swelling that does not improve, worsens or persists beyond a month: arrange reassessment; do not wait for this point if symptoms are concerning.
- •Repeated giving way despite rehabilitation (chronic instability)
- •In children with open physes: focal tenderness over the distal fibular or tibial physis after trauma (possible physeal injury, even with normal radiographs)
Author: Dott. Daniele Priano, Paediatric Orthopaedics. Content version: 9 September 2026.
Timings are indicative: progression depends on clinical and functional criteria and on the treating clinician’s instructions.
Full introduction and references at ortopediaevolutiva.com/en/rehabilitation/ankle-sprain
Ankle sprain: conservative protocol — Dott. Daniele Priano, Pediatric Orthopaedics · Information document: it does not replace an in-person assessment.
 Latest online version
This protocol may be used and shared for clinical and informational purposes provided that attribution to the author and to the original source is kept intact. Republishing or distributing it as one’s own work is not allowed.
Other protocols

Any questions?
For information or questions, email me or view the locations and contact details.
Email: daniele.priano@ortopediaevolutiva.com