Flatfoot: post-operative pathway after endosinotarsal arthroereisis
Pathway after endosinotarsal arthroereisis without a cast: protected weight bearing and early movement within discharge instructions, with progression guided by recovery and clinical review.
Early motion if authorised · Protected weight bearing with crutches · Strengthening after recovery and clearance · Running and sport based on criteria and review
Prepare the visit handout
Use the condition and phase indicated by your clinician. You can leave out individual exercises; instructions, illustrations and safety advice remain together.
Changing phase restores its full exercise list. Timing alone does not determine the phase.
Exclude exercises if needed
14 of 14 exercise cards included
The full web page remains available. Your selection is not saved or shared.
This protocol is part of the post-operative pathway and must be adapted to the surgeon’s instructions and to the individual clinical response.
These documents are protocol templates for information and education only: they do not replace the rehabilitation prescription for the individual case. Timing, loading and progressions must always be adapted to the patient, the lesion pattern, the surgical technique used and the clinical course, in collaboration between orthopaedic surgeon, physiotherapist and, where appropriate, physiatrist. Progression is driven by objective criteria, not by the calendar alone.
At a glance — the full pathway
- Weight bearing
- Respect weight bearing specified at discharge and use two crutches as taught. Reduce aids only with clearance and controlled gait; suture removal does not automatically authorise unrestricted loading.
- Active mobilisation
- From day 1 only if authorised at discharge: gentle active toe and ankle movements within the permitted range, without resistance or forced rotation. Follow the prescribed duration and frequency.
- Passive mobilisation
- Only if authorised at discharge: gentle assisted motion after demonstration, within the prescribed range. Do not force end range or foot rotation.
- Surgical wound
- Follow discharge instructions for dressings and washing. Keep the wound protected and dry as directed; do not apply unprescribed antiseptics or creams. Washing and scar massage require a fully closed wound and clinician approval.
- Running and jumping
- No running or jumping in the first 45 days; gradual resumption after day 45, with normal gait and no pain.
- Return to sport
- Sport at about 2 months, with symmetrical foot contact and restored dorsiflexion.
Subtalar arthroereisis mechanically limits some hindfoot movements using an implant. Implant type, associated procedures and healing determine the postoperative pathway. The times below are indicative: follow the surgeon’s written instructions for the individual procedure.
Step by step
Each phase offers exercise options: perform only those selected by your clinician, without bringing later phases forward or automatically adding earlier exercises. Dosage, frequency and rests are individualised; the complete catalogue is not a single session.
Before surgery — Preparation for surgery
Short phase in the weeks before elective surgery: it does not require a structured course of physiotherapy.
When it applies
- •Before elective arthroereisis (with or without associated procedures).
- •A standard course of preoperative physiotherapy has not been shown to improve the outcome of arthroereisis: preparation is mainly educational and organisational.
Goals before surgery
- •Understand the planned post-operative weight bearing and be able to use crutches.
- •Organise home and school for the first weeks.
- •Check baseline foot and ankle mobility and strength, where useful.
- •Know when motion starts and its limits for the specific procedure: with a cast, no ankle mobility until removal and movement clearance.
Activities
- •Practical crutch training before surgery, on level ground and stairs.
- •Home and school organisation: pathways, bathroom, transport, accessible desk, temporary PE exemption.
- •Where useful, simple ankle and foot mobility exercises, without turning preparation into a mandatory programme.
Preoperative exercises
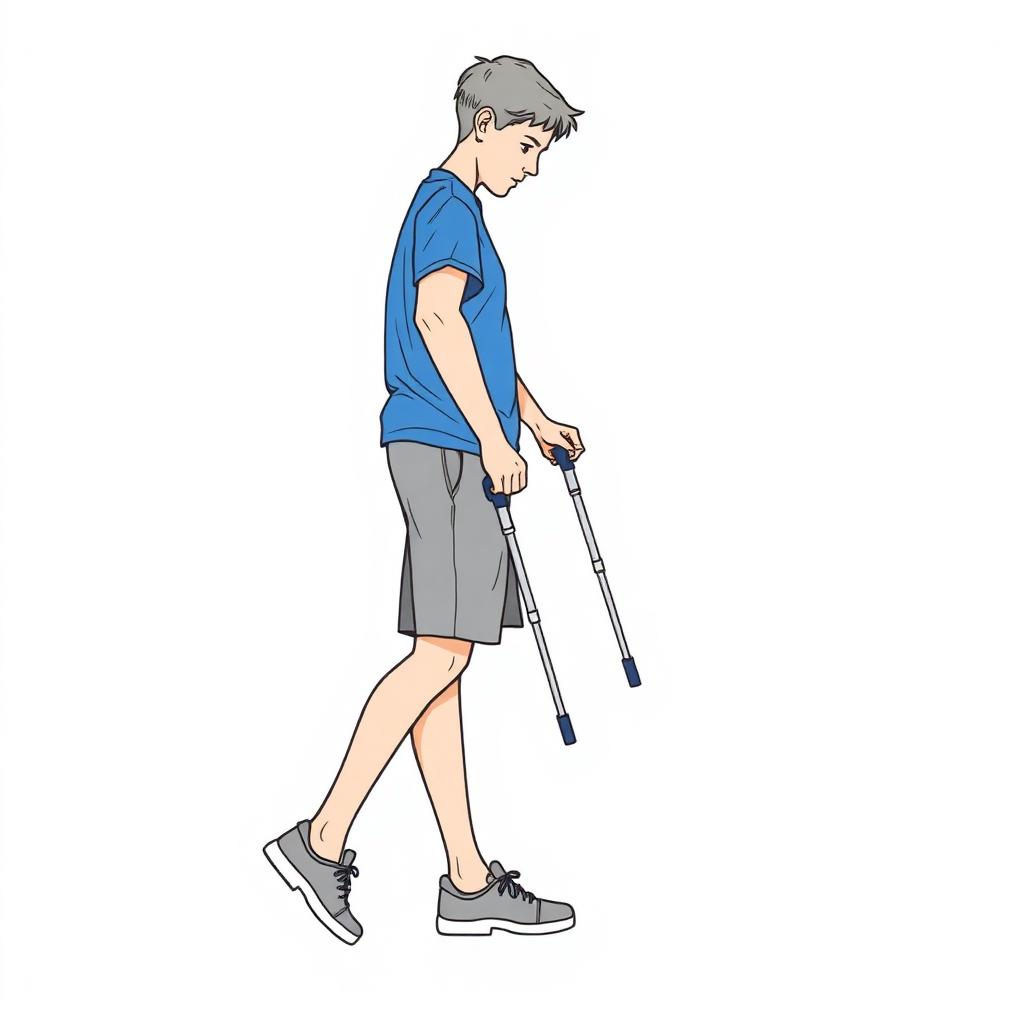
Crutch and weight-bearing training
- •Try the crutches before surgery, with correct height and the weight-bearing status set by the surgeon.
- •Practise on level ground, stairs and the entrance to your home, with someone assisting.
- •Also practise sitting, standing and moving in the bathroom while respecting the planned loading restrictions.
Dosage: At least one training session before admission; repeat until the technique is safe.
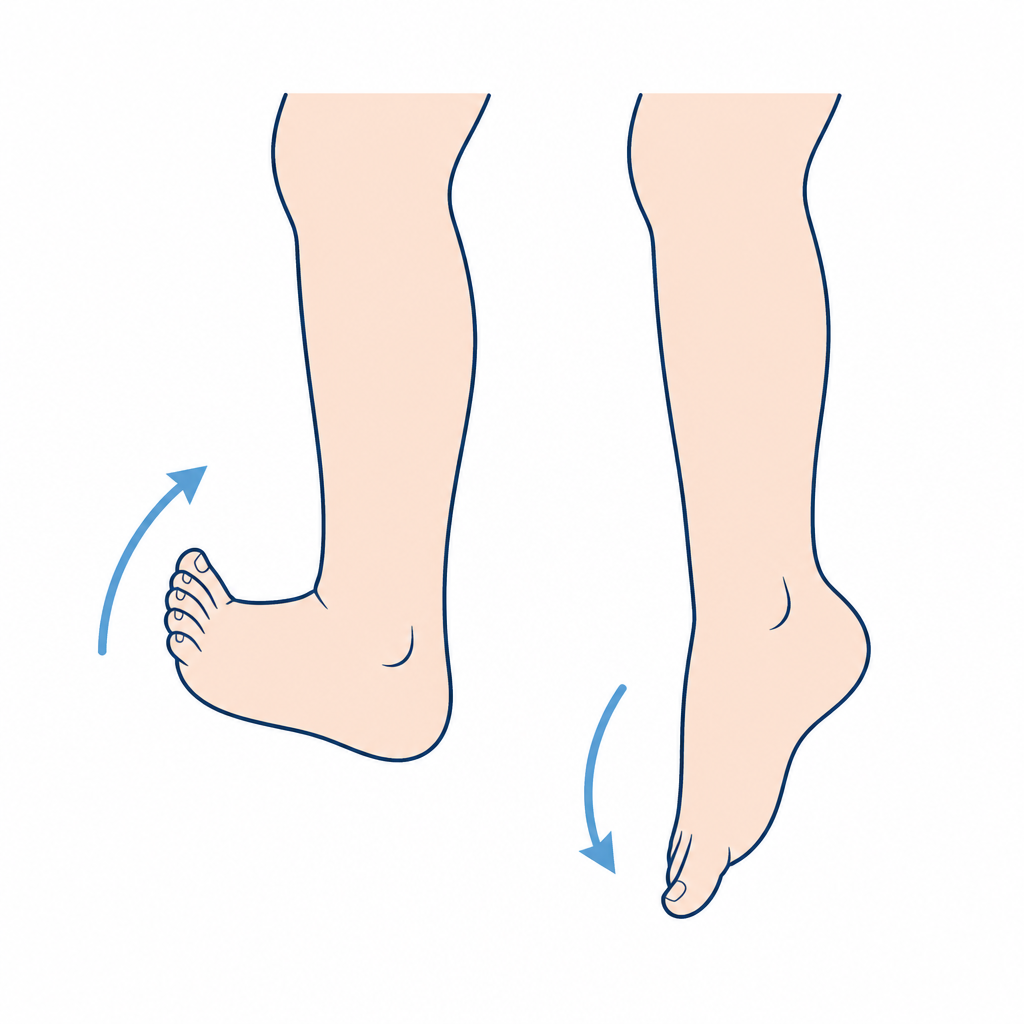
Active ankle mobility
- •Seated or lying, move the ankle into flexion, extension and slow circles, within the pain-free range.
- •Keep the movement smooth, without forcing the painful end range.
Dosage: Indicative: 10-15 movements per direction, 2-3 times a day.
Readiness criteria for surgery
- ☐Safe crutch use with the planned weight bearing.
- ☐Family informed about weight bearing, crutch use and return to school.
- ☐Home and school organised for the return after surgery.
When surgery must not be delayed
- •Preparation is not a prerequisite: elective surgery should not be postponed to complete preoperative exercises.
What to prepare at home and school
- •Prepare clear pathways, a place to keep the foot elevated and comfortable wide shoes for the return home.
- •Check stairs, bathroom and school transport with crutches.
- •Inform the school: expected absence, accessible desk, temporary PE exemption.
Phase 1 — First 72 hours: swelling, pain and start of mobilisation
Indicative timing: Days 0-3
The time window is indicative: progression depends on the criteria listed below, not on the calendar.
Goals
- •Control swelling and pain
- •Protect the surgical wound and the implant
- •Start the active movements authorised at discharge, without resistance
What to do
- •Limb elevated above heart level whenever sitting or lying, as much as possible in the first 72 hours
- •Ice pack (never directly on the skin) 15-20 minutes, 4-6 times a day
- •If authorised from day 1: gently move the toes and ankle within the permitted range, without resistance. Do not seek wide circles or rotate the hindfoot against the implant’s limit.
- •Assisted mobilisation only when prescribed and demonstrated by the physiotherapist: repeat the taught hand placement, direction and range, without forcing inversion or eversion. Absence of pain does not permit exceeding procedure-specific limits.
- •Isometric calf contractions (venous pump) several times a day
- •Respect weight bearing specified at discharge and use two crutches as taught. Reduce aids only with clearance and controlled gait; suture removal does not automatically authorise unrestricted loading.
- •Use analgesia as prescribed; do not use it to force movement or exceed permitted loading.
Restrictions and precautions
- •No resisted exercise (no bands, weights or forced end-range pushes)
- •Keep the wound dry
- •No full weight bearing without crutches
Exercises for this phase
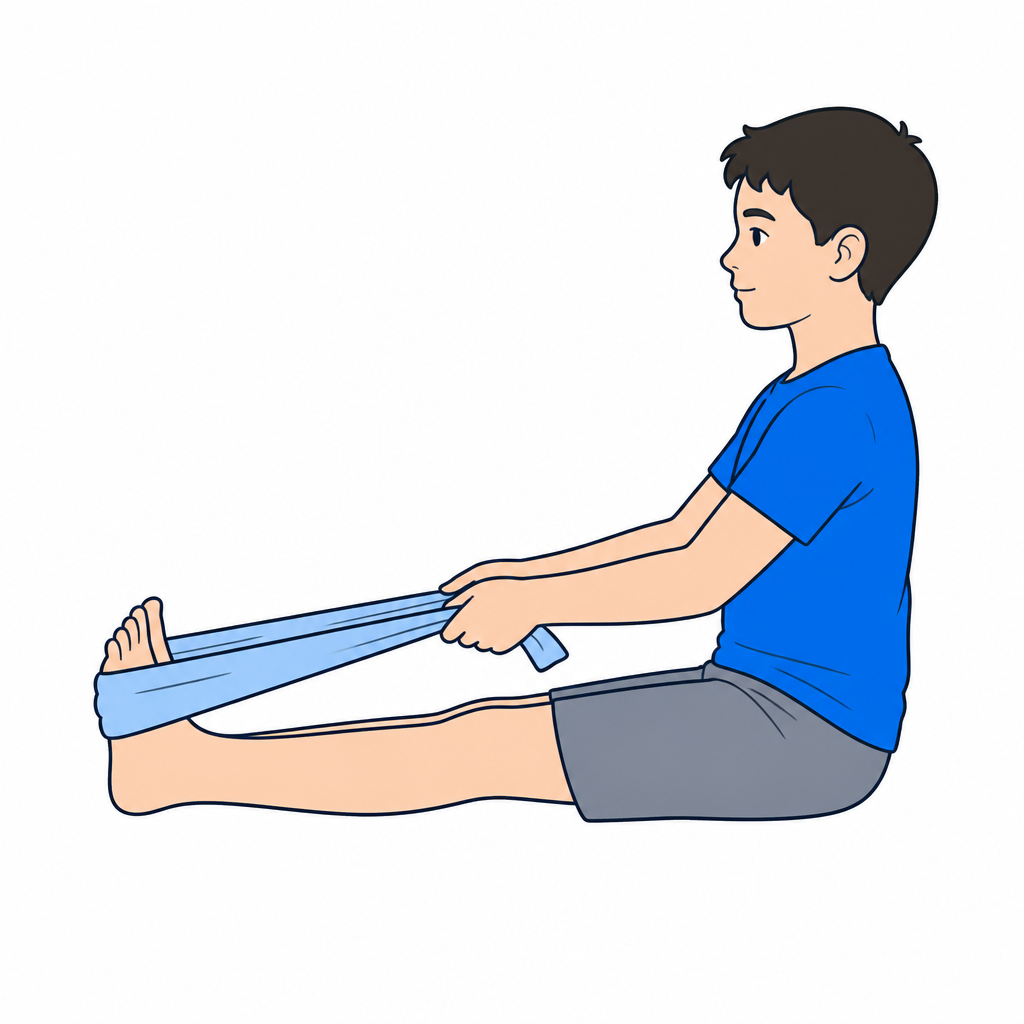
1. Static belt stretch (passive mobilisation)After entering the indicated phase and receiving clearance for this exercise; respect prescribed load and range.
- •Sit on the floor with a straight back and knees fully extended.
- •Loop a bathrobe belt around the base of the toes of the affected foot.
- •Pull gently towards you until you feel tension in the Achilles tendon, never pain.
- •Keep the knee in the position demonstrated for this variant. Do not force it: bending changes the tension on the calf muscles but does not automatically eliminate the stretch of the calf–Achilles complex.
Dosage: Hold 30 seconds, 10 repetitions every day
2. Active ankle mobilisationAfter entering the indicated phase and receiving clearance for this exercise; respect prescribed load and range.
- •Sitting or lying, move the ankle (not just the toes) pulling the foot up and then pointing it down.
- •Then draw wide circles with the foot, first clockwise then anticlockwise.
- •The movement must be gentle, wide and complete, up to the pain-free limit.
Dosage: 20 seconds of continuous motion, 10 times a day
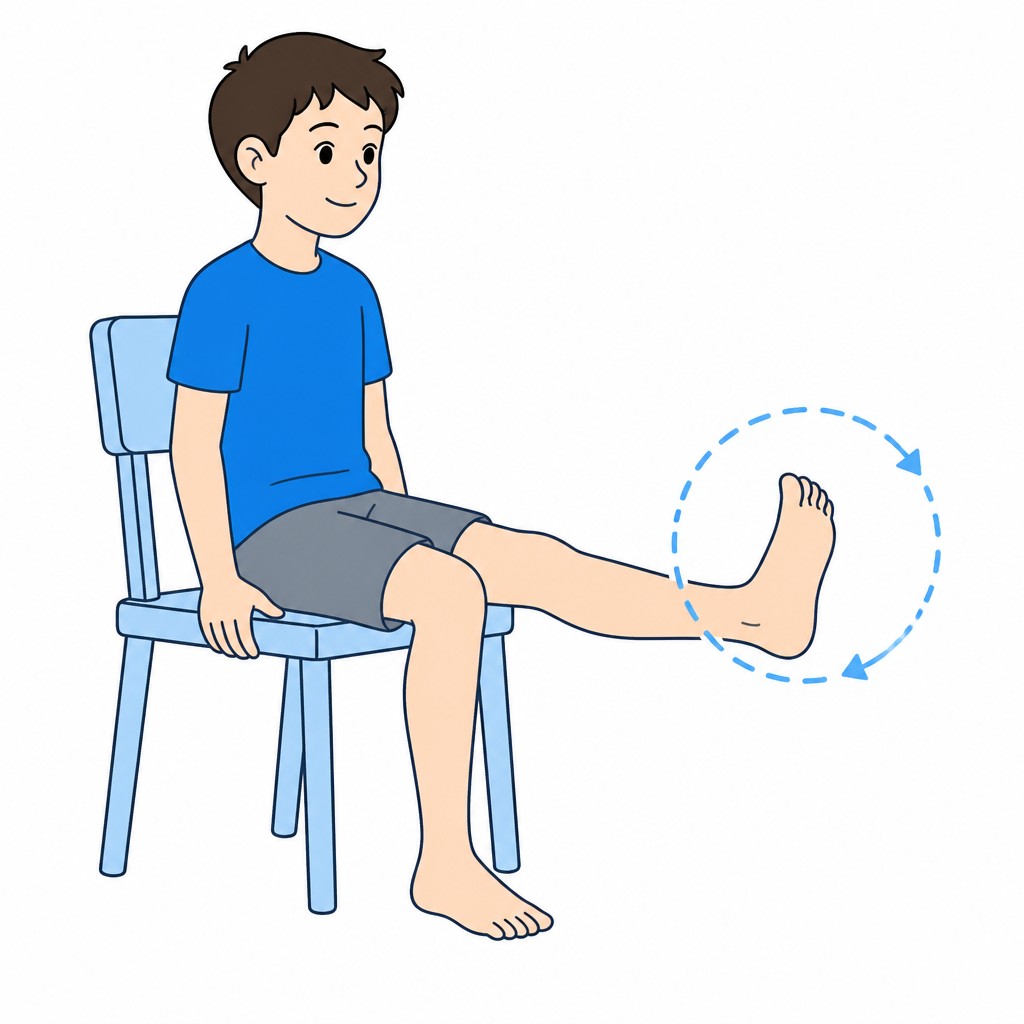
3. Foot alphabetAfter entering the indicated phase and receiving clearance for this exercise; respect prescribed load and range.
- •With the leg supported and the foot free in the air, “write” the alphabet letters with the big toe.
- •Move only the ankle, keeping the knee still.
- •Make big letters: they are meant to explore the whole range of motion.
Dosage: 1-2 alphabets, 2-3 times a day
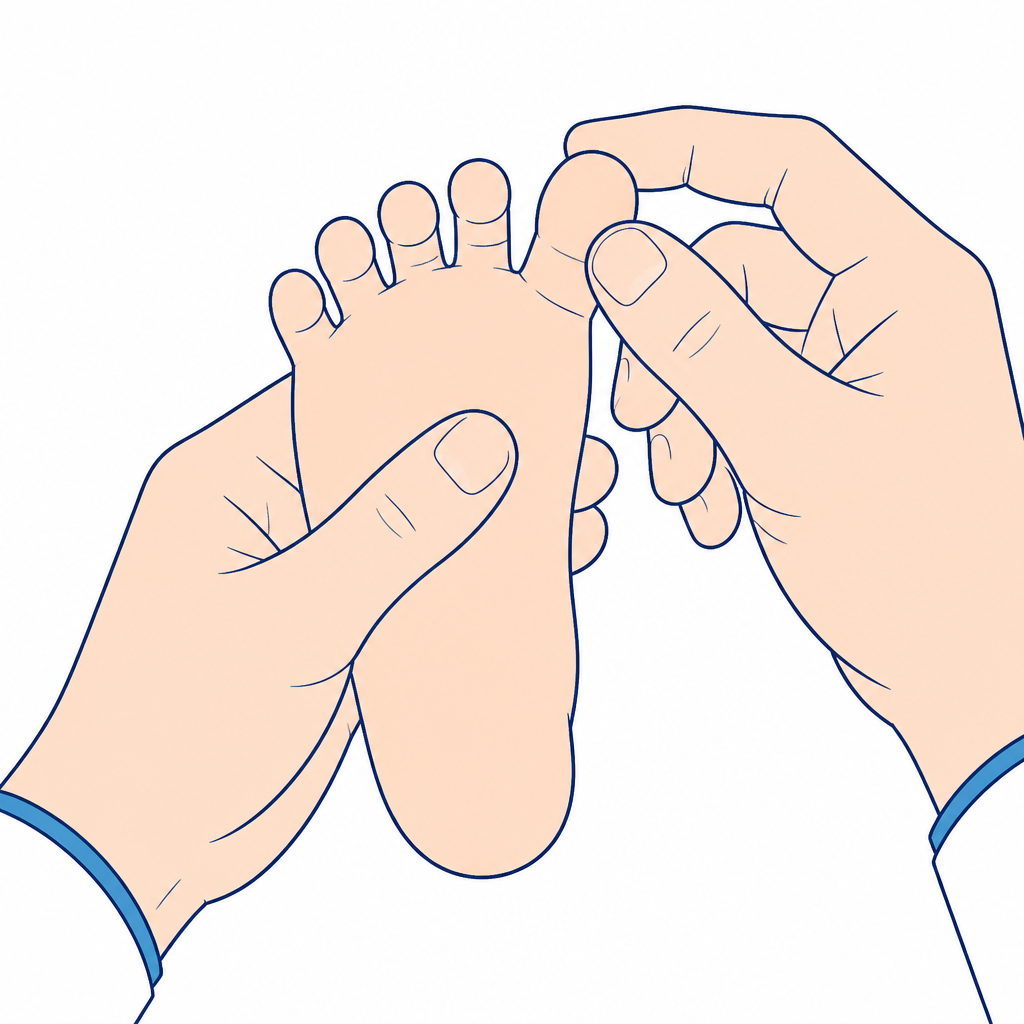
4. Toe mobilityAfter entering the indicated phase and receiving clearance for this exercise; respect prescribed load and range.
- •Open and close the toes, then try to lift only the big toe and then only the others.
- •If a cast is in place, still move the toes that remain free.
- •It is the simplest way to activate the venous pump and reduce swelling.
Dosage: 20 repetitions, 5-6 times a day
Ready for the next phase when
- ☐Pain controlled with prescribed medication
- ☐Swelling decreasing with elevation and ice
- ☐Dry wound without discharge
Note for the physiotherapist
Early mobilisation follows the procedure-specific instructions: short sessions, permitted movements and no forcing.
Phase 2 — Daily mobilisation and protected walking
Indicative timing: From day 4 to suture removal (about 2 weeks)
The time window is indicative: progression depends on the criteria listed below, not on the calendar.
Goals
- •Gradually restore permitted mobility while respecting the implant’s mechanical limit
- •Prevent adhesions and subtalar stiffness
- •Maintain trophism of the intrinsic foot muscles
- •Walk safely with two crutches
What to do
- •Active ankle mobility within the permitted range, without resistance. Use short sessions at the prescribed frequency; do not force full hindfoot movement.
- •Foot alphabet: “write” the letters in the air with the big toe, 1-2 alphabets 2-3 times a day
- •Belt stretching only when specifically authorised and demonstrated: position, range and duration depend on the procedure. Do not use it to tension tissues that still require protection.
- •Parent assistance must follow the demonstrated manoeuvre; stop for pain or resistance without increasing force.
- •Mobility and grip: scrunch a towel with the toes, pick up and move small objects — 5 minutes a day, as play
- •Walking with 2 crutches, with heel strike and the most physiological roll-over possible
Restrictions and precautions
- •Still no resisted work
- •Do not exceed the permitted range, even without pain. Stop a painful manoeuvre or one that meets resistance.
- •No running, jumping or sport
Exercises for this phase
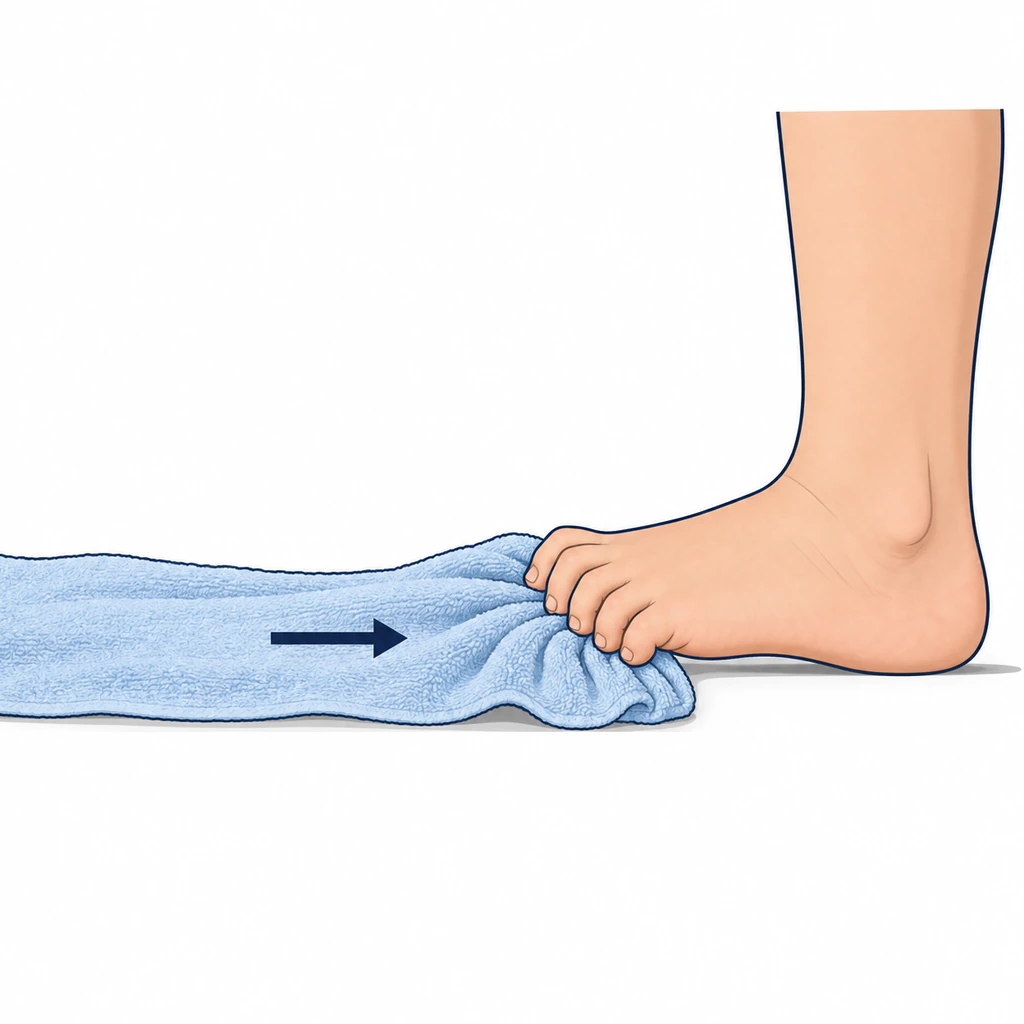
5. Towel curlsAfter entering the indicated phase and receiving clearance for this exercise; respect prescribed load and range.
- •Sitting, place the foot on a towel spread on the floor.
- •Scrunch the towel towards you using only the toes, without lifting the heel.
- •Then try to grasp it and move it sideways.
Dosage: 5 minutes a day
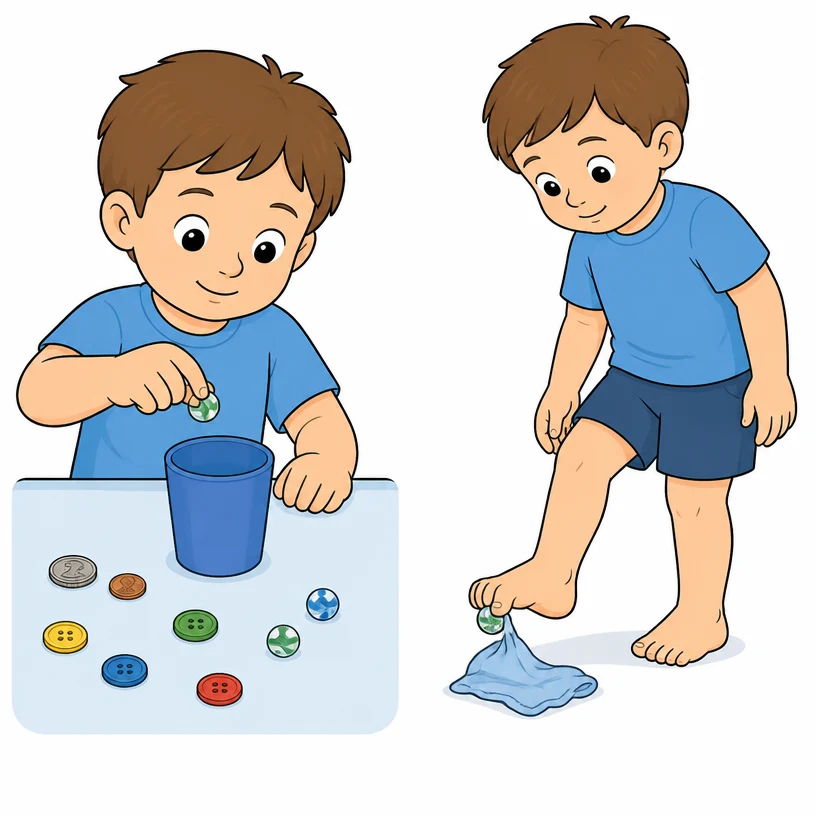
6. Picking up small objectsAfter entering the indicated phase and receiving clearance for this exercise; respect prescribed load and range.
- •Scatter marbles, bottle caps or small bricks on the floor.
- •Grasp each object with the toes and drop it into a container.
- •It works best as a timed game: how many objects in 2 minutes?
Dosage: 5 minutes a day
Ready for the next phase when
- ☐Active and passive dorsiflexion improving day by day
- ☐Mobile toes able to grasp the towel
- ☐Walking with crutches without marked antalgic limp
- ☐Wound healing without signs of infection
Note for the physiotherapist
Reassess mobility, pain and gait regularly. Adapt session frequency to the child’s response and the surgical instructions.
Phase 3 — Suture removal, crutch weaning and free walking
Indicative timing: From about 2 weeks
The time window is indicative: progression depends on the criteria listed below, not on the calendar.
Goals
- •Walk normally without aids
- •Complete recovery of range of motion
- •Reactivate calf and tibialis posterior
What to do
- •Suture removal alone does not authorise washing, stopping crutches or unrestricted weight bearing. Wait for wound healing and weight-bearing clearance; reduce aids only with controlled gait.
- •Continue permitted active mobility. Retain assisted mobilisation and stretching only if prescribed, within the taught range and dose.
- •Continue authorised active mobility. Resisted work starts in phase 4 after the required recovery and surgeon clearance.
- •Toe grip and mobility exercises maintained as daily play
- •Cycling and swimming (once the wound is healed) as low-impact aerobic activities
Restrictions and precautions
- •No running or jumping until day 45
- •Avoid very uneven ground and games with sharp direction changes
No additional exercise cards are assigned here. Follow this phase’s indications and the programme selected by your physiotherapist; do not automatically continue or progress every previous exercise.
Ready for the next phase when
- ☐Independent walking without crutches and without significant pain
- ☐Dorsiflexion similar to the non-operated side
- ☐No significant end-of-day swelling
Note for the physiotherapist
If dorsiflexion remains limited, the physiotherapist should reassess the cause and permitted limits before increasing stretching or load.
Phase 4 — Strengthening, proprioception and gait retraining
Indicative timing: After phase 3: recovered mobility and gait, resistance authorised
The time window is indicative: progression depends on the criteria listed below, not on the calendar.
Goals
- •Strengthen tibialis posterior, peroneals and intrinsic foot muscles
- •Restore single-leg balance
- •Normalise foot contact, reducing walking on the outer border
What to do
- •Short foot exercise: shorten the foot by drawing the forefoot towards the heel without curling the toes, 10 reps of 5 seconds, 3 times a day
- •Toe yoga: lift the big toe keeping the others down and vice versa, 10 reps each way
- •Tibialis posterior strengthening with a band in resisted inversion (first introduction of resistance), 3 sets of 15
- •Calf raises, double-leg then progressively single-leg, 3 sets of 10-15
- •Single-leg balance on firm ground with eyes open, next to a stable support; unstable surfaces only under direct professional supervision.
- •Heel walking and toe walking alternated for 10-15 metres, as daily play
Restrictions and precautions
- •No running, jumping or team sport before the times given in phase 5
Exercises for this phase
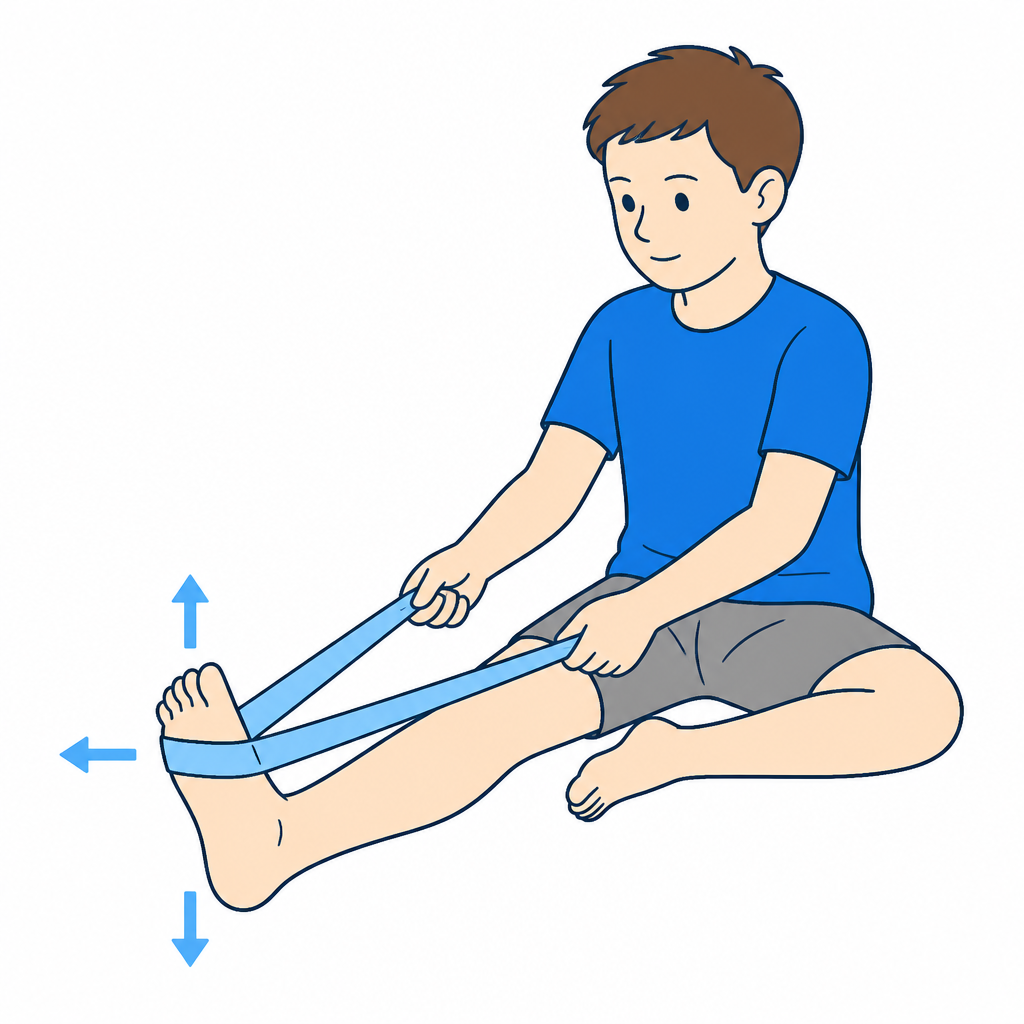
7. Dynamic band stretching (4 directions)After entering the indicated phase and receiving clearance for this exercise; respect prescribed load and range.
- •Anchor an elastic band (TheraBand type) to a fixed support such as a table leg.
- •Move against the band’s pull: foot up, foot down, inwards, outwards.
- •Control the return: the slow part of the movement is what strengthens most.
- •Increase resistance (a stiffer band) once the exercise feels easy.
Dosage: 15 movements per direction, every day
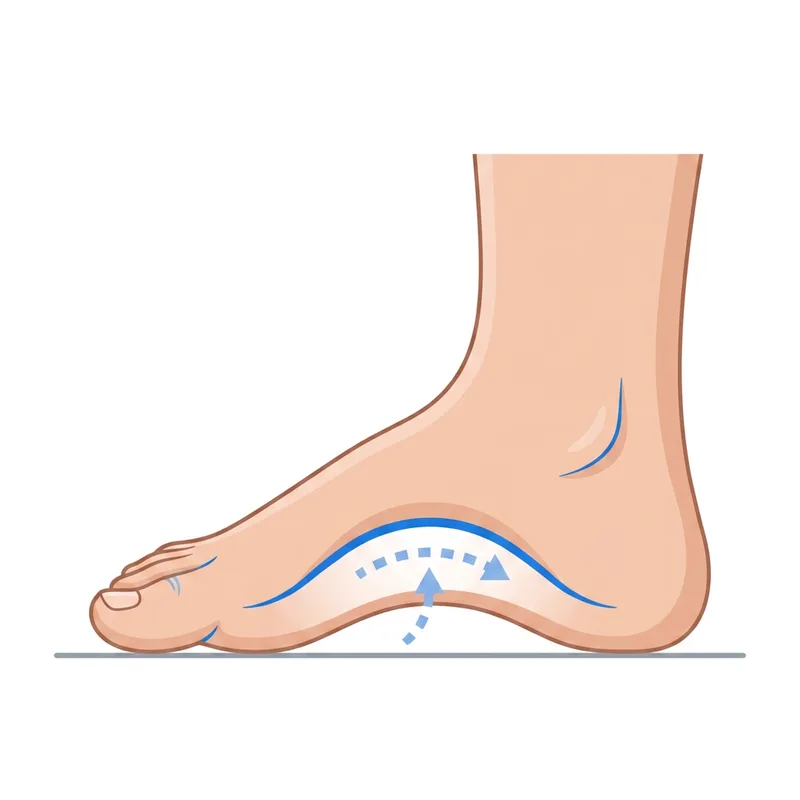
8. Short foot exerciseAfter entering the indicated phase and receiving clearance for this exercise; respect prescribed load and range.
- •Sitting with the foot flat on the floor, heel and toes in contact.
- •Draw the forefoot towards the heel, “shortening” the foot and lifting the arch, without curling the toes.
- •Aim to keep the toes long and relaxed. If they curl, reduce the effort and ask for help finding the movement; this is not a test of an individual muscle.
Dosage: 10 repetitions of 5 seconds, 3 times a day
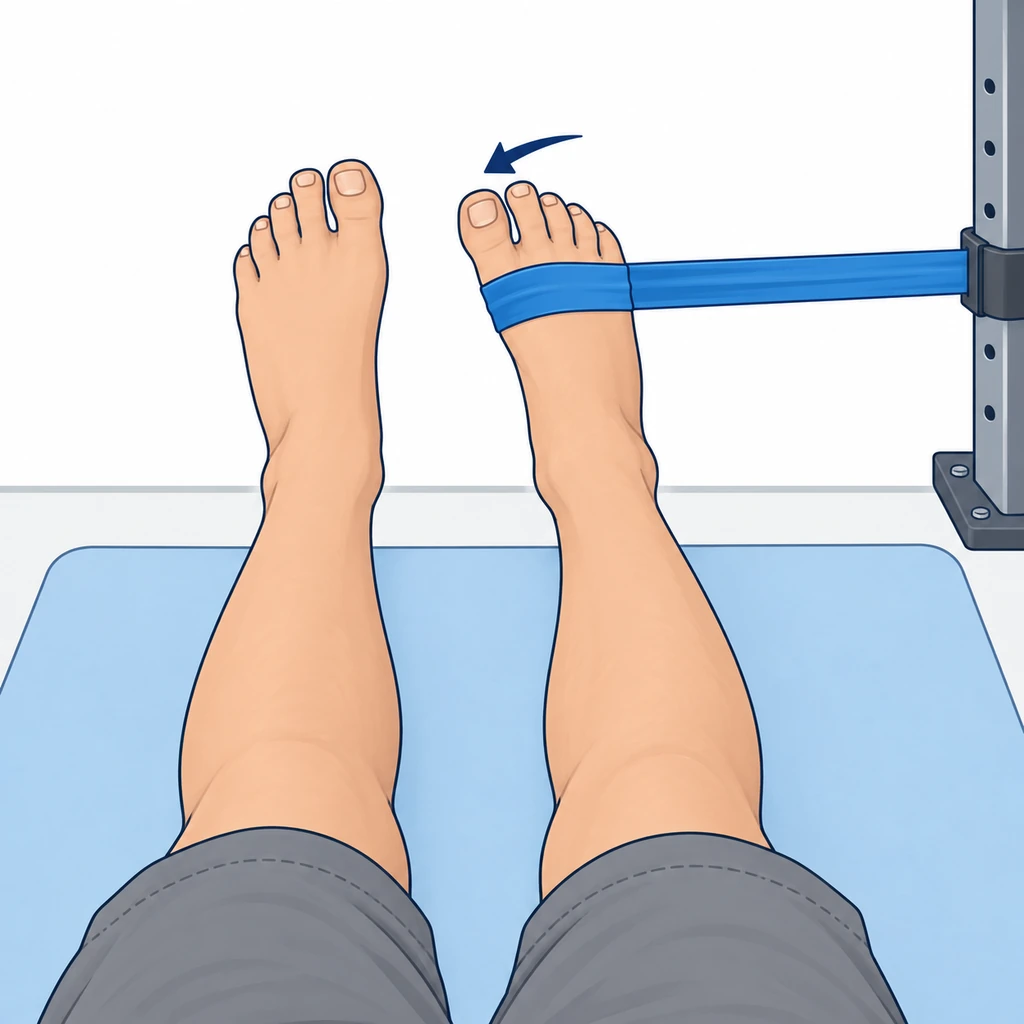
9. Tibialis posterior strengthening with a bandAfter entering the indicated phase and receiving clearance for this exercise; respect prescribed load and range.
- •Band anchored to the side, looped around the forefoot.
- •Move the foot inwards and downwards against the resistance, keeping the knee still.
- •Return to the start position slowly, over 3 seconds.
Dosage: 3 sets of 15, daily
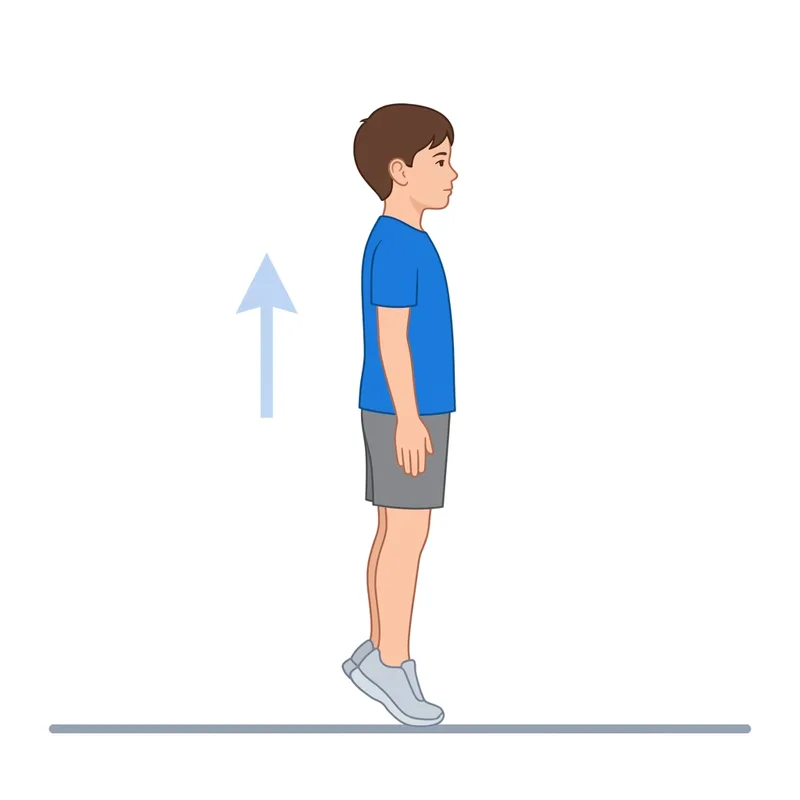
10. Calf raisesAfter entering the indicated phase and receiving clearance for this exercise; respect prescribed load and range.
- •Standing, hands on a wall for balance.
- •Rise onto the toes keeping the heels aligned, then lower slowly over 3 seconds.
- •Agree progression to single-leg work or greater resistance with the physiotherapist, taking the procedure, control and load response into account.
Dosage: 3 sets of 10-15, daily
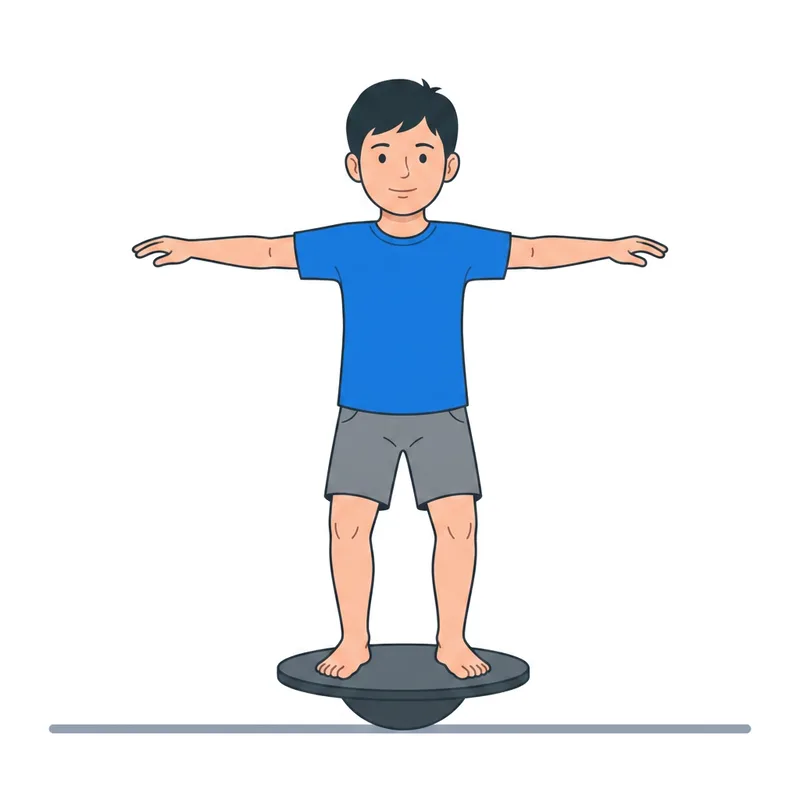
11. Balance on an unstable surfaceAfter entering the indicated phase and receiving clearance for this exercise; respect prescribed load and range.
- •Only under direct physiotherapy supervision, in the authorised phase and after recovering balance on firm ground.
- •On the selected cushion or board keep your eyes open, the knee slightly bent and a stable support within reach.
- •Put the other foot down if you lose control. At home use the demonstrated firm-ground variant; do not add closed eyes or perturbations independently.
Dosage: 3 x 30 seconds per side, daily
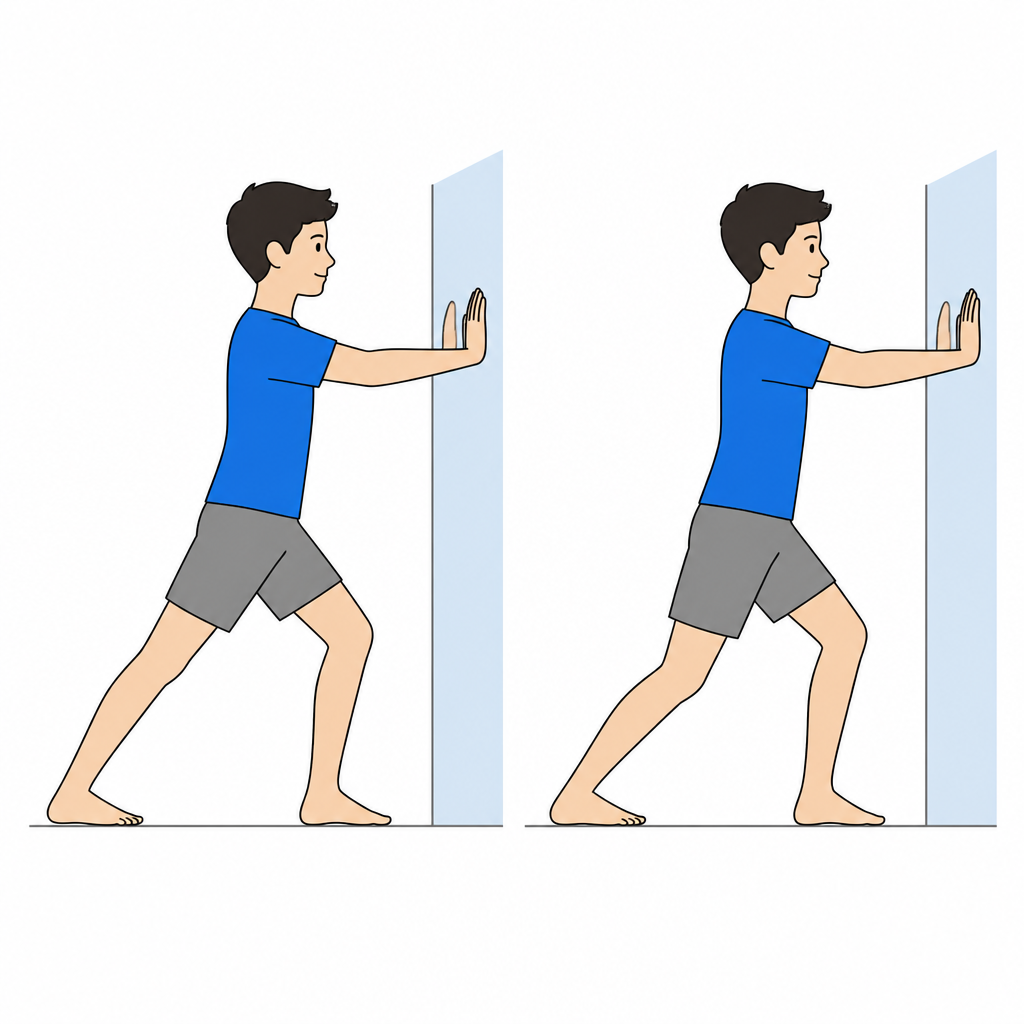
12. Wall calf stretch (two positions)After entering the indicated phase and receiving clearance for this exercise; respect prescribed load and range.
- •Hands on the wall, operated leg behind, heel firmly on the floor.
- •First position: back knee straight (stretches gastrocnemius).
- •Second position: back knee slightly bent (stretches soleus).
- •The heel must never lift off the floor.
Dosage: 3 x 30 seconds per position, daily
Ready for the next phase when
- ☐Single-leg heel raise performed with the heel inverting
- ☐Single-leg balance ≥30 seconds
- ☐More symmetrical foot contact with less outer-border walking
Note for the physiotherapist
If outer-border loading persists, reassess pain, mobility and implant tolerance before progressing. Do not correct it with forced passive movement.
Phase 5 — Return to running, jumping and sport
Indicative timing: No running or jumping in the first 45 days; gradual resumption after day 45, with normal gait and no pain.
The time window is indicative: progression depends on the criteria listed below, not on the calendar.
Goals
- •Progressively resume running and jumping
- •Return to the chosen sport without pain or reactive swelling
What to do
- •Running progression: brisk walking, then walk/jog alternation, then continuous running on even ground
- •Introduction of jumping: double-leg hops, then single-leg, then jumps with direction changes
- •Return to team training before matches/competition
- •Daily maintenance of calf stretching and intrinsic foot exercises
Restrictions and precautions
- •Stop the progression if sinus tarsi pain or swelling persisting the next day appears
No additional exercise cards are assigned here. Follow this phase’s indications and the programme selected by your physiotherapist; do not automatically continue or progress every previous exercise.
Ready for the next phase when
- ☐Continuous running for 10-15 minutes without pain
- ☐Symmetrical single-leg hop compared with the healthy side
- ☐No swelling the morning after activity
Note for the physiotherapist
In children progression often happens spontaneously during play: the physiotherapist’s role is more to contain than to push.
Phase 6 — Follow-up and implant management
Indicative timing: From month 3 until screw removal
The time window is indicative: progression depends on the criteria listed below, not on the calendar.
Goals
- •Maintain the correction obtained and a mobile foot
- •Monitor implant tolerance
- •Plan screw removal when indicated
What to do
- •Scheduled clinical review assessing foot contact, dorsiflexion and sinus tarsi pain
- •Long-term maintenance of calf stretching and short-foot exercises, especially in high-impact sports
- •Comfortable shoes with a supportive heel counter; insoles only if specifically prescribed
- •Implant removal is not automatic: the indication and timing depend on implant type, growth, symptoms and follow-up findings.
No additional exercise cards are assigned here. Follow this phase’s indications and the programme selected by your physiotherapist; do not automatically continue or progress every previous exercise.
Ready for the next phase when
- ☐Pain-free foot with a maintained arch on weight bearing
- ☐Full and symmetrical ankle range of motion
- ☐Sport performed without limitations
If symptoms appear after a progression
If persistent pain, effusion or swelling, or loss of movement appears after moving to a new phase or increasing load, stop progression and contact the treating clinician or physiotherapist to review the programme. Seek prompt assessment for the red flags below. This document does not replace individual clinical assessment.
Return to sport / full activity
Sport at about 2 months, with symmetrical foot contact and restored dorsiflexion.
- ☐Normal gait, without limp and without predominant outer-border loading
- ☐Ankle dorsiflexion symmetrical to the other side (knee-to-wall test)
- ☐Single-leg heel raise x 10 repetitions without pain
- ☐Single-leg balance ≥30 seconds, including on an unstable surface
- ☐Continuous running for 10-15 minutes and symmetrical single-leg hop, without sinus tarsi pain
- ☐No swelling the day after sport-level loading
Without immobilisation range of motion returns quickly: the limiting factor is intrinsic and tibialis posterior strength, to be checked with the single-leg heel raise before jumping.
Red flags: stop and contact us
- •Fever, spreading redness, discharge or bad smell from the wound (suspected infection)
- •Pain that increases instead of decreasing after the first days, or is not controlled by prescribed analgesics
- •Marked swelling not settling with elevation and ice, or a hard, painful calf
- •Persistent pins and needles, numbness, or cold, pale or bluish toes (dressing or cast too tight: seek advice immediately)
- •Progressive inability to move the ankle, or stiffness worsening despite exercises
- •Persistent focal pain in the sinus tarsi (in front of and below the lateral malleolus) not improving after month 2: possible implant intolerance
Author: Dott. Daniele Priano, Paediatric Orthopaedics. Content version: 9 September 2026.
Timings are indicative: progression depends on clinical and functional criteria and on the treating clinician’s instructions.
Full introduction and references at ortopediaevolutiva.com/en/rehabilitation/flatfoot-surgery-endosinotarsal-arthroereisis
Flatfoot: post-operative pathway after endosinotarsal arthroereisis — Dott. Daniele Priano, Pediatric Orthopaedics · Information document: it does not replace an in-person assessment.
 Latest online version
This protocol may be used and shared for clinical and informational purposes provided that attribution to the author and to the original source is kept intact. Republishing or distributing it as one’s own work is not allowed.
Other protocols

Any questions?
For information or questions, email me or view the locations and contact details.
Email: daniele.priano@ortopediaevolutiva.com