Osteochondral Lesion of the Talus: fragment fixation or microfracture
A protected five-phase pathway after osteochondral fragment fixation or talar dome microfracture. Loading, motion and sport depend on the procedure performed and the surgeon’s assessment.
Indicative windows: protection in the first weeks · authorised loading recovery · running and sport in the following months
Prepare the visit handout
Use the condition and phase indicated by your clinician. You can leave out individual exercises; instructions, illustrations and safety advice remain together.
Changing phase restores its full exercise list. Timing alone does not determine the phase.
Exclude exercises if needed
14 of 14 exercise cards included
The full web page remains available. Your selection is not saved or shared.
This protocol is part of the post-operative pathway and must be adapted to the surgeon’s instructions and to the individual clinical response.
These documents are protocol templates for information and education only: they do not replace the rehabilitation prescription for the individual case. Timing, loading and progressions must always be adapted to the patient, the lesion pattern, the surgical technique used and the clinical course, in collaboration between orthopaedic surgeon, physiotherapist and, where appropriate, physiatrist. Progression is driven by objective criteria, not by the calendar alone.
At a glance — the full pathway
- Offloading
- In this protected template, offloading is often prescribed for about 4-6 weeks, sometimes longer after fixation. The surgeon must specify duration, any permitted foot contact and walking aids.
- Brace
- Cast or walker boot as prescribed. Removal, replacement and night-time use are not determined by the week reached.
- Mobilisation
- Active ankle movement without weight bearing only when the surgeon permits removal of the immobilisation. Do not move the ankle inside a cast or remove a brace independently.
- Load progression
- Only after clearance; respect the written weight-bearing limit. Pain, swelling and gait quality guide progression within that limit, without exceeding it.
- Dorsiflexion
- Gradual recovery within the permitted range; wall distance is a professional measurement, not a universal target to meet by a preset month.
- Running
- Only after impact clearance and assessment of healing, gait, strength and joint response. In this pathway it is considered over months, not the first few weeks.
- Return to sport
- See the return-to-sport section: dates are indicative and remain subject to healing, functional criteria and clearance.
The talus lies between the tibia, fibula and calcaneus. Much of its surface is covered by cartilage. Trauma or osteochondritis dissecans can affect the cartilage and underlying bone of the talar dome; lesion site and extent influence treatment.
Step by step
Each phase offers exercise options: perform only those selected by your clinician, without bringing later phases forward or automatically adding earlier exercises. Dosage, frequency and rests are individualised; the complete catalogue is not a single session.
Before surgery — Preparation for surgery (elective cases)
Short educational and functional phase in elective cases; not applicable to acute cases needing immediate treatment.
When it applies
- •Only in elective cases, typically chronic symptomatic lesions of the talar dome.
- •Aggressive ankle prehabilitation is not needed: the aim is to prepare off-loading, home management and allowed range of motion.
- •Fragment fixation, microfracture/marrow stimulation and other procedures have different restrictions, explained before surgery.
Goals before surgery
- •Crutch training with full or partial off-loading as directed.
- •Swelling and pain control.
- •Maintenance of allowed ankle and foot mobility.
- •Maintenance of hip, knee and contralateral limb strength.
Activities
- •Practical crutch trial with the planned off-loading, including stairs.
- •Education on brace/boot, off-loading duration and school organisation.
Preoperative exercises
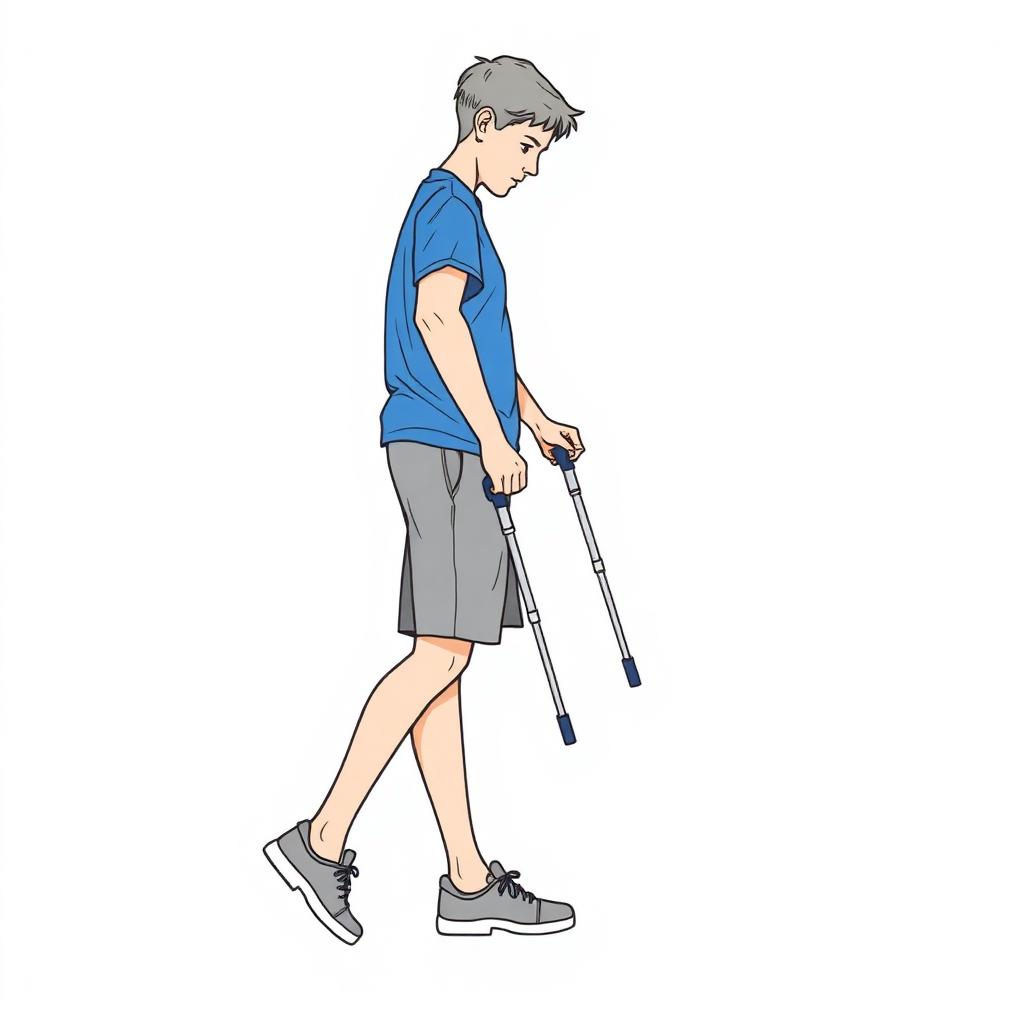
Crutch and weight-bearing training
- •Try the crutches before surgery, with correct height and the weight-bearing status set by the surgeon.
- •Practise on level ground, stairs and the entrance to your home, with someone assisting.
- •Also practise sitting, standing and moving in the bathroom while respecting the planned loading restrictions.
Dosage: At least one training session before admission; repeat until the technique is safe.
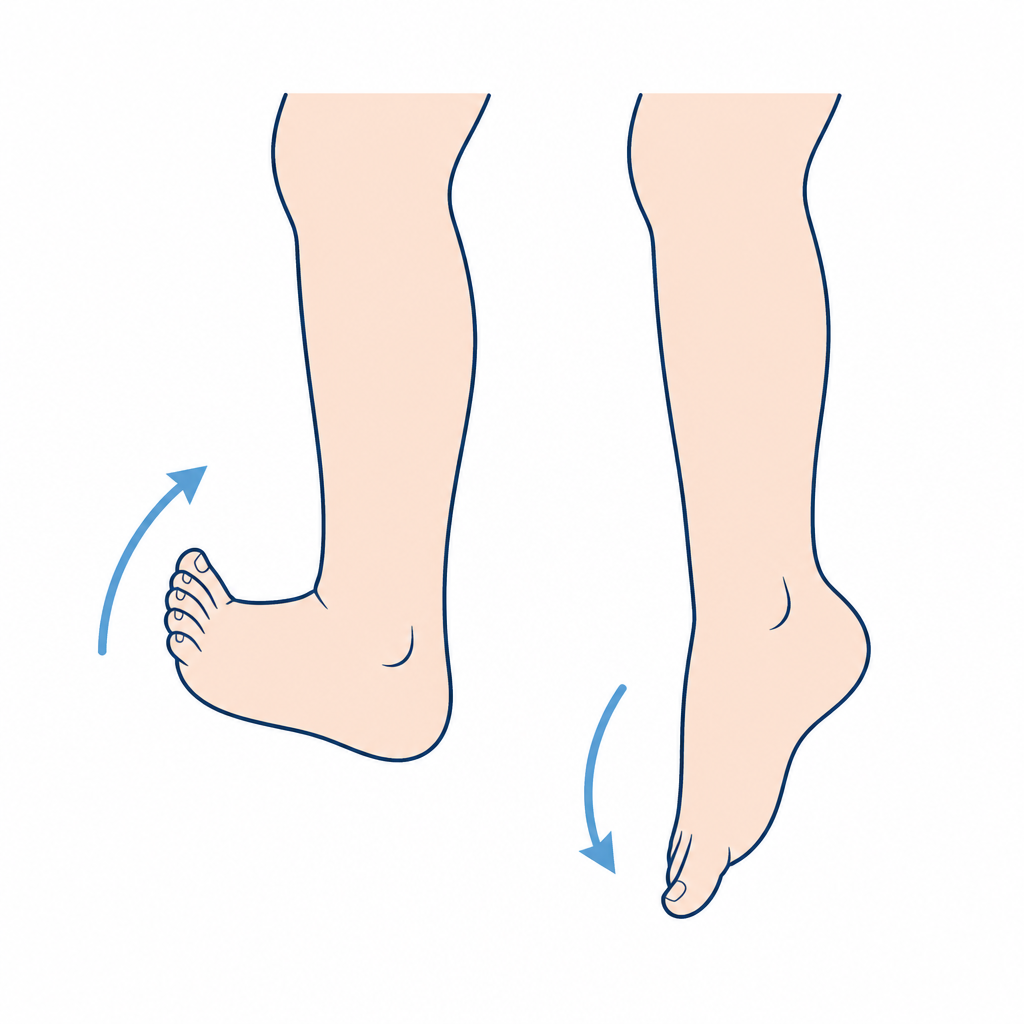
Active ankle mobility
- •Seated or lying, move the ankle into flexion, extension and slow circles, within the pain-free range.
- •Keep the movement smooth, without forcing the painful end range.
Dosage: Indicative: 10-15 movements per direction, 2-3 times a day.
Readiness criteria for surgery
- ☐Safe crutch use with the planned weight bearing.
- ☐Swelling and pain controlled.
- ☐Allowed mobility maintained.
- ☐Family informed about procedure and restrictions.
When surgery must not be delayed
- •Acute, salvageable osteochondral fragment: fixation must not be delayed.
- •Joint locking or worsening mechanical symptoms.
What to prepare at home and school
- •Prepare clear pathways at home and a place to keep the leg elevated.
- •Check stairs, bathroom and school transport with the planned off-loading.
- •Inform the school: accessible desk, temporary PE exemption, backpack management.
Phase 1 — Offloading, protection and early motion
Indicative timing: Weeks 0-2
The time window is indicative: progression depends on the criteria listed below, not on the calendar.
Goals
- •Protect the repair with strict offloading
- •Control swelling and pain
- •Prevent stiffness and loss of muscle recruitment
What to do
- •Prescribed offloading with aids selected and practised with the physiotherapist. For children unable to use crutches safely, consider a walker or wheelchair, including school access
- •Walker boot or cast as prescribed; limb elevated above heart level for most of the day
- •Cryotherapy 15-20 minutes, 4-6 times daily (never ice directly on skin)
- •Active movement without weight bearing only if the immobilisation can be removed with permission; otherwise move only the free joints.
- •Muscle activation only as specifically prescribed for the repair; no self-selected resistance.
- •Hip, knee and contralateral limb exercise, upper-body cardiovascular work
Restrictions and precautions
- •No foot contact at all, not even touch-down, when full offloading is prescribed
- •No resistance bands in this phase
- •Avoid prolonged dependent leg position
Exercises for this phase
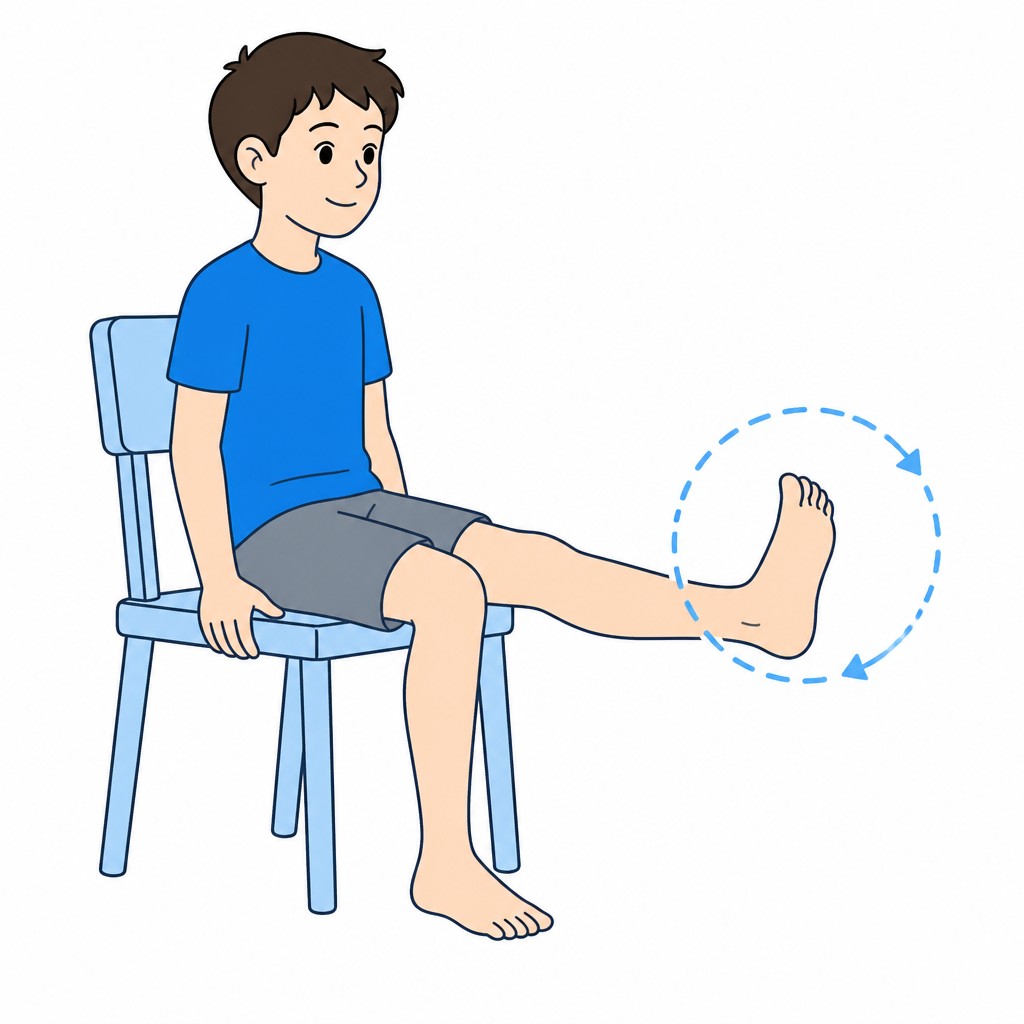
1. Ankle alphabetAfter entering the indicated phase and receiving clearance for this exercise; respect prescribed load and range.
- •Sitting or lying, leg elevated and foot free in the air.
- •Draw the letters of the alphabet with the big toe, moving only the ankle.
- •Slow, wide movements, within pain limits.
Dosage: Full alphabet, 3-4 times a day
2. Unloaded active ankle mobilityAfter entering the indicated phase and receiving clearance for this exercise; respect prescribed load and range.
- •Sitting with the leg on a chair, foot free beyond the edge.
- •Move the ankle up and down, then in and out, slowly and without forcing.
- •The foot must never touch the ground during the exercise.
Dosage: 3 sets of 15 per direction, 3-4 times a day
Ready for the next phase when
- ☐Pain controlled with simple analgesia
- ☐Decreasing swelling, dry wounds
- ☐If motion is authorised: movement within the permitted range without sharp pain; ROM must not be tested by removing immobilisation that is still prescribed
- ☐Offloading performed correctly and safely, including stairs
Note for the physiotherapist
Check concretely how the patient moves at home and at school: practical difficulties (stairs, bathroom, schoolbag) are a frequent cause of offloading not being respected, more than lack of willingness. Planning the logistics is part of the protocol.
Phase 2 — Permitted motion during protection
Indicative timing: Weeks 2-6
The time window is indicative: progression depends on the criteria listed below, not on the calendar.
Goals
- •Gradually recover permitted motion without compromising the repair
- •Maintain calf trophism
- •Prepare the ankle for loading
What to do
- •Active and assisted mobility in permitted directions, outside a removable brace only when authorised.
- •Specifically prescribed muscle activation, without self-selected band work. In this template resisted ankle strengthening starts in phase 3 after clearance
- •Scar and soft-tissue mobilisation and drainage techniques: only once the wound has fully healed and as directed by the physiotherapist
- •Any pool work only after wound healing, under supervision and within prescribed offloading restrictions. Cycling and water walking belong to the authorised loading phase
- •Hip and core strengthening in offloading, so the whole chain is not deconditioned when loading starts
Restrictions and precautions
- •No loading before the prescribed time
- •No forced high-resistance inversion/eversion
- •No deep-water walking before partial weight bearing is authorised
No additional exercise cards are assigned here. Follow this phase’s indications and the programme selected by your physiotherapist; do not automatically continue or progress every previous exercise.
Ready for the next phase when
- ☐Permitted movement improving, without forcing symmetry
- ☐Clinical review and written clearance before starting the next loading phase
- ☐Stable swelling, no night pain
- ☐Good voluntary activation of peroneals and tibialis posterior
Phase 3 — Progressive loading and gait re-education
Indicative timing: Weeks 6-12
The time window is indicative: progression depends on the criteria listed below, not on the calendar.
Goals
- •Reach full weight bearing without limp
- •Restore weight-bearing dorsiflexion
- •Reactivate the triceps surae
What to do
- •Only after clearance; respect the written weight-bearing limit. Pain, swelling and gait quality guide progression within that limit, without exceeding it.
- •Gait re-education in front of a mirror: heel-to-toe contact, symmetrical stance times, progressive crutch weaning
- •Weight-bearing dorsiflexion mobilisation (knee-to-wall) and calf stretching with knee extended and flexed
- •Assisted double-leg calf raise progressing towards single-leg; tibialis posterior and peroneal band strengthening
- •Double-leg proprioception on a stable surface, then single-leg as tolerated
- •Imaging review (MRI or CT) only where the surgeon considers it likely to change management, for example after fixation or in large lesions
- •Stationary cycling or pool activity only when cleared for loading, motion and wound condition
Restrictions and precautions
- •No jumping, no running, no uneven surfaces
- •Pause load progression if recurrent evening swelling appears
Exercises for this phase
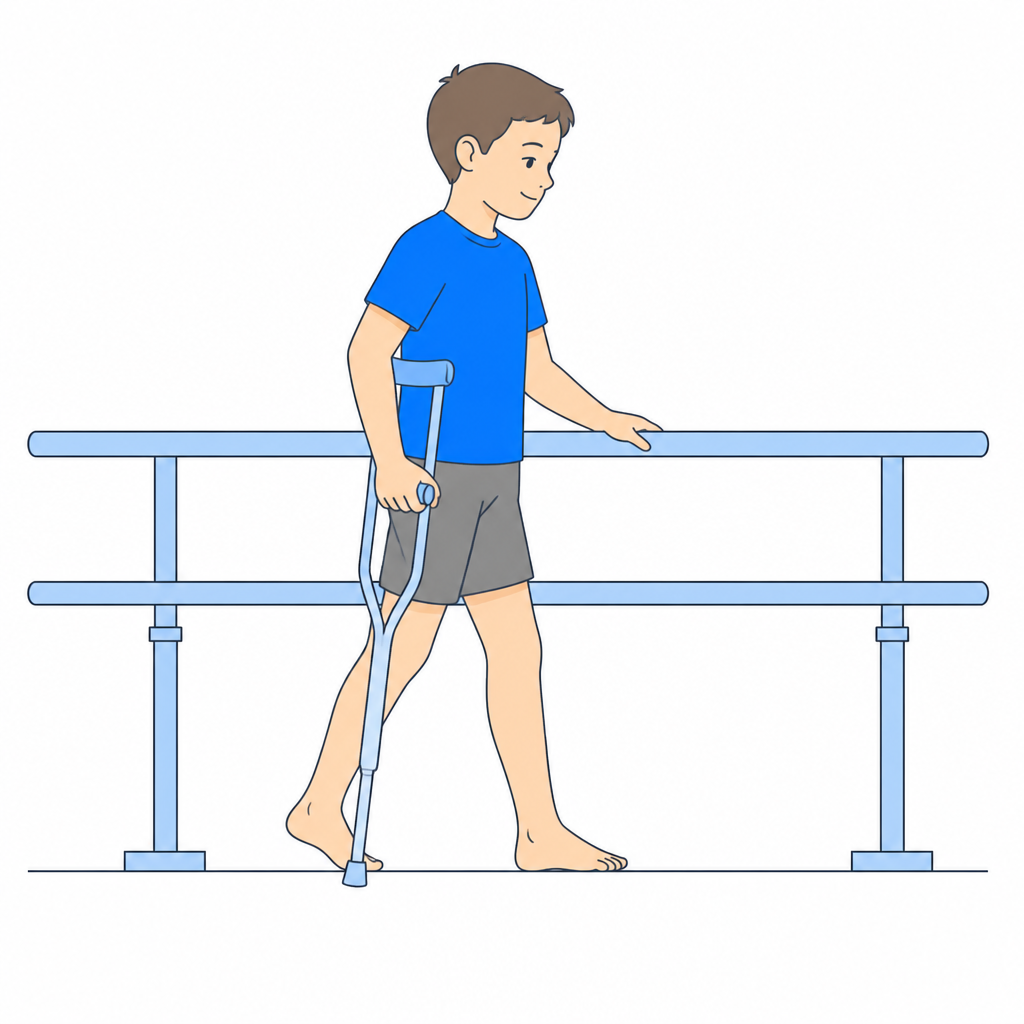
3. Load progression using scalesAfter entering the indicated phase and receiving clearance for this exercise; respect prescribed load and range.
- •Practise first with your physiotherapist, using crutches and stable supports to prevent falls.
- •Place the foot on the scales only if weight bearing is allowed and reach only the prescribed value. A percentage depends on your body weight and is not a fixed number of kilograms.
- •Scales help you recognise static loading but do not certify loading while walking. Do not increase it automatically each week.
Dosage: 5 minutes of load training per day
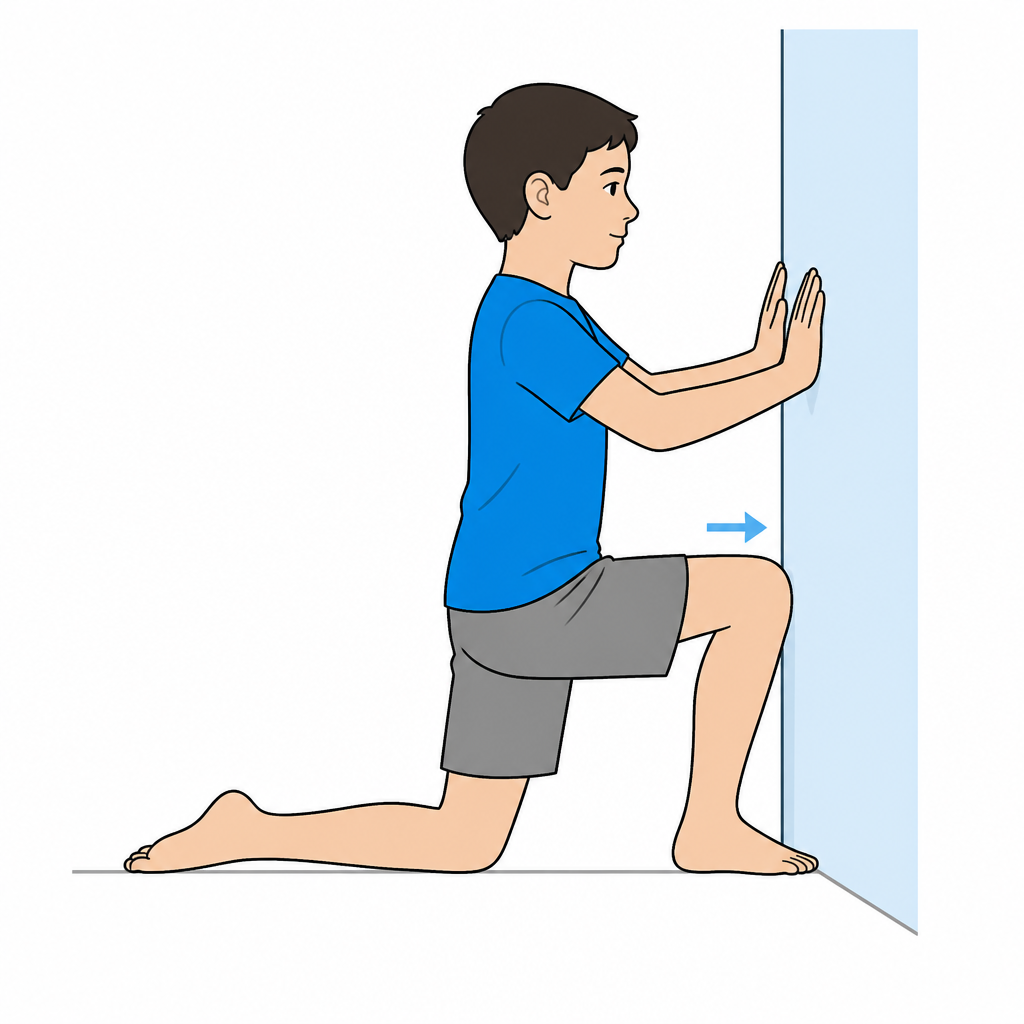
4. Knee-to-wall (dorsiflexion)After entering the indicated phase and receiving clearance for this exercise; respect prescribed load and range.
- •Stand facing a wall with the affected foot forward and the heel down, only when loading and movement in this direction are allowed.
- •Move the knee towards the wall within the permitted range without lifting the heel, forcing or seeking pain.
- •Your physiotherapist may measure the toe-to-wall distance and compare it over time and between sides. Do not force a preset distance: this measurement alone does not provide running or sport clearance.
Dosage: 3 sets of 10 pushes, twice a day
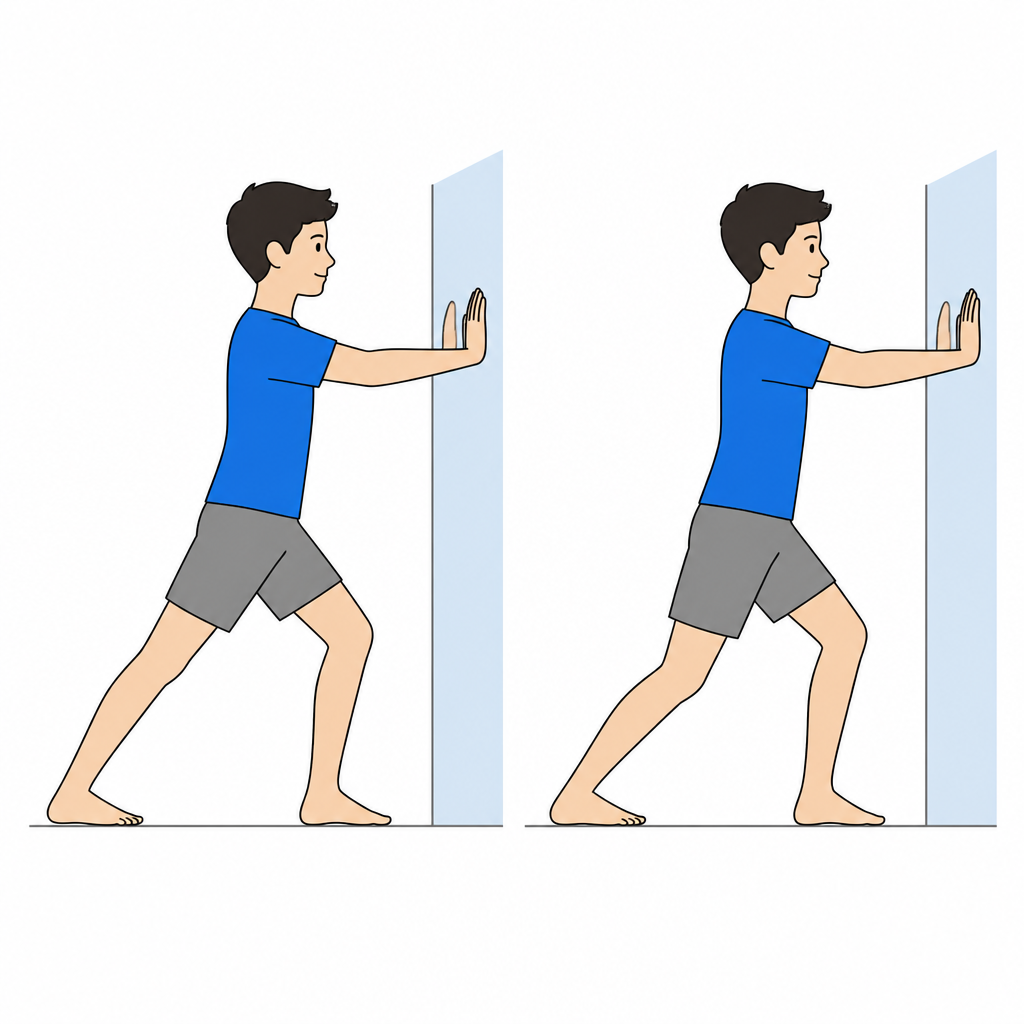
5. Wall calf stretch (two positions)After entering the indicated phase and receiving clearance for this exercise; respect prescribed load and range.
- •Hands on the wall, operated leg behind, heel firmly on the floor.
- •First with the knee straight (gastrocnemius), then with the knee bent (soleus).
- •The heel must never lift: if it does, move the foot closer to the wall.
Dosage: 3 x 30 seconds per position, twice a day
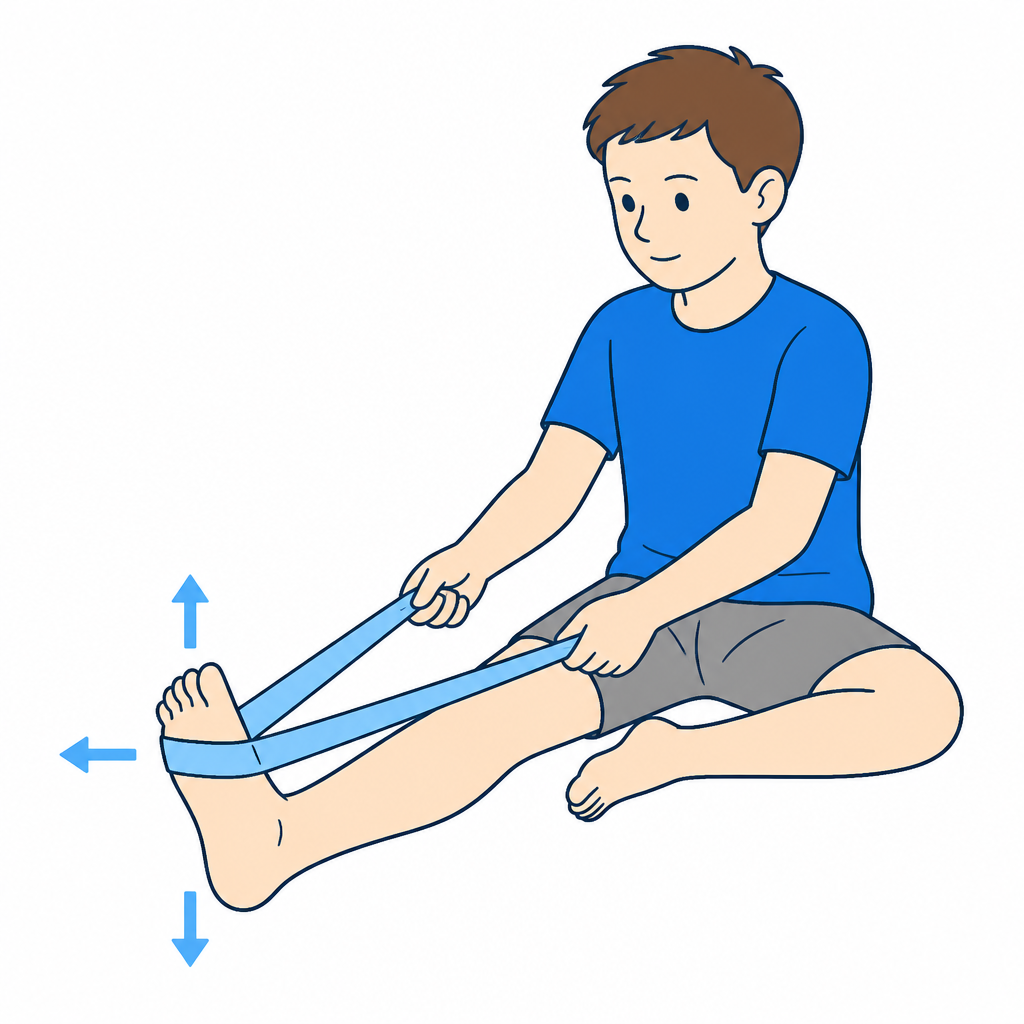
6. Four-direction band workAfter entering the indicated phase and receiving clearance for this exercise; respect prescribed load and range.
- •Sitting with the leg extended and a band around the forefoot.
- •Move in four directions: up, down, inwards, outwards.
- •Move slowly over 2 seconds, return under control over 3 seconds.
- •Have each permitted movement demonstrated: the anchor must change to oppose that direction. Never use a single anchor for all four directions.
Dosage: 3 sets of 15 per direction, daily
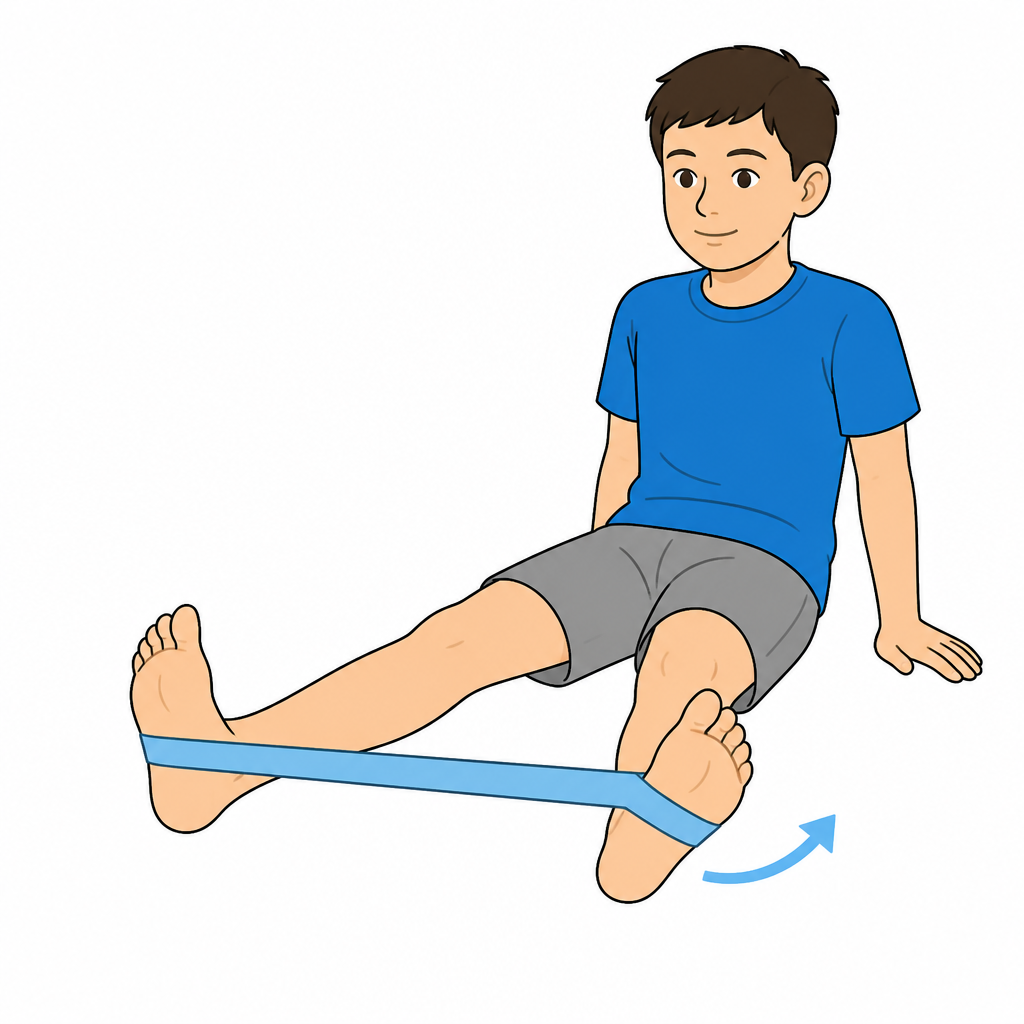
7. Eversion band work (peroneals)After entering the indicated phase and receiving clearance for this exercise; respect prescribed load and range.
- •Band anchored on the inner side, wrapped around the forefoot.
- •Turn the foot outwards keeping the knee still: only the ankle moves.
- •Slow, controlled return without letting the band snap back.
Dosage: 3 sets of 15, daily
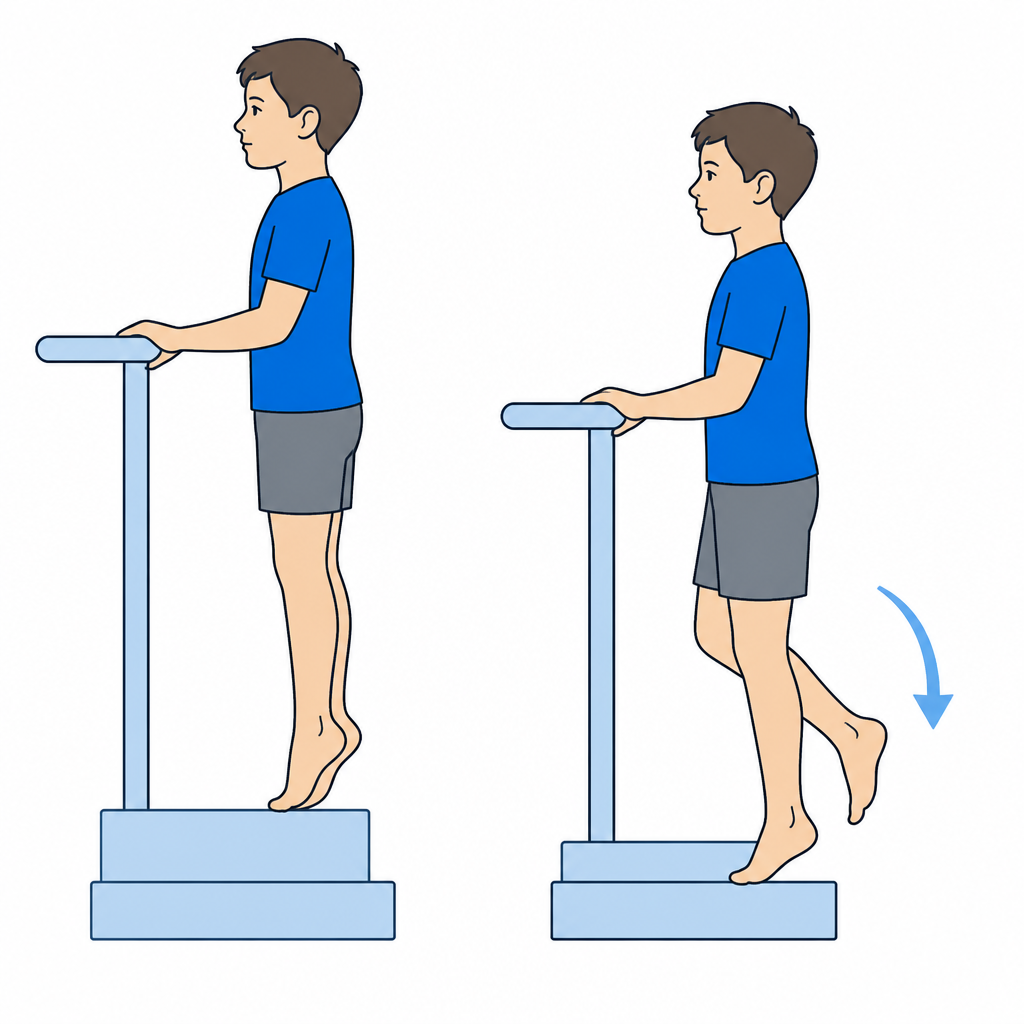
8. Calf raiseAfter entering the indicated phase and receiving clearance for this exercise; respect prescribed load and range.
- •After clearance for loading and strengthening, hold a stable support and rise onto the toes with both feet.
- •Eccentric lowering and single-leg work require an agreed progression: do not start them only because the two-leg version feels easy.
- •Maintain movement height and control for the selected repetitions. Dose, rest and targets must be adapted to age, procedure and ankle response.
Dosage: 3 sets of 15, 4-5 times a week
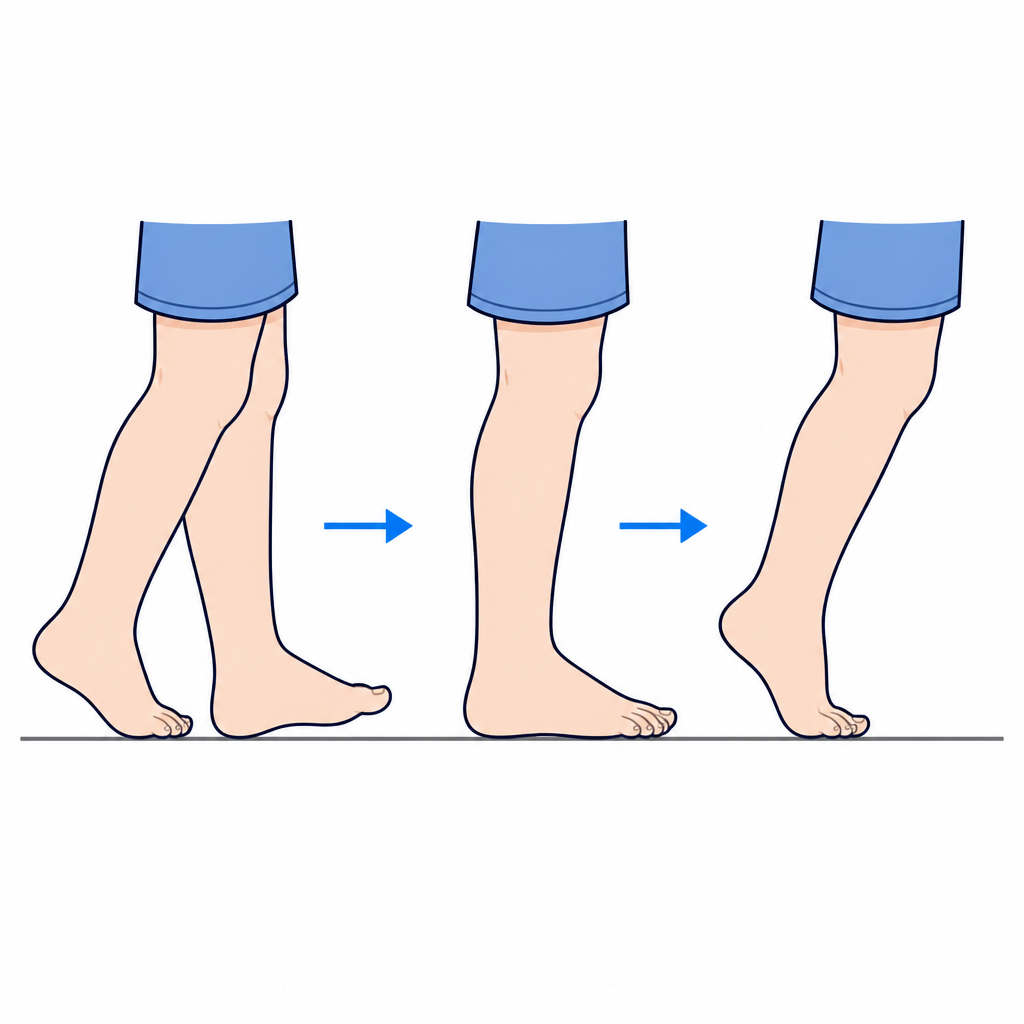
9. Heel-to-toe gait re-educationAfter entering the indicated phase and receiving clearance for this exercise; respect prescribed load and range.
- •Walk slowly in front of a mirror, contacting heel first and then toes.
- •Count stance time mentally: it must be equal on both feet.
- •Short symmetrical steps are better than long steps with a limp.
Dosage: 5-10 minutes, twice a day
Ready for the next phase when
- ☐Full weight bearing without crutches and without limp
- ☐Functional walking dorsiflexion recovered within the permitted range, assessed alongside gait quality
- ☐Full pain-free double-leg calf raise
- ☐No persistent swelling after 30 minutes of walking
Note for the physiotherapist
Persistent limping requires assessment of pain, mobility, strength and the repair; do not assume it is simply stiffness or weakness.
Phase 4 — Strength, proprioception and first impact
Indicative timing: Months 3-6
The time window is indicative: progression depends on the criteria listed below, not on the calendar.
Goals
- •Symmetrical calf strength
- •Single-leg control on unstable surfaces
- •Graded introduction of impact
What to do
- •Progressive calf strengthening, from double-leg to single-leg and any eccentric work only after clearance; dose adapted to age, procedure and control
- •Global limb strengthening: squats, lunges, step-ups and step-downs, posterior chain
- •Advanced balance on a cushion or wobble board only under direct professional supervision; do not independently add closed eyes, dual tasks or perturbations
- •Y-balance / Star Excursion as both exercise and measure
- •Running intervals on even ground only after explicit impact clearance and healing review; also monitor the response over the next 24-48 hours
Restrictions and precautions
- •Plyometrics and direction changes belong to phase 5 after further clearance: a successful calf raise alone does not provide clearance
- •Avoid uneven ground and unplanned spontaneous sport
Exercises for this phase
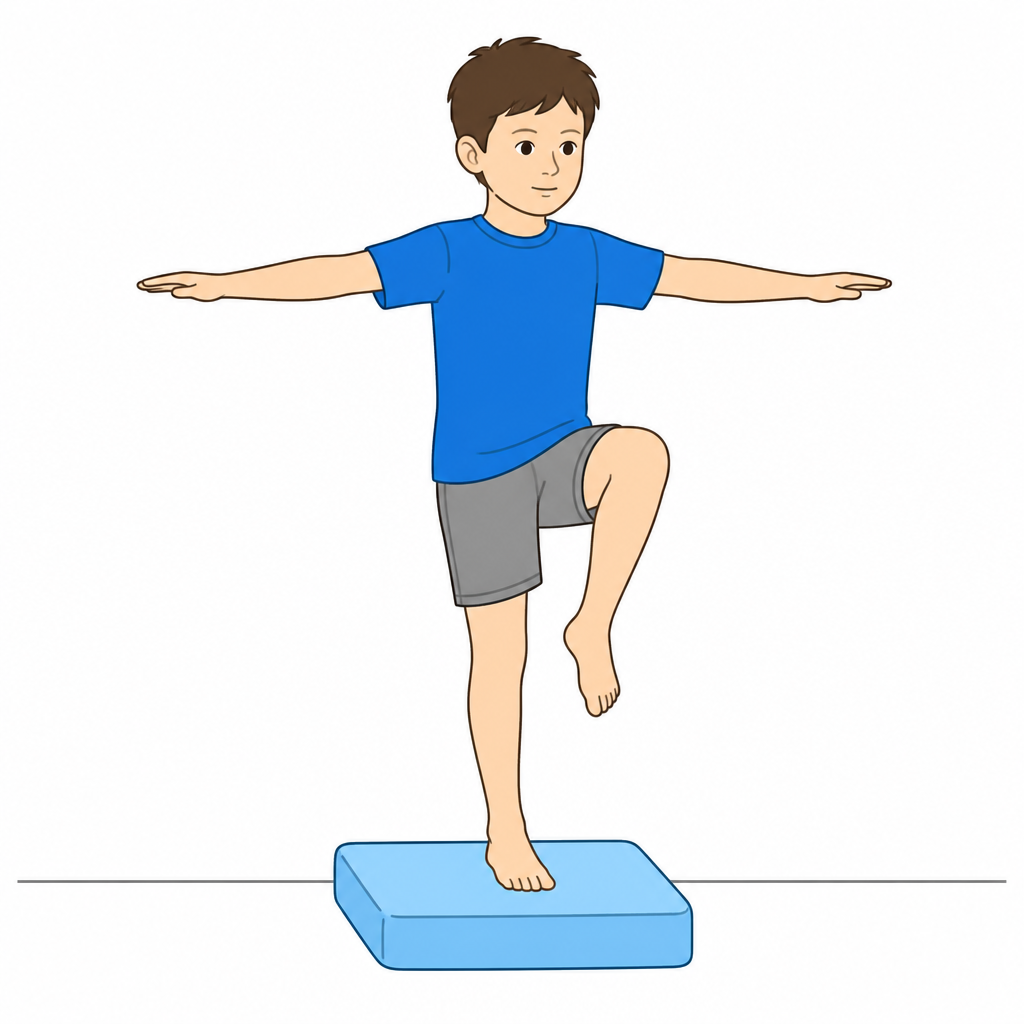
10. Balance on a soft surfaceAfter entering the indicated phase and receiving clearance for this exercise; respect prescribed load and range.
- •Perform this exercise under direct physiotherapy supervision, after recovering safe single-leg support on firm ground and receiving clearance.
- •On the selected cushion or wobble board, keep your eyes open, the knee slightly bent and a stable hand support within reach.
- •Put the other foot down if you lose control. Do not add eyes-closed work or perturbations independently; at home use the firm-ground version prescribed by your physiotherapist.
Dosage: 3 x 30 seconds, daily
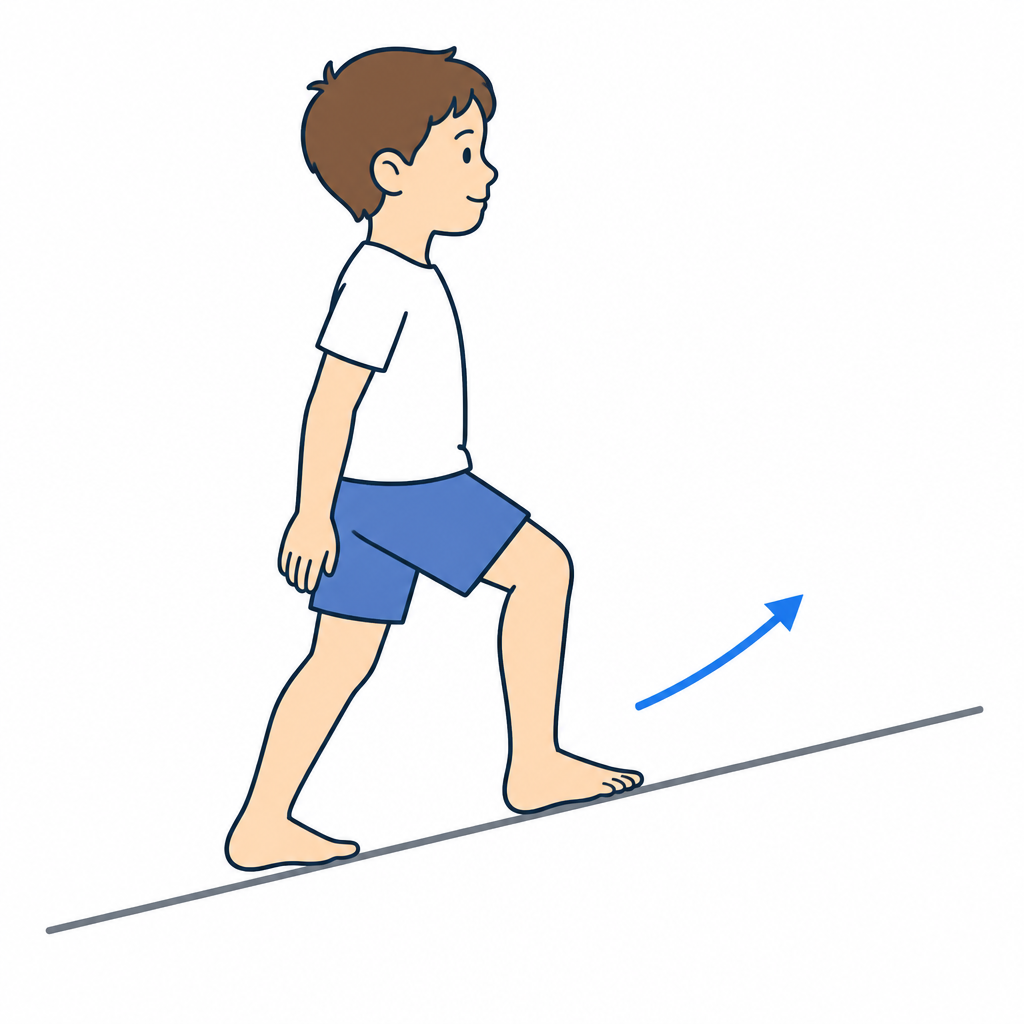
11. Uphill and incline walkingAfter entering the indicated phase and receiving clearance for this exercise; respect prescribed load and range.
- •Treadmill at 5-8% incline or a gentle outdoor hill.
- •The heel must contact fully with every step.
- •This prepares the ankle for cyclic loading before running is introduced.
Dosage: 10-20 minutes, 3 times a week
Ready for the next phase when
- ☐Calf strength and endurance sufficient for the planned tasks, assessed for age and sport
- ☐Adequate dynamic balance control, without assuming a universal centimetre threshold
- ☐10-15 minutes of light running without pain or next-day swelling
- ☐No deep pain during or after prolonged loading
Phase 5 — Return to sport and recurrence prevention
Indicative timing: Months 6-12
The time window is indicative: progression depends on the criteria listed below, not on the calendar.
Goals
- •Full sporting skills without symptoms
- •Prevention of chronic ankle instability
- •Long-term cartilage protection
What to do
- •Plyometrics after clearance, using a physiotherapist-selected progression: controlled landings on firm ground before more complex tasks
- •Agility: shuttles, figure-of-8, decelerations, sharp cutting, sport-specific skills
- •Graded reintegration: partial training → full training → competition
- •Ongoing preventive neuromuscular programme (single-leg balance and peroneal strengthening at least three times weekly)
- •Consider taping or a semi-rigid brace in high-risk sports for the first 6-12 months
Exercises for this phase
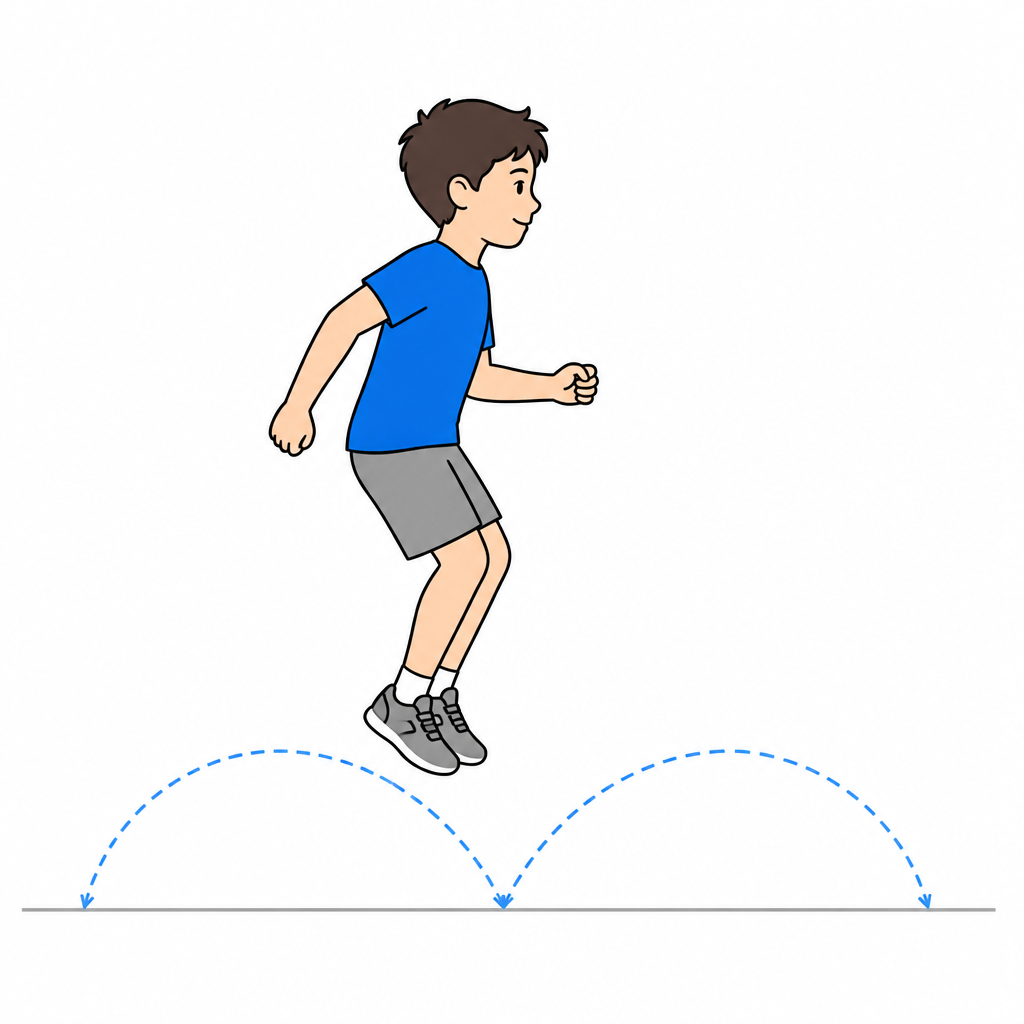
12. Progressive plyometricsAfter entering the indicated phase and receiving clearance for this exercise; respect prescribed load and range.
- •Only after clearance for impact and demonstration by your physiotherapist, start with small two-foot hops on a stable surface.
- •Increase direction, height or single-leg work only within the agreed progression; do not add several challenges at once.
- •Aim for a controlled landing with knees and feet aligned. Stop for pain, giving way or loss of control; report swelling or worsening symptoms afterwards. Landing noise alone does not measure movement safety.
Dosage: 2-3 sets of 10-20 contacts, 2-3 times a week
Ready for the next phase when
- ☐Hop and agility tests selected and interpreted by the physiotherapist for age and sport, without pain or relevant compensation
- ☐Daily and sporting activities resumed without reported pain or limitation
- ☐No reported functional instability (no giving way)
- ☐No new effusion or deep pain during graded return or after a full training session
- ☐Surgeon clearance, integrating the clinical course and imaging where indicated
If symptoms appear after a progression
If persistent pain, effusion or swelling, or loss of movement appears after moving to a new phase or increasing load, stop progression and contact the treating clinician or physiotherapist to review the programme. Seek prompt assessment for the red flags below. This document does not replace individual clinical assessment.
Return to sport / full activity
In this protected pathway, running and sport are reassessed over the following months; windows of 4-6 months for running and 6-12 months for demanding sports are indicative, not universal paediatric timelines. Associated procedures or incomplete healing may change them.
- ☐Surgeon clearance based on the procedure and healing, with imaging where needed to guide the decision
- ☐Mobility, strength and endurance appropriate to age and sporting demands
- ☐Controlled gait, balance and later hopping and direction changes at the authorised stages
- ☐No deep pain, locking or giving way during return
- ☐A full training session tolerated without new pain or swelling over the following 24-48 hours
These criteria are a clinical synthesis to individualise, not a battery validated for every paediatric OCD lesion. Functional tests and comparison with the other side do not establish osteochondral healing on their own. Swelling helps guide loading but does not directly measure cartilage condition. Adult evidence after isolated microfracture does not authorise shorter offloading in children or after fixation.
Red flags: stop and contact us
- •Deep pain that increases with each loading progression or appears at night
- •Locking, painful catching or the sensation of a loose body in the ankle
- •Swelling that systematically returns after every session
- •Worsening mobility or stalled recovery: arrange reassessment without forcing movement or waiting for a preset deadline
- •Redness, warmth, fever or wound discharge (suspected infection)
- •Calf pain with new asymmetric swelling: urgent medical assessment. Sudden breathlessness, chest pain or fainting: call 112 immediately
Author: Dott. Daniele Priano, Paediatric Orthopaedics. Content version: 9 September 2026.
Timings are indicative: progression depends on clinical and functional criteria and on the treating clinician’s instructions.
Full introduction and references at ortopediaevolutiva.com/en/rehabilitation/talus-osteochondral-lesion
Osteochondral Lesion of the Talus: fragment fixation or microfracture — Dott. Daniele Priano, Pediatric Orthopaedics · Information document: it does not replace an in-person assessment.
 Latest online version
This protocol may be used and shared for clinical and informational purposes provided that attribution to the author and to the original source is kept intact. Republishing or distributing it as one’s own work is not allowed.
Other protocols

Any questions?
For information or questions, email me or view the locations and contact details.
Email: daniele.priano@ortopediaevolutiva.com